Quantcast
Channel: Web Junkies
Viewing all 3220 articles
Browse latest View live

Chain Chronicle- RPG [Repeatable Free Quests] Holy Kingdom- Chest Drops, AP, EXP

$
0
0
Vice Capital - Vice Capital Guard
AP: 4, Difficulty: 1, Waves: 5, EXP: 250, Gold: 200
Chest #1: Diplomat Otto*(A)
Chest #2: Merchant of Benevolence Patricia**(A)
Chest #3: 300 Gold
Chest #4: Archer Enchancer I*
Completion Chest: Archer Enchancer II**

Breezeway - City Lookout 
AP: 4, Difficulty: 1, Waves: 4, EXP: 250, Gold: 200
Chest #1: Soldier of Revenge Greg*(S)
Chest #2: 300 Gold
Chest #3: 200 Arcana Coins
Chest #4: Soldier Enchancer I*
Completion Chest: Soldier Enchancer II**

Winged Heights - Monster Extermination 
AP: 4, Difficulty: 1, Waves: 5, EXP: 250, Gold: 200
Chest #1: Veteran Mercenary Roberta*(K)
Chest #2: 200 Arcana Coins
Chest #3: Tomcat Knight Knuckle*(K)
Chest #4: Knight Enchancer I*
Completion Chest: Knight Enchancer II**

Town of Fortitude - Beast Eradication 
AP: 5, Difficulty: 4, Waves: 6, EXP: 300, Gold: 300
Chest #1: Young Healer Katry*(C)
Chest #2: 200 Arcana Coins
Chest #3: Ivory Healer Latty**(C)
Chest #4: Cleric Enchancer I*
Completion Chest: Cleric Enchancer II**

Barrierboro - Station Quarrel 
AP: 5, Difficulty: 4, Waves: 5, EXP: 300, Gold: 250
Chest #1: Light-Footed Mercenary Carlo*(S)
Chest #2: 300 Gold
Chest #3: Hot-Blooded Arms Dealer Dusty**(S)
Chest #4: Soldier Enchancer I*
Completion Chest: [[[B class Spear Weapon]]]

Holy Capital - The Apprentice Knights 
AP: 5, Difficulty: 4, Waves: 5, EXP: 300, Gold: 250
Chest #1: Captain of the Bloodlusts Beatrix**(K)
Chest #2: 200 Arcana Coins
Chest #3: Self-Named Hero Albert**(K)
Chest #4: Knight Enchancer I*
Completion Chest: Knight Enchancer II**

Great Shrine - Attack of the Shadow Blade 
AP: 6, Difficulty: 8, Waves: 5, EXP: 350, Gold: 300
Chest #1: 200 Arcana Coins
Chest #2: [[[Anton*(K)]]]
Chest #3: Troubled Sister Kate**(C)
Chest #4: Cleric Enchancer I*
Completion Chest: [[[B class Staff Weapon]]]

Mystic Mountains - The Mighty Mystic Mountains 
AP: 10, Difficulty: 19, Waves: 6, EXP: 550, Gold: 500
Chest #1: 200 Arcana Coins
Chest #2: Earth Sprite Warrior Eidal*(S)
Chest #3: Wizard Enchancer I*
Chest #4: Club Crafter*
Completion Chest: [[[B class Club Weapon]]]

Craggy Pass - Arrow Clouded Ridge 
AP: 9, Difficulty: 16, Waves: 4, EXP: 500, Gold: 450
Chest #1: 450 Gold
Chest #2: 200 Arcana Coins
Chest #3: Merchant of Benevolence Patricia**(A)
Chest #4: Archer Enchancer I*
Completion Chest: [[[B class Bow Weapon]]]

Hideaway Village - Solid Precipice 
AP: 10, Difficulty: 19, Waves: 6, EXP: 550, Gold: 500
Chest #1: Captain of the Hawkfathers Harman*(K)
Chest #2: 500 Arcana Coins
Chest #3: Knight Enchancer I*
Chest #4: Pure Hearts Knight Rhuana**(K)
Completion Chest: [[[B class Wand Weapon]]]

Minecraft: Story Mode – A Telltale Games Series Announced for PC, Mac, Mobile, Xbox & PlayStation

$
0
0
Telltale Games have announced a partnership with Mojang to create a new episodic game series based on one of the most popular video games in history – Minecraft. The episodic downloadable game series is called “Minecraft: Story Mode – A Telltale Games Series” and will come out on PC, Mac, Mobile devices, Xbox One, Xbox 360, PlayStation 4 and PlayStation 3.

Minecraft: Story Mode will be an all-new narrative-driven game series developed by Telltale in collaboration with Mojang. Set in the world of Minecraft, the series will feature an original story, driven by player choice. It will not be an add-on for Minecraft, but rather a separate stand-alone product that will premiere in 2015 on consoles, computers and mobile devices.

Telltale’s game series will mix new characters with familiar themes, in an entirely original Minecraft experience, inspired by the Minecraft community and the game that continues to inspire a generation.

Minecraft: Story Mode Features:

• Minecraft: Story mode will be a narrative-driven video game created by Telltale Games. It will be about Minecraft.
• Mojang is collaborating with Telltale and members of the community to make Minecraft: Story Mode as Minecrafty as possible.
• The first episode will be released some time in 2015, and will be available on Xbox consoles, PlayStation consoles, PC, Mac, iOS, and Android-based devices.
• Minecraft: Story Mode will be released episodically, just like The Wolf Among Us, The Walking Dead, or the recent Tales from the Borderlands, which is another developer-collaboration series between Telltale Games and Gearbox Software.
• We’re not intending on creating an “official” story for Steve, or explaining the world of Minecraft in detail. It will be a cool game.
• The Minecraft 2 thing was a joke. No really. It was a joke.

To quote the developers at Telltale Games:

“2014 is Telltale’s tenth anniversary year; seeing in the climactic finales of the critically acclaimed and best-selling The Wolf Among Us and The Walking Dead: Season Two. With the recent premieres of both Game of Thrones and Tales from the Borderlands, our 2015 lineup will include the remainder of both of those new series, and now it will also include the premiere of Minecraft: Story Mode.

After ten years of making games, Telltale is JUST getting started! We would like to thank all of our incredible fans across the world, as we continue to forge ahead in creating adventures where the most important author of each story is YOU. We’ll have more in the months ahead, but for now, we thank you again, and wish you a safe and happy holiday and a prosperous New Year!”

For more information on why Telltale and Mojang chose to work together, Mojang has made a funny “Info Quest II” flash game on their Mojang Blog here.

source: videogamesblogger.com/toucharcade.com

How to Run Multiple Skype Accounts on Windows Desktop

$
0
0
Usually, Skype only allows you to log in with one account on one computer at the same. But what if you want to log in with multiple skype accounts on one PC at the same time?

When you have multiple Skype accounts, running all of them at the same time might be a tough challenge.

This method allows you to run multiple Skype accounts at the same time and on one computer as easy as it can only be. We are sure you’ll like it no matter whether you share your computer with other Skype users or use multiple Skype accounts yourself.

Note: For modern windows 8 or later version, first you will have to install Skype for windows desktop. You can download it from following link : http://www.skype.com/en/download-skype/skype-for-computer/ 

Method 1: Every time you want to login to multiple skype accounts you’ll have to follow this steps –

Step 1. From the Windows taskbar, click Start > Run (or press the Windows The Windows keyand R keys on your keyboard at the same time).
Step 2. In the Run window, type the following command (including the quotes) and press OK:

For 32-bit operating systems:
“C:\Program Files\Skype\Phone\Skype.exe” /secondary

For 64-bit operating systems:
“C:\Program Files (x86)\Skype\Phone\Skype.exe” /secondary
If the above solution fails, you can try another option:

Method 2: By this method you can start a new instance of Skype every time you double-click the new shortcut.

Step 1. Find the Skype.exe file in C:\Program Files\Skype\Phone\ if you’re running a 32-bit operating system.
If you’re running 64-bit operating system, you can find the file in C:\Program Files (x86)\Skype\Phone\.
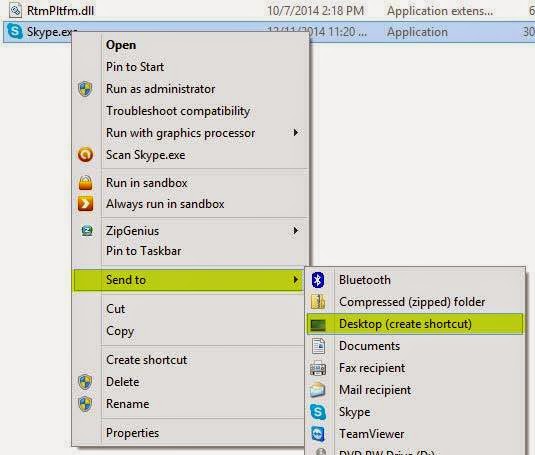
Step 2. Right-click on Skype.exe and select Send to > Desktop (create shortcut).
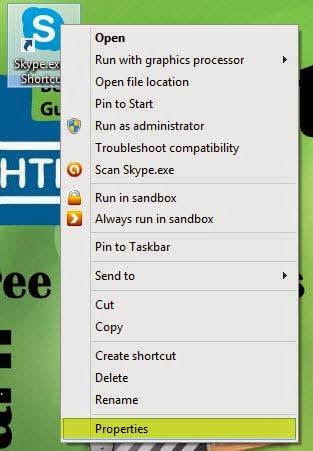
Step 3. Locate the shortcut on your desktop, then right-click it and select Properties.
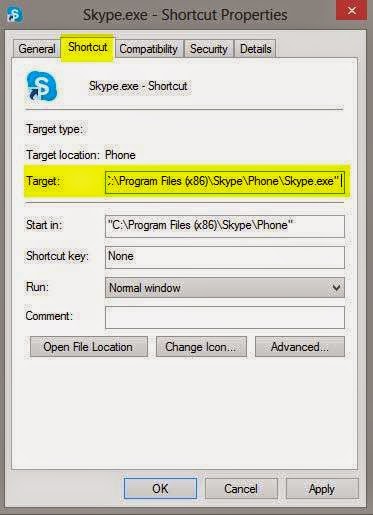
Step 4. In the Target field of the Shortcut tab, add /secondary to the end of the path. The Target field should now be “C:\Program Files\Skype\Phone\Skype.exe” /secondary.
Step 5. Click on Apply than OK.

You can now start a new instance of Skype every time you double-click the new shortcut.

Credits: Special thanks to letsdnd.com for making this very informative guide.

Best 61-70 Leveling Guide in Dragon Nest [T4]

$
0
0
And so this is a guide to leveling in this level cap and how to spice it up abit. Hope you all have a nice read.

For those who are, TL;DR. i would highlight the important parts in red for those who just wants to know tips to leveling fast.

High-lighted Blue for those parts who people are trying to have fun leveling!

Lets get started shall we!
==============================================================================

1st Guide:

All right guys so 1st i would like to talk about Grinding.
Grinding is the act of doing the same thing constantly to level. In the end its very tiresome and boring. For people who have stamina to just grind, this would be i guess the best option for you.
The best grinding spot would be Golden Meadow. 

Most of you would know this by now. But here i give you a layout (crude) of the exp gained in the end dungeon bonus exp.

With FTG Solo Run: 220k exp.
Without FTG Solo Run: 120k exp.
With FTG Teamed 2/3/4: 120k,100k,80k exp.
Without FTG Teamed 2/3/4: 100k, 80k, 60k exp.

So with this i would recommend this way of just doing mindless grinding.

Daily FTG Runs : 4.
With Weekly : 9/10.

These FTG runs (if you are geared enough), Solo them. they will give you more benefit than with a party because the shared exp is a very big factor. If you cant then just run in a party.
After solo-ing you can decide to do it in a team or just solo it yourself.

The next important part, Time to EXP.

Most decently geared people would run 2m30s to 3m. the exp gain would be around 2% to 3% depending on level and bonus EXP gain from guild/ftg/conbined skills.
Likely you can run about 15 runs minimum in the dungeon in an hour so thats about 50% exp.
2 hours for 1 level. Slower than the previous cap. So this is just for grinding and in the end tiresome.

Important notes for those who are grinding :
Guild Costume | Guild EXP Bonus | Combined Skills .
Try to get all of them to make your runs better. Lets say from 60-70. Total you can save roughly 20-30 runs of dungeons if you have all of them. you can have lesser stress than usual.

==============================================================================

2nd Guide(Obviously a hybrid of both!) :

Okay i actually will enjoy writing this part of the guide because its the non-boring part of leveling.
Most of you should know about Side Quest and their exp rewards by now.
But some of you dont know about how much the EXP is. Its a whooping 500-600k EXP/Side Quest.
"WOW! THATS LIKE MORE THAN THE EXP I GET FROM DUNGEONS!!"
Better yet, Main Quest(Story Quest) gives 600k-700k/Quest.

Obviously these quest are from the new map and not from from SH.

Although you can take some daily quest from our dear Blacksmith MERLIN which gives about 110k-120k exp per quest. at Lv 65 the amount of quest doubles up.

Also dont forget the SH side quest for lv 50-60 dungeons. Each gives about 300-400k each. If you have NEVER touched them b4, i recommend doing that from lv 60-65. Because there is a little special something for lv 66.

So this is how i would do it :

Lv 60 - 65 : Do all SH quest and pass them up.
Lv 60 - 65 (If there is no more SH Quest) : Go to Golden Meadow and grind a few runs.
Lv 66 - 70 : Do all New Quest from the new map including Merlin's DQ.

Now for something special. Press your Quest Log after doing all of Merlin's DQ.
You should notice something in your Remote Quest, " Oh Look, 4 Remote Quest what do i do with them? take them all uhhuh, what am i to do with them. Okay talk to this NPC. WHATTTT FREE 550K EXP!?? AND ALL 4 OF THEM!!!??? JUST BY TALKING!!??"
Yes i really mean it. Free Exp just from talking to NPCs, thats about free 15-20% or so. Then some of them asked you to go into some maps to complete a 2nd part of the remote quest. to get a few more exp. Aint that great?

Also something extra, when you are level 66, go to Disappearing Half Moon Desert. There is a side quest about a journal there. Take it and complete it.

Important Note :
If you are really bored of grinding, and want to give yourself some buffering between dungeons, i recommend reading the side quest story and what the npcs have to say, some of them are interesting, (To me i like the romance story between the elves >w<) just to make it less boring.

==============================================================================

3rd Guide :

I got this information from a friend, he is a great friend and fellow greenwoodian >w<.
Credits to him for this information [ Astraekhir ]

Okay. Some of you dont know this but Memoria gives 2 Million Exp for a 2 man run.
2 Million Raw Exp.
Some of you would not be able to clear it 2 man. and its very gear dependent. So thats why this is a special section just for those geared peeps. If you feel you dont have good enough gear then skip this section, or if you dont have a consenting partner to running Memoria.
Okay, im going to quote him here :
[ usually 15 - 30 minutes,depends on gears and party setup.

I can say clear Memo I and II duo should be easy,depends on gear and party setup.Memo III still can be cleared duo but definitely need a geared member with at least 1 healer(that could DPS a bit),Memo IV needs at least 3 man. ]

[ Memo I usually 15 - 30 minutes.]
[ Memo II 20 - 40 minutes]
[ Memo III 20 - 40 minutes]
[ Memo IV 30 - 1 hour.]

[ Though the gears and party composition would affect the clearing time of memo greatly,example 2 full FD players cleared memo I in 10 minutes while non FD with average gears took 20 - 45 minutes.]

Spoiler

Memoria I With 4 Peeps. 1 Mil Exp With FTG. Credits to Astraekhir for the picture.

So this is for peeps who can do memoria fast for a straight 10%-15% exp.

Special Thanks to Loli Hunter Astraehkir. If you appreciate this information give him a like or hug him with your loli characters ^~^/ !

==============================================================================

Special Tips Section:

Okay this would be where i put my tips.

Well, i'll just list them down then explain them.

1. Play Music from a Radio or a Shuffled Playlist of music you LIKE of around 200 to 1000 songs.
2. Dont aim too high.
3. Set Quota and a motivation.
4. Give yourself a buffer rest of 30-60 mins.

1: Playing music soothes the mind and makes leveling more relaxing. Also i recommend a radio, because you have no choice but to dont touch it because you cant change the song currently playing, changing songs make you distracted and making yourself do something else like tabbing out to change the song makes you lose focus. Focus makes it more easier for the mind to do the same thing repeatably. Therefore the 2nd option Shuffled Playlist of music you LIKE. If you dont like a song then you will change it. same theory.

2: If you intend to aim lv 70 in a single day. i'm sorry, but i'm just gonna put it out for you, its stressful and im going to quote my friend here now : "NO70NOSLP" - iBarrett.

3: I recommend setting a quota like lv to 63 by today. level once every 2 hours. Makes it easier. Secondly, a motivation, lets say, you race against your friend under the rule of reaching this level first, then loser pays 1k gold, or something like that. Makes you motivated, overall better experience.

4: A Rest period is very useful. lets say every 1 level you give yourself a rest of 30-60 minutes. Go stand up stretch watch some drama/anime/youtube whichever you enjoy. Although you might be like, "this contradicts what you said in point 3! makes me slow down against my race!". Well your choice, but honestly a buffer period makes my run faster the next few times because im not so tired after leveling that way. Also if you won already you can relax for awhile and you still can win whatever you bet. Not so baddddd.

Credits: Special thanks to SNSD_AjumNy for making this very informative guide. If anyone deserves credits, it should be him.

Dragon Nest All PVE Achievement Guide [T4] by GigaBlast

$
0
0
Credits: This PVE achievement guide was written by GigaBlast from GreenWood server on Dragon Nest SEA. If someone deserves credits on this guide, it should be him.

This will be a guide on collecting Dungeon/Nest based achievements.

Credentials
I have completed most dungeon and nest achievements. Progress: 41011/45000 Points

For Dungeon achievements, I lack
- Infinite Pormido Round 75 onwards
- Hero's Battlefield Complete 60 rounds onwards

For Nest achievements, I lack
- DDN Normal "This is an accident" (Desert Dragon to use its breath on ground to destroy eyes of life), 6 Man Clear Nest
- Most DDN Hardcore achievements
- Guardian Nest 15 minutes, Solo Nest
- Mist Nest Solo Nest
- Anu Arendal Ordeal's Nest 4 Man, 5 Man
- All BDN and BDN Hardcore achievements

Motivation
Although I started early achievement hunting, the addition of achievement points shop certainly helps to reward achievement hunters. In particular, I am sure most of you will be eyeing on the 35,000 achievement points milestone which rewards Black Dragon Nest Legend Scale.

Guide
There are many achievements as you can see, up to 1k+. I will classify them into 8 categories, from easiest to hardest.

1) Revive a Party Member!
Examples
i. Resurrect a fallen party member! (Level 31 abyss dungeons and Cerberus Nest are most known for this)
General Strategy
This is the easiest achievement. No brainer. Just painful for your red hearts.
Hardest Currently
None. All are of the same difficulty.

2) Defeat XXX Monsters in One Strike
Examples
i. Defeat 5/10/15/20 monsters in One Strike!
General Strategy
This used to be the developers favorite. You can see in the early dungeons (level 16 and 24) that many dungeons have these. Newer dungeons do not have these anymore.
Use your highest damaging skills here. Ultimate skills will mostly get you this achievement (except maybe Divine Avatar)
Hardest Currently (Note that this section is based purely on my opinion. You may concur/disagree)
Typhoon Nest Hell Kill 10 Monsters in one strike is rather hard for people that havent reach level 70. Still relatively easy compared to the achievements below.

3) Visit/Clear XXX Dungeon/Defeat XXX Boss
Examples
i. Visit Mana Ridge
ii. Clear Catacombs in Hard/Master/Abyss Difficulty.
iii. Defeat Gigantes Maha
General Strategy
Highly straightforward. Simply visit the dungeon, clear it on hard/master/abyss difficulty and defeat the boss
Although simple, these occupy the bulk of the achievements, yet many people don't even have them. Reason? Grinding. Many people just follow levelling guides (eg. lvl 9-15 sc lvl 16-24 dtmi, etc.) They don't even visit other dungeons or give them a try.
Hardest Currently 
Black Dragon Nest Hardcore is the hardest nest in the game at the moment. Feder Feather Plucker should be the hardest in this category.

4) Time Limit
Examples
i. The Famous Overcoming Limits- Clear Green Dragon Nest within 20 minutes
ii. Powerful Blow- Clear Green Dragon Nest Hardcore within 20 minutes.
General Strategy
Okay this will vary with different dungeons. First rule is probably get Good DPS. This might not be required for easy dungeons like Dried Marissa Spring, etc. but for nests it is generally good to get DPS.
Next get speed buffers. These include Force Users (Beyond Time), Acrobats (Spirit Boost), Academics (Wax).
You will have to rely on mechanics of the dungeons at times. Famously known is the KOS (Kill on Sight) technique employed in Green Dragon Nest.
Another strategy is to suicide and resurrect for cooldown of skills. However, nests like Typhoon Nest and Professor K Nest Hell mode requires clear in 8 minutes WITHOUT DEATH. This means the suicide strategy is not applicable here.
Hardest Currently 
Self-illuminating (Clear Black Dragon Nest Hardcore within 30 minutes) is the hardest as of now, as it not only requires 8 minutes to complete, it also requires

5) Combos
Examples
i. Achieve success with 50/100/200 combos.
General Strategy
This will be difficult for certain classes and easy for others. I will try to separate for different classes.
1) Warriors- Mercenaries use Cyclone Axe. Sword Masters use Cyclone Slash (level 1).
2) Sorceress- Poison Missile (level 1) should do the trick.
3) Archers- Bow Masters use arrow shower (level 1). Acrobats use their chain combos.
4) Clerics- Paladin use divine avatar and sacred hammering all the way. Priests should find this easy with relics.
5) Academics- Academics should have this easy with many of their summons.
6) Kali- Despair Needle (level 1) should do the trick.
Of course all these might be interrupted by knockback and other skills of mobs. Try to avoid them as much as possible. Paladins have this easy with divine avatar.
Hardest Currently 
I would say the earlier dungeons are actually the hardest ones. The higher level the dungeon, the easier it actually is because the mobs don't die so easily.

6) Last Hit
Examples
i. Achieved by defeating 5 local bosses with the final blow and not dying.
General Strategy
This is HARD but not impossible.
Burst Damage Types like Smashers, Gladiators can find their way to final hit easily. Wait for bosses to reach x0.2 and unleash a laser cutter/ final attack for example.
Summon Types like Engineers/Priests can spam their towers/ducks/relics everywhere and hope to kill steal the last hit.
Constant DPS types unfortunately will have to rely on their luck.
You can ask your party to slow down and let you final hit. But this is provided you have a cooperative/friendly team that is willing to wait for you. I always find this embarrassing to ask for, but nevertheless still ask for it 
Hardest Currently 
With Level 70 Cap, many people (even those not well geared) are hitting HARD. This will make last hitting a chore. Ever title (last hit 5 bosses in Green Dragon Nest) may seem hard. But this can be done in Stage 1, letting the boss keep respawning. The hardest I have to say, is Sea Dragon Nest normal achievement, One Who Became the Legend(last hit 6 bosses in Sea Dragon Nest). That is TOUGH for public parties.

7) Get a Good Rank!
Examples
i. Clear dungeon with S/SS/SSS Rank or Higher.
General Strategy
This is the category where many people are complaining about. I admit this is hard and even biased towards certain classes.
General Strategy and the best way is
1) Make a lot of combos (generally the maximum points for this is capped. Meaning 500 combos is the same as 1000 combos. Just make 500 combos and move on)
2) Clear as fast as possible
3) Clear with as many people as possible
However, certain dungeons have too little mobs/too easy to finish. Here is where a desperate strategy kicks in.
1) Stay in the dungeon for as long as possible (the time bonus is gone at a certain timing. so might as well stay infinitely long)
2) Keep buffing yourself (whatever it is, Battle Howl, Brave, Block, Striking, ANY BUFF will give you a certain point) until you hit 150k dungeon points. Note that this may take 1 hour to 1 day.
Not recommended unless you're an achievement hunter.
Hardest Currently 
These are two of the hardest dungeons to get SSS rank IN MY OPINION.
1) Prayers Resting Place.
Okay this is difficult but not yet impossible considering there are still plentiful mobs inside here.
I employed the General Strategy and got SSS rank. Took 25+ tries though.
Both master and abyss are included here.

2) Catacombs Hall
Now this is the HARD one. So few mobs inside here and you expect a SSS rank? Abyss mode still manageable but master mode is tedious. I desperately employed the desperate strategy.

Sorry No Screenshot of SSS on top but rest assured i got it.

But as hard as these 2 dungeons seem, the HARDEST yet must be apocalypse nest (solo) mode SS Rank (UPDATE: THIS SEEMS TO BE REMOVED)

120k points and still no SS rank. The only achievement I lack. I'm lazy to employ the desperate strategy given this needs maybe up to 150k points. Anyone that is willing to contribute please refer to here http://forum.cherryc...poca-solo-mode/ (not a bug i must say, but still impossibly tedious)

8) Clear Dungeon WITHOUT DEATHS
Examples
i. Clear Death Basin alive.
ii. Clear Apocalypse Nest with 2/3/4 people alive.
iii. Clear Sea/Green Dragon Nest Normal/Hardcore with 5/6/7/8 people alive.
General Strategy
This must be the hardest one yet. This tests everything you need all in one.
1) Team Coordination (NO Force Disconnection. That won't work here. Ironically, sometimes 5 people alive achievement is easier to do than 6/7/8 people alive. This ALL depends on team coordination)
2) Geared Members (Laziness to gear yourself will not only lead to your demise but also frustration from your team members if you die, costing them a title)
3) Understanding of dungeon mechanics (Certain dungeons like Gigantes Nest cannon stage requires an understanding. You can't push through with brute strength or the infamous phrase, KOS)
I do not find myself fit enough to give you strategy on this as I still have many achievements missing. Majority of my missing achievements lie in this category. But generally, my strategy is
1) Get healers/tankers
2) Bring potions into nest/dungeons
3) Learn to dodge while contributing damage
4) Learn dungeon mechanics
All these are essential. Feel free to contribute your tips here.
Hardest Currently
Likely to be Black Dragon Nest Hardcore 5 people alive for various reasons. Those that are geared are likely to complete 8 people for increased drops. Those that aren't need no further explanation.  

Useful Links
Content Specific Guides
Lumc SSS Rank Guide:
Class Specific Guides:
Sylpid's Bowmaster Achievement Hunting 101 Guide:

End Notes
I understand certain other dungeons have other form of achievements. Example: Gigantes Nest/Typhoon Kim Nest/ Professor K nest royal chest. I will leave specific guides by other users to settle these.
Good luck if you want to hunt achievements like us!
Any tips/add ons will be appreciated.
Do note this is a PVE guide. PVP and general achievements are not covered. 

It's Here! Albion Online Alpha Test Announced

$
0
0
It’s finally here, what you’ve all been waiting for! Albion Online’s Winter Alpha has an official start date, and it is… (drumroll please)…

The 26th of January, 2015

This leaves the developer with just 5 weeks to build in the great new features we have planned, ready for testers to enjoy in the alpha. It will last 4 weeks, similarly to the previous Summer Alpha, and will put Albion Online well on the way to closed beta testing later in the year.

What the developer got planned for you?

Here’s a run-down of just some of the great new features debuting in the Winter Alpha, based on feedback from testers in our previous alpha:

Farming

Want to take a break from non-stop PvP action? Why not retire to your own farm to breed and raise animals, cultivate crops and harvest their yield in order to produce food and consumables. Check out a more in-depth blog on farming and consumables here.

New buildings

In addition to farms, a few more buildings are being added under the farming system; these will help players make use of their farms by allowing them to create consumables which will afford their characters buffs to make their journey through Albion just a little bit easier.
Consumables

Consumables can be created from produce harvested from farms. Players can take their harvest to one of our many new buildings to refine the produce into ingredients, and subsequently use them to create meals. The miller, for instance, will mill a player’s grain into flour, so the flour can be used to create a tasty cake to replenish health.

A whole bunch’a new weapons!

Albion Online’s arsenal has been extended massively, with more weapon styles and options than ever before! In a classless world where you are what you wear, more weapons allow you more options to work out your perfect play style!

Player and guild islands

Players and guilds can now claim their own islands around the world, which will give them extra building space and alleviate problems with lack of land for player housing and other building space without devaluing owned land.

Changes to crime system

Players will now have the option to flag themselves as friendly or hostile in PvP areas. This constitutes a big change from the earlier system, which categorised the level of PvP available solely on which area a player found themselves in. There will still be free-for-all PvP in designated regions in the world, though friendly players will not be able to attack other friendly players.

And a few extras:

– Controls options for remapping hotkeys for spells and abilities, a common request from testers after the Summer Alpha.

– Overhaul and rebalancing of weapons and spells, to improve overall balance and enjoyment.

– Dungeons will now be classified based on their size and difficulty, and a notice on the world map will inform players of the recommended group size for tackling a dungeon.

– Resource nodes in the world now have a chance to become magical, providing magical resources which can increase the quality of items crafted from them.

– New territory types for guilds to claim and control. This will hopefully increase turnover on territory ownership, making guild vs. guild play more accessible to more guilds.

And many, many more!

You can head to their new six-month development roadmap in their forums for more details about our intended direction for the game in the future.

They will be releasing a thorough changelog in the coming weeks, so you’ll be able to see exactly what kind of world you’ll be playing in in January!

The Winter Alpha test will be open to ALL Legendary and Epic founders,  and if you’d like to join them, you can head to their website to become a founder. Becoming a founder helps support the development of Albion Online and brings all sorts of rewards, including access to closed testing phases AND exclusive in-game items and currency.

source: albiononline.com

Brave Frontier: Comprehensive Guide on How to Defeat Boss Creator Maxwell

$
0
0
This is a guide for Brave Frontier players on iOs and android devices which will help them defeat the big boss Creator Maxwell in the game. The guide was written in details by a BF players also, whose IGN is AbsentNight. So if anyone deserves credits on this guide, then its AbsentNight.

Team Building

The basic team should have the following in order to have the best results during the trial:

Damage Reduction
Healer
Status Curer/Nullifier
Damage Dealer
BB Support (optional)
Attack Buffer (optional)

Units

Leaders

Grah- His 20% to all parameters and -15% is very helpful when taking hits from Maxwell. Due to Grah's subpar stats and dark element, you'll have to guard him a lot if you want him to stay alive. If he does die, don't use revives on him.

Lilly - Her utility is unique to no other unit currently. She's the most useful unit to have on your team but it's not impossible without her.

Darvanshel - Having Darvanshel as either a friend or lead is also very helpful since he can cover for two roles on your team. You will be losing out on survivability if you're not using Grah as your other lead/friend.

Exvehl - His 30% HP and gradual heal can be useful for survivability though Grah would be better suited for this role as a lead. Nonetheless, he works.

Kuhla - Same reason as Exvehl

Oulu - You could possibly work with his LS if you already have some good units. Compared to the other options, he's not really the best.

Damage Reduction

This is an almost must have for Maxwell. You will increase your chances of succession by a LOT by having one of these units. You should be using these unit's BB at the appropriate times.

Grah - Strictly to only be used as a lead.

Oulu - The first of his kind to ever offer -50% damage mitigation. Though outclassed by Darvanshel, he's still a very good unit to have on your team. Though, BC drop is going to be an issue.

Darvanshel - Currently in both Global and JP the best damage mitigating unit. He'll double as an attacker helping in BC drop and resisting the loop.

Narza - Though not as good as Darvanshel since he can't attack with BB or SBB, he's still good to have for this fight.

Fiora - Her ATK down buff can provide for nice damage reduction in conjunction to a damage mitigator. You should only be using this unit if you have a damage mitigator on the team.

Ardin - Like Fiora, you should be only be using this unit if you have a damage mitigator somewhere on the team. Unlike her however, Ardin has add dark buff which can help a lot with damage output if you don't have Grah or Themis on the team already.

Healers

This one is an obvious for your team. If you're unable to sustain you HP gauges, then you have no chance.

Altri - Doubling as both a healer and an status nullifier, it's obvious why this one is chosen. He also boasts with the highest healing of any unit. His stats are low but with his high HP so he'll be able to stand against the onslaught fairly well. He loses points for ripping off a Miyazaki film though.

Rashil - An interesting unit to have. The Angel Idol buff can work hilariously well (in my experience) against Maxwell if she decides to repeatedly attack him. Coupled with Lilly, you'll be able to get that Angel Idol buff again (unless Maxwell uses Rune on him).

Themis - She adds dark element and increases REC which can help in damage output and surviving. Works great with Exvehl or Kuhla lead.

Elimo - Another viable healer, though, her buffs collide with Darvanshel/Oulu's. Best to be used when they don't have their buff up. Her stat's are somewhat unfavorable.

Lancia - Her heal and HoT can help a bunch in healing. Her stats, like Elimo's, are a bit unfavorable, however.

Tiara - If you have absolutely no other options, then you can try to work with this unit.

Arius - Though heavily reliant on Lilly, you can still work with this unit.

Tia - As a pure healer, this woman is best out of all of them. She'll pretty much make sure that your HP is full all of the time. The gradual BB fill is a nice bonus if you don't have any already.

Ulkina - The others are better options as a healer but if you have no one but Ulkina or want to save a slot, then you could work with her. You'll have to avoid using her SBB then unless you don't need healing (which may not come to rise often).

Note: If you don't have any option, then you can use farmable unit.

Status Curers/Nullifiers

Though this won't be too much of a problem with the actually fight with Maxwell, you'll still need these units to get there. You're chances of even getting past Juggernaut and Abaddon is very dependent on these units.

Altri - I don't need to explain this one.

Exvehl - Provides both curing and nullifying for his BB and SBB and gets a 24 hit AOE for his SBB. He's great if you don't have Altri.

Darvanshel - He's the only unit with status nullifying LS that's really viable for this fight and can fill in for damage reduction role. I don't recommend using anything else.

Lunaris - This unit is very BB support dependent, Lilly being the most recommended on your team, but you can use this one if you don't have anyone else.

Melchio - Melchio should only be your last resort if you don't have the units listed above since he can't cure statuses.

Narza - Yet again, you see Narza. Like Melchio, I don't suggest using this unit over the others that can cure statuses. Damage mitigation is the prime utility for this unit though so he's still nice to have on the team.

Ulkina - Though Laputa can create mass destruction, Kiki can fly around deliver pies bringing happiness and joy to people's faces. I liked Laputa better though.

Damage Dealer

For any boss, you'll need to be dealing an ample amount of damage. Though your team for Maxwell should be more focused on your survivability, you still need enough damage to resist the Sacred Song loop at the end.

Lilith - With her infinite target BB, 32 BC checks and high damage multiplier, she'll be a very nice unit to have.

Dia - Since Maxwell is a single target, her random BB can actually work for this fight. Her BC cost is a bit higher then the target BB units, though.

Rickel - Her SBB does the same amount of damage as Rowgen and Lilith. With Lilly on your team, you'll be able to get some simular results with our little cowgirl here.

Faris - Her damage multiplier may not be as high as Lilith's but she makes up for her 30 hit target BB and 30% HC drop.

Luther - Although not the best, he's still a viable option for dishing out damage. His BB cost is also very quick at 15 BC.

Rowgen - Basically a Thunder Lilith. Spark with him for best results.

Any other target BB units can be use as long as they aren't too squishy and are reliable.

BB Support

Though not need, per ce, this is important for sustaining everyone's BB up so that you can get damage mitigation and healing up as soon as possible.

Lilly - She gives BB fill when attacked, gradual BB fill and BC drop+. She's most useful asset in sustaining your BB gauges. She can be used either as a lead or a sub.

Zelnite - Having BC and HC drop+ is always nice to have and 8 BB fill on BB and SBB can help you whenever you're in a pinch. Though, if you have Lilly, Zelnite is not needed as much.

Lodin - Lodin's gradual BB fill is the best out of any unit. His BC cost is a bit high at 40 BC but he's still usable.

Kuhla - Basically, she's Lodin and Michele fused into one unit.

Narza - What? This guy again?

Attack Buffer

These aren't actually needed but are more of a convenience to have if you have all the other roles filled. This can also help in breaking the Sacred Song Loop.

Michele - Her 115% ATK buff is best in the game. Her stats aren't though.

Leorone - He gives 70% to ATK, DEF, and REC. He has low max BC checks though.

Kuhla - Lodin plus Michele.

Kuda - With 100% ATK and 40% crit, he's not a bad unit to fill that last slot if you have all other roles filled though a bit vulnerable.

Lucca - This guy has a 100% ATK buff. Yay.

------------------------------------------------------------------------------------------------------------------------------------------------------------------------------------
Spheres

Spheres you equip are also going to be very important in making or breaking the battle. The following are recommended you should be equipping. Any spheres that have similar effects can be used.

Sacred Jewel - 15% to all stats
If you don't have anything better, then you can use this as long as your unit(s) have enough HP (8k+).

Medulla - 20% to all stats
This sphere is my recommended minimum when taking on Maxwell. Any lower may not be end well for you units especially if you don't have Grah on your team.

Legwand - 25% to all stats
Slightly better than Medulla but at same time, much more favorable.

Malice - 30% to all stats
Not much explanation is needed for this one.

Dark Armor - 35% to HP
If you really have a to equip this to any of your units to get HP up, then go ahead. Whether or not it's going to be worth it depends on you.

Dandelga - 30% HP, 30% ATK, BB fill per turn (2 BC)
A very nice sphere to have with Oulu or Darvanshel especially in conjunction of Magic Ore or Evil Shard.

Drevas - 30% HP, 30% DEF, nullifies status statuses
A sphere recommended to put on your healers, Altri in particular.

Lexida - 30% HP, 30% REC, doubles normal attack hit count, gradually heals HP (2000-3000 + 10% REC)
A sphere that is very useful for keeping any fragile units alive, Grah in particular. You can also use this on a high unit with high BC checks on their normal attack to take advantage of the double hit count.

Leomurg (aka Black Lance) - 30% HP, 30% DEF, HP drain (15%-30%), 4-6 BC fill when attacking
This sphere is never a bad thing to have. I recommend equiping this to your attacker unit like Lilith.

Sol Creator - Increases BC drop by 15%
A nice sphere to have for some extra BC. Best used with units that have high amount of BC checks like Lilith.

Evil Shard - 3 BC fill per turn
Best used with damage mitigation units or healers.

Magic Ore - 4 BC fill per turn
Slightly better version of Evil Shard.

Refined Gem - Nullifies status status
This should only be used if you're lacking in Drevas or choose to have the whole team with this sphere.

------------------------------------------------------------------------------------------------------------------------------------------------------------------------------------

Team Examples

In order for you to get an idea of how your teams should go, I've made some examples.

Note: This does not mean that your team should be limited to these. You don't need the perfect squad to beat Maxwell.

Example 1
Grah lead - Medulla
Lilith - Medulla
Darvanshel - Dandelga
Altri - Drevas
Michele - Legwand
Lilly Friend

This team is a bit more similar to the teams that people in Global may want to aim for. Each unit covers for each of the roles. Grah and Darvanshel provide for survivability and damage mitigation. Lilith will be the main damage dealer. Altri can sustain HP gauges and deal with statuses. Michele will help in damage output. Finally Lilly will help keep BB gauges full. The spheres will help in taking hits.

Example 2
Grah lead - Medulla
Luther - Medulla
Elimo - Medulla
Zelnite - Medulla
Lodin - Medulla
Darvanshel friend

This team is an example for those who lack with some of the top units for Maxwell, Darvanshel in particular. Grah will provide for more bulk and survivability. Luther, Zelnite, Lodin and Darvanshel friend can all provide for some offensive. Elimo will help with healing and give at not as impressive but still useful -25% damage reduction. Lodin and Zelnite can help with BB support. Darvanshel friend will provide for damage mitigation and status nullifying. This team may not seem as impressive but if you know what you're doing, it is very possible to beat Maxwell with this team.

Example 3

Exvehl lead - Medulla
Faris - Legwand
Michele - Medulla
Darvanshel - Medulla
Themis - Medulla
Lilly Friend

Like the last teams, this one fits all of the requirements you need to beat Maxwell. If I go on about why this team is viable, I'm just going to sound like a broken record. You should get it at this point.
------------------------------------------------------------------------------------------------------------------------------------------------------------------------------------

Battle

Note: You should count turns starting with Juggernaut. Brave Fronteir PROs has been very kind as to make this nifty counter. They've also added an HP marker which will be very useful for estimating critical points.
http://touchandswipe.github.io/bravefrontier/maxwellcounter.html#_=_
http://touchandswipe.github.io/bravefrontier/hpmarker#_=_

Juggernaut
Inflicts Injury, Paralysis and Weakness
Magnetron, AOE, cast randomly
Graviton, AOE, cast randomly
Neo Plasma Blast, AOE, every 4 turns
This battle overall is actually pretty easy. There's not much that you need to know about this one. Just make sure you have damage mitigation up or guard every 4 turns. It is also important to get nullification up as soon as possible so that your don't get paralyzed. Water units should also be guarded. Items should not be used here but flutes.

Abaddon
Inflicts all status ailments
Evil Hole, AOE, cast randomly
Necro Curse, TGT, cast randomly
Black Force, AOE, cast randomly
Banishment, TGT, that removes buffs, cast randomly

At 50%, Death Gate, TGT, cast twice
At 30%, Death Gate, TGT, cast four times

This battle is a bit harder but still manageable with the right team. Just make sure you watch out for those critical points and don't accidentally go over for if you do, a couple of you're units are very likely to die. It is very important to have an status healer here since Abaddon inflicts everything. When reaching the critical points, make sure you guard your units and use damage mitigation. Again, items should not be used here. The spoiler below has a reference of where the critical points. I know, my Photoshop skills are too good.

Note: These images aren't pixel perfect accurate.
Maxwell

Inflicts Weakness and Injury
Sacred Song, every 4 turns, ATK and DEF buff, casts ignore defense and angel idol
Rune, TGT, removes buffs, every 4 turns
Genesis, AOE, randomly cast
Destiny, TGT, every 5 turns, fixed 14k damage
At 70%, Meteor, TGT, fixed 4.8k damage, casts randomly later
At 50%, Resurrection, AOE, self-heal, casts randomly later
At 30%, Destiny cast twice every 5 turns from now on
At 20%, Endless, AOE, very strong
Now this is a fight that you should be worrying about. First things first, if you don't want to have SS, Rune and Destiny all on the same turn early on, then I suggest to not kill off Abaddon before turn 21. It should also be noted that whatever turn you're own, that will be where Maxwell's attack pattern will start i.e. if Maxwell appears at turn 24, she'll start off with Sacred Song and Rune. During this fight, you're going to want to maintain you're HP gauges full. Guard anyone with less then 60% HP if you're not healing that turn. When Sacred Song and Rune comes up, you should guard all of your units and use damage mitigation. On the turn after Maxwell casts Sacred Song, you'll want to either have mitigation up or guard your units to be safe since the ignore defense buff is still active. For Destiny, it is also very recommended that you guard and use damage mitigation, too. As you approach the 70% mark, you'll face Meteor for the first time. Though it's not too strong, you should be using damage mitigation to be safe. Once you reach to 50%, Resurrection will come up. Resurrection isn't too strong but can still mess up your units if you don't guard or have damage mitigation up. The self-heal that comes with it shouldn't be much of a problem. At 30%, the double Destiny cast isn't really too much of a problem (in my experience) then just single Destiny. You should still, of course, be guarding and use damage mitigation. As you approach 20%, you should be very careful not to go over too soon. If you accidentally go over without damage mitigation, you're as good as dead. After that, the rest should be a breeze til you reach the end. Below in the spoiler is a reference of where the important critical points are.
------------------------------------------------------------------------------------------------------------------------------------------------------------------------------------

Sacred Song Loop

Because of Maxwell's Angel Idol, she'll revive after her HP is reduced to 0%. In order to have your best chances, you should reduce her HP to 0% on the turn after Maxwell casts Sacred Song to have a total of three turns til she'll cast it again. Still be wary of Destiny though for it is still a threat to you. Below is an example of how it should be executed.

Turn 41 - Reduce health to 0%
Turn 42 - Attack
Turn 43 - Attack
Turn 44 - Killshot

In order to avoid starting the loop again, you have to deal enough damage to take out 100k HP. You can roughly calculate damage by taking all of you accumulated damage in one turn. Keep in mind that this number won't be accounting for crit, spark or weakness.

Regular attacks will deal the amount of attack your unit has and multiply by attack multipliers i.e. Grah 1800(1+.2(LS)+1.15(ATK buff)+.2(Sphere)) = 4570

For BBs, you have to take all attack multipliers and multiply by your attack i.e. Lilith 1823(1+6.2(BB%)+.2(LS)+1.15(ATK buff)+.2(Sphere)) = 15951.25
If you can, try start the loop at turn 1 or turn 17 of Maxwell's attack pattern to avoid Destiny.

If you still have trouble comprehending this, then @ZURA has taken the liberty to explain it some more here:http://www.bravefrontierforum.net/threads/trial-no-003-maxwell-the-loop-explained.38143/

------------------------------------------------------------------------------------------------------------------------------------------------------------------------------------

Miscellaneous Notes

Just some final things I would like to add that may help.

  • My most recommended item set for this is Cures/Flutes/Lights, Fujin potion, Fujin Tonics, Revives, Revive Lights.
  • One strategy you could do if you lack a good status curer is to have a first team with nullifying LS unit as a lead for Juggernaut and Abaddon and then a second team for Maxwell.
  • Count to four with your fingers if you find yourself losing count or forgetting which turn you're on. I've found that to work for me better than the other methods.
  • If you see Maxwell constantly attacking one of your units til they die, then that's just RNG screwing you over rather then your team not being good enough. This whole battle will rely on some luck for success.
  • I recommend to have all of your units with at least 8k HP to ensure you can take Maxwell's hits. Having 10k+ HP is superb. However you do that varies.
  • You may not get Maxwell on your first try. In my experience, I have found myself messing up on either critical points, turn count (or sometimes being thwarted by RNG). It took me several tries not because Maxwell was so powerful but rather mistakes on my own part (or RNG). This battle is a battle of wits. (RNG also plays a role in this battle)
  • It helps a lot if you have dark element buff up to ensure you break the Sacred Song loop.
  • Planning to beat Maxwell with more than one team can actually be unhelpful in most cases since they'll go into the fray with absolutely no buffs once the team before them goes down. (Bringing crit teams to blow through that last 100k HP at the end is fine as long as you have fujins to spare.)

Brave Frontier: A Guide on How to Build a 100% Winning Rate Arena Squad

$
0
0
Below you will see a guide made by Glum on how to never lose in the Arena of the game Brave Frontier on iOs and android devices.

To start, here is the team I currently use. I haven't lost since using these guides, and I've never ever missed a turn 2 BB.

Zurg (breaker) - Lexidia to boost his HP
Maxwell (lord) - Amano and Sol Generator
Kuda (breaker) - Hween sphere and Sol Generator
Ardin (breaker) - Amano
Hogar (breaker) - Amano

Step 1: Pick Your Units
BB Types:
In general, picking units with an AOE BB is the best option. There are three major types of AOE BB:
15 BC requirement, does 190% damage at max BB10. (Lira, Farlon, Uda, Hogar, etc)
28 BC requirement, does 240% damage at max BB10. (tons of units fit this category)
34 BC requirement, does 250% damage at max BB10 and typically has a status effect. (tons of units fit this category)
A good arena team always has at least 4 units that can activate an AOE BB. In general, you don't want to have only the 15-BC requirement units because they alone generally can't wipe out a team. (One or two of these units is okay, but you don't want to place your chips in such weak-damaging units.) The 240% damage units generally can kill the whole team alone. These are the ones you should focus on.

Dropchecks:
Arena is all about high dropcheck. (Note: This doesn't mean high hitcount.) To find a unit's dropcheck, go here: http://touchandswipe.github.io/bravefrontier/comparemaxbc#_=_

Typically, you want your team to have at least 180 dropchecks to maintain a turn-2 BB (without Ares/Zelnite) and 120 dropchecks (with Ares/Zelnite). Note that a Lexida Sphere or a Halloween Sphere does double your unit's dropchecks.

Here are the units with 24 or more dropchecks. I've marked the top-tier units with green. They are all okay to use, but try to make sure you have at least 4 units with AOE bb's.
  • Len (50 dropchecks but random BB and he's got low stats)
  • Melchio (39 dropchecks but his BB is useless)
  • Lucina (36 dropchecks but her BB is only single-target)
  • Deemo (34 dropchecks but she's weak)
  • Rickel (32 dropchecks, but she's only single-target)
  • Serin (32 dropchecks, but she's weak)
  • Narza (32 dropchecks, but his BB is useless)
  • Grybe (30 dropchecks, AOE BB)
  • Michele (30 dropchecks, strong utility on her BB if she's first to attack)
  • Duel-SGX (30 dropchecks, decent utility on his BB if he's first to attack)
  • Elza (30 dropchecks, hella-strong BB)
  • Kuda (30 dropchecks, probably best unit in the arena)
  • Heidt's 6* (30 dropchecks but single-target BB)
  • Eve (28 dropchecks, strong AOE BB)
  • Cayenna (28 dropchecks, weak unit)
  • Alyut (27 dropchecks, strong BB)
  • Logan (27 dropchecks, rainbow lead, single-target BB)
  • Zelnite (26 dropchecks, very strong BB/fills other unit's BBs if casted)
  • Faris (26 dropchecks, single-target BB)
  • Shida (26 dropchecks, strong AOE BB)
  • Kikuri (24 dropchecks, strong BB)
  • Ardin (24 dropchecks, strong AOE BB)
  • Farlon (24 dropchecks, only needs 15 BC for his BB)
  • Sodis (24 dropchecks, strong BB)
  • Bran (24 dropchecks, rainbow leaderskill, AOE BB)
  • Agni (24 dropchecks, single-target)
  • Yujeh (24 dropchecks, AOE BB but bad stat distribution for arena)

Step 2: Pick Your Leader
In arena, your first priority is to ensure that all 5 of your units get their BB gauge full. This is extremely easy to do with so many high-class units these days.

Option 1: ATK (Zurg, rainbow leads, mono-element leads, Azael)
Most good teams nowadays can get full BB gauges without the need of a BB fill leader. This means taking a 50% ATK leader makes your team so much more deadly. The team I run can get 3 kills on turn #1 almost every game.

Zurg is obviously the best leader currently because you get 100% ATK on the first turn. Most squads running Zurg lead can wipe out 2-5 of the enemy units by the first turn.

Option 2: BB Filling (Uda, Elza, Zelnite, Kuda, or Phee)
Take these if you are having a hard time filling all 5 units' BBs. Filling the gauges is a priority, so if you can't, make sure you run Zelnite, Uda, or someone similar.

Step 3: Choose the Order of Attacking
(thanks to http://www.reddit.com/r/bravefrontier/comments/2ksl5k/team_building_arena/ for the info here)

This is probably the most important part of arena in ensuring a guaranteed win. Every unit has a specific type of programmed AI that tells them when to activate their BB. If you end up in a turn with all 5 units not using their BB, you probably put them in the wrong order.

To see what type of AI your unit is, look it up on http://touchandswipe.github.io/bravefrontier/skillseffectsguideglobal#_=_.

Type 1: 2nd best type
60% purely random chance to cast BB
If they don't cast BB, 30% chance of attacking the unit with highest ATK
This type can go anywhere in the squad. I like to place them after the type 2's

Type 2: worst type!
60% chance to cast BB if one or more enemies is above half-HP
If not, a purely random 20% chance to cast BB
This type should always go first. If they are not the first unit, they will probably not cast their BB.

Type 3: best type
60% purely random chance to cast BB
If not, 20% random chance to cast BB on the target with highest ATK
If not, 30% chance to atk enemy with lowest HP
This type can go anywhere. They are the best type because they have a 68% chance of casting BB.

Type 4: 2nd-worst type
60% chance to cast BB if if at least one enemy is below half HP
If not, 30% random chance to cast BB
If not, 70% chance to atk enemy with highest HP
If not, 30% chance to atk enemy with lowest HP
This type should always go last in the order because chances are the last-attacking unit will probably have half-HP.

A good squad is going to emphasize the random chance of BB without any stipulations. You don't want to have a full team of types 2 and 4 because they have strict restrictions on casting a BB. Having one of each isn't bad, but you want your best arena squad to have at least three units from types 1 or 3.

There is a lot of analysis that can go in here for plays and counterplays, but in general as long as you don't have lots of units from types 2 and 4, you are basically guaranteeing a BB. Also, making sure that Type 2 is first and Type 4 is last will help a lot with ensuring BB's.

Step 4: Spheres
There are only two types of spheres you should try to use in the arena:

Halloween & Lexida. These spheres are OP for the arena. They double your hitcount and they increase your damage by about x1.7. They are statistically the best for a turn-1 kill and for a turn-2 BB. You should always use all 3 of these in an arena team.

Amanohabaken. These spheres are also very strong. A 75% increase to ATK and a 5% increased crit chance helps guarantee a lot of damage on the first turn. They also add a lot of punch to a turn-2 BB, helping ensure that practically any unit's BB will guarantee a win.

For secondary spheres, I wouldn't focus on Sphere Frogging a unit that you only use in arena. However, many units like Maxwell, Elza, Kuda, and Zelnite are excellent candidates for sphere frogs. They should basically get these items:

Sol Generators. These are only good as secondary spheres if you can't guarantee a turn-2 BB.

Havoc Axe/Geldnite Axe. These can help ensure 3 kills on the first turn. However, Sol Generators have priority if you need the extra BC generation.

Brave Frontier Arena Tips and Tricks

$
0
0
In this page is the guide written by Josh which tackles on some tips and tricks on winning fights in Brave Frontier for iOs and Android devices.

When I first started out playing the game, the key to winning in the Arena was to build a mono element squad and make use of their 50% damage boost leader skill. This was good for a while but people seem to be shifting towards using Felneus or Duelmex as a leader and using other units that have either a fast BB refill rate or a high hit count.

Hit count is a frequently overlooked stat in this game. It's important because the higher your hit count, the more BC/HC is going to drop each turn. Combining high hitting units with Felneus' or Deulmex's leader skills (greatly increased the drop rate of BC) means that you're going to fill or almost fill your Brave Burst gauges on the first turn. If you can pop off a Brave Burst or two on the second turn, then the chances are that you're going to wipe out the opponent's entire squad during that turn.

One of the most effective squad's to use this method is using Felneus and 4 Gun Goddess Serin's. Gun Goddess Serin's normal attack has 14 hits, and her Brave Burst is a 16 hit AOE attack. I've fought a few players that use this squad and I almost always lose to them as they fill their BB gauge's so quickly.

If you're going to use a squad that relies on wiping the opponent out quickly with a Brave Burst, then it's most definitely worth leveling your units Brave Burst to BBLv 10. Increasing your unit's BBLv means that it's going to hit more damage and has a better chance of wiping your opponent's squad out.

If you don't have Felneus or Duelmex, you can still build an effective Arena squad. My second choice to Felneus and Duelmex would be using Gaia King Lugina as your leader. His leader skill gives your entire squad a 50% ATK and DEF boost for the first two turns. This doesn't stack with Muramasa's, so it's better to equip permanent stat boosting Spheres like Medulla Gem's and Sacred Jewel's. As his leader skill benefits your entire squad regardless of element, it's a good idea to just use your best units in a Lugina squad.

If you don't have Lugina either, then sticking to the original method of building a squad to utilize the +50% ATK leader skill is your best bet. This can either be a mono element squad or a rainbow squad that uses one of the rainbow leaders (Michele, Zelban, Lodin, Tiara etc).

When building mono element squad's, most people try to build either a Dark or a Light element squad because their only weakness is also their strength. The other four elements all have a vulnerability, while Light and Dark's weaknesses pretty much cancel one another out. That being said, there's nothing wrong with building a mono elemental team for one of the other elements like Fire or Water, just try to watch your opponents leader when entering the Arena as this will give you an idea of what the primary element for their squad is.

Regarding unit's typing, I'd always aim for units with either high HP or high ATK. This makes Anima, Breaker and Lord types the best in the Arena. Lord units stats raise evenly as you level, Anima's HP is increased while REC is decreased and Breaker's attack is increased while DEF is reduced.

During the early Arena ranks, Muramasa is probably the best Sphere to equip to your units. It gives a +50% ATK boost for the first two turns. As you progress through the ranks and get more Spheres, I'd recommend using Medulla Gem's, Sacred Jewel's or Angelic Foil's.

The Official Albion Online Newbie Guide

$
0
0
Written in this page is an official beginners guide on Albion Online. This guide was made by the developer themselves to make it easier for new players to familiarize the game.

Note: You may need to click the link of each item to redirect you into a page which tackles the item in details.

The main Interface
  • User Interface
  • Chat Interface
  • Crafting Interface
  • Marketplace Interface

Guild & Alliance UI
  • Guild related interfaces
  • Alliance related interfaces
  • Guild vs Guild related interfaces

General game play guides
  • Gathering
  • World & Region Maps - Finding your way in Albion Online
  • Dungeons - A good source of Silver & Fame
  • Item Tiers, Durability & Quality
  • Real estates
  • Building, Housing & Furniture Guide
  • Finding a guild
  • Destiny Board & Mastery Levels
  • Mounts
  • Death & Resurrection
  • The Mail System

Territories, Player cities And Castles
  • An introduction to Guild V Guild Mechanics
  • Territories & Territorial Warfare
  • Player Cities & Player City Warfare
  • Castles

Albion Online: The Main Interface

$
0
0
User Interface

Main UI:
Inventory UI:
Chat Interface:

Current chat channels are:
Global - /O - A global chat view able by everyone everywhere.
Guild - /G - Guild chat will be seen by every member of your guild (if you are part of one)
Alliance - /A - Alliance chat messages will be seen by every member of every guild in your alliance (if you are part of one)
Local - /L - Local chat will be seen by everyone in your current region
Whisper - /w Playername - Private messages
Say - /S - A local chat which will only be seen by people nearby you.
Emote - /E - The emote channel, functions the same as the 'Say' channel.
System - System message
Take damage - Damage received
Give Damage - Damage dealt
Kill Player - Players killed
Heal Player - Players healed

Crafting Interface:


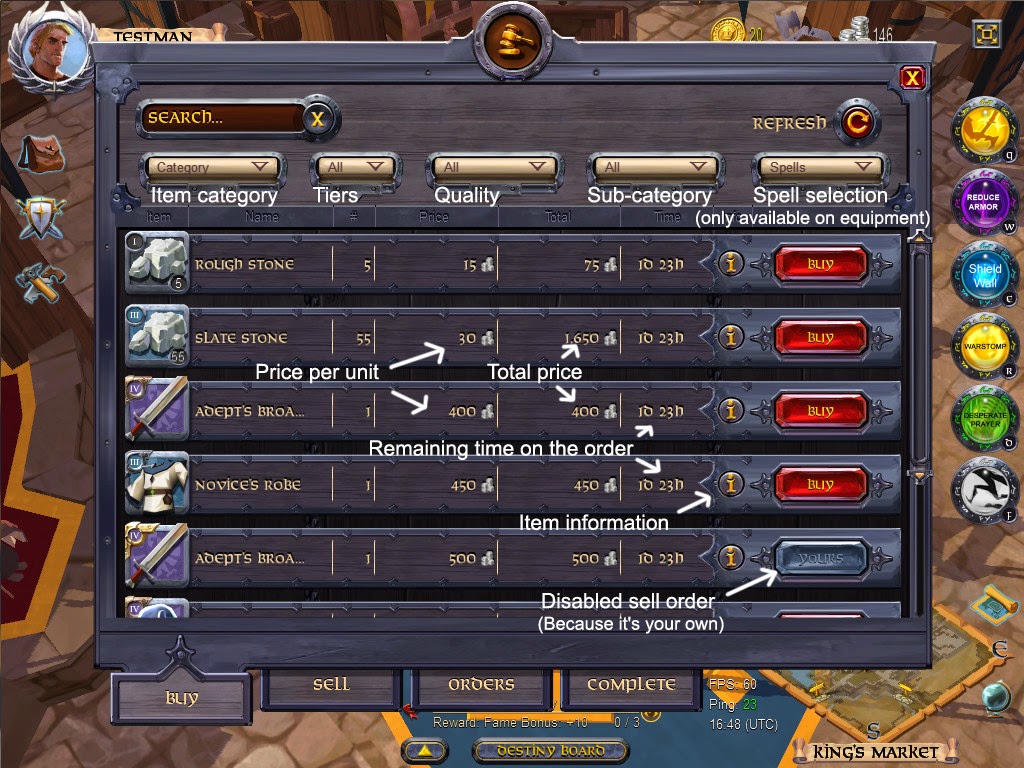
Marketplace Interface 
The marketplace is divided into 4 different screens: Buy, Sell, Orders and Complete.

Buy

Sell
The Sell Order screen essentially shows what you have in your inventory and if you are able to sell it.

Orders


Complete

Skype Translator- Bridging the Language Barrier

$
0
0
For more than a decade, Skype has been breaking down geographical barriers to make every day audio and video communications possible. As we enter an era in which computing experiences need to be more personal, Skype has looked at ways to help communities create stronger connections and be more productive. Using innovations from Microsoft Research, Skype is now removing another barrier to make it possible for people to communicate irrespective of what language they speak.

Today, we are excited to announce the first phase of the Skype Translator preview program. The preview program will kick-off with two spoken languages, Spanish and English, and 40+ instant messaging languages will be available to Skype customers who have signed-up via the Skype Translator sign-up page and are using Windows 8.1 on the desktop or device.

Skype brings people together to make progress on what matters to them. Skype Translator will open up endless possibilities for people around the world to connect, communicate and collaborate; people will no longer be hindered by geography and language.
The team asked two schools to try Skype Translator – Peterson School in Mexico City, and Stafford Elementary School in Tacoma, USA – playing a game of ‘Mystery Skype’ in which the children ask questions to determine the location of the other school. One classroom of children speaking Spanish and the other speaking English, Skype Translator removed this language barrier and enabled them to communicate – the video shows their wonderful reactions.

Skype Translator is a great example of the benefit of Microsoft’s investment in research. They have invested in speech recognition, automatic translation and machine learning technologies for more than a decade, and now they’re emerging as important components in this more personal computing era. Skype Translator is the most recent and visible example.

Skype Translator relies on machine learning, which means that the more the technology is used, the smarter it gets. We are starting with English and Spanish, and as more people use the Skype Translator preview with these languages, the quality will continually improve. We also need your help to expedite new language releases. So make sure you sign up, let your language preferences be known and get involved!

source: Skype

Brave Frontier Guide: All You Need to Know About Karl

$
0
0
Here's a guide written by Eiris about all the things you need to know about Karl in the game Brave Frontier on iOs and Android devices.

FAQs About Karl

1. Where is the battle?
  • The battle is going to be in Imperial Capital Randall in a building that hasn't opened for us yet. It will cost 50 energy and it is an unlimited event. You can get Karl anytime, so don't feel pressured.
2. What type is Karl?
  • Karl is a water type. He will also use an earth attack and lightning attack on single enemies as the battle gets closer to the end.
3. How does the battle work?
  • You can take three teams against Karl. Each of these teams must consist of different units.
  • Your three teams cannot exceed your total unit cost multiplied by two. For example, if your unit cost is 48, then you cannot go over 96 using all three of your squads. Choose wisely.
  • When a unit dies, it dies for good in this battle. You cannot use that unit again in a different squad.
  • You can bring one set of items. If you run out of items, then that's it.
  • You can bring three friends, one for each squad.
4. What will happen in the battle?
  • From the video below, he does a Water AoE BB every 5 turns, so guard accordingly.
  • When Karl reaches below 50% HP, he regenerates into an even stronger form and regains all of his HP back.
  • In his second form, he does a super powerful Water BB at 50% HP, so leave your best team for last. (@Box)
  • After his massive BB in his 2nd form, his regular Water BB is random from there on out.
  • At 75% HP loss of his second form, he buffs himself with ATT up/DEF down for 3 turns. (@Cloud)
  • His earth attack inflicts weaken and his lightning attack inflicts paralysis. So, be sure to bring a Twins friend.
  • Karl can be injured.
  • You can poison Karl.
  • Towards the end of his second form, he will start healing himself. He gets a DEF/Healing buff at around 10% HP and heals about 7,000 HP per turn. @Josh
5. What is Karl's Leader Skill?
  • He can refill the BB gauge every turn.
  • He refills it by 5 BC at 4 and by 7 BC at 5. (@BigMarks)
  • 5. Is it 100% guaranteed that I will get Karl?
  • Yes. If you beat him, he is yours. He will be given as a Lord type.
  • You can only acquire one Karl.
6. Can I gem during this event?
  • No, you can't.
7. Is there any way to see a video of the event?
  • Yes! And you can see it below.

Brave Frontier Free Farmable Units [High Drop Rates]

$
0
0

The majority of units that drop in the map are pretty useless, and you won't find them good for anything other than leveling up your Rare/Honour Summoned units or selling them for Zel.

Maps in St. Lamia do have a chance of dropping some pretty powerful units that can be evolved into 4 star forms (and later 5 forms when the update comes).

The encounter rate for these units is very low and the drop rate is even lower, but you will eventually capture the unit you're after if you keep trying.

Below is a list containing the unit name and the map they can be encountered/captured on.

Dragon Nest Will Have a Mobile Game Next Year

$
0
0
At G-Star 2014 Actoz Soft unveiled its new fighting game DragonNest Labyrinth, an adaptation of MMORPG Dragon Nest, which at present is in test phase. And Shanda Games China has been are granted the agency. Though no demo version was available for visitors at G-Star 2014, Actoz Soft director Yongjun Bae revealed some information about DragonNest Labyrinth.

As a mobile RPG, DragonNest Labyrinth carries the typical features of Dragon Nest that developed by EYEDENTITY GAMES. According to the feedbacks of closed beta, the game will be launched in Korea during April to May 2015.

As to the content, DragonNest Labyrinth shares the same world as Dragon Nest and has an interesting story either. Lots of familiar NPCs and many environments in client Dragon Nest will make appearances on mobile version, an overwhelming sense of familiarity will undoubtedly give experienced player and beginner a wonderful time.

More news about Dragon Nest is coming, please stay tuned! Enjoy more screenshots below:


source: mmosite.com

The PVP Master Dark Valkyrie Build Guide on Kritika [iOs/Android]

$
0
0
Here's a guide written by Xvenic on how to build your Dark Valkyrie towards PvP in the game Kritika on iOs and Android Devices.

For reader, you could say Dark Valkyrie is pale compare to CA, CrA, SM in term of many things
She's good cause many of her skill got big radius, 
but then again she still lose to CA in term of Arena, and lose to SM in term of monsterwave ,
and now with CrA coming DV kinda left behind

Now, I've been trying many combination of gem built, and skill combination and it still kinda hard for her to compete.

Here's a tips to balancing the DV in Arena

Skill Build
1st slot - Fatal Delight
2nd slot - Death Trap
3rd slot - Heaven bound
4th slot - Siren's Snare

Why this skill? For DV with Fatal Delight, Hit Count top the Damage output as Fatal Delight give 100% increase of Critical Attack. 

Fatal Delight
100% Crit Attack Increase? nothing more to add.. sensation delighttt

Death Trap
Usually I say death trap is a bad skill, AoE's small, High Cooldown, in term of fighting episode bosses also useless.
Then again in PvP after death trap summoned, it stays there while DV can keep attacking, unlike many of other skill.

Heaven Bound
Why default skill? in term of spam-able skill for DV there's only three - Heaven Bound, Vicious Split, Vixen Ambush with 10s CD.. if by Any chances the fight goes bellow 15s then only this three skill can be used twice. As for why Heaven Bound between this three? Like I said hit count over damage output in DV

Siren's Snare
To be exact, you can also use whiplash, but from personal opinion siren's snare hit more than whiplash, but whiplash got bigger AoE. then again 1v1 what's the use of this AoE? lol

What's the Build?
DV like I said need to crit as much as she can, but in the process of that she need to tank all the damage, so Defensive built and Crit Rate increase built are needed

As Far as Gem Built, using 2x Onyx is a must, where as equipment goes, crit rate / def are preferable

Misc: MASTER Skill?
Hate to say this, but master skill that could really helpful for Dv is Cooldown reduce... but it's kinda useless for other char especially our new char CrA.. 

Guide's work at least for me, so if there's a different opinion i'm sorry to hear that 

IGN: Xvenic
Server: SEA
Avatar: (Is it Set, Wings, Weapon or Body, since the thread doesn't explain much, i'll assume its a set )

Wing of Destructions Lv.30 Black + Valkamorts Luxurious blade + blade assassin vortex for Crimson Assassin

PS: by any chance it's not a set but pick one, then the priority would be wing, blade, body 

Kritika Cat Acrobat Guide- Power Leveling and Maximizing Resources

$
0
0
Here's a guide on Kritika [iOs/Android] which tackles on how to power level and maximize resources for Cat Acrobat character in the game.

Mission & Objectives : 
To Maximize your resources while leveling up.
To Gain a fair amount of Gold of refining, Combining, and ETC.
To Level Up quickly while making money.
To acquire good items / equips.

-------------------------------------------------------------------------------

Introduction
---------------------------------------------------------------------------------------------------------------------------------
The Cat Acrobat is Quick and agile, finishes her enemies with fast and deadly strikes, She uses two-handed daggers to make unassailable combos.

Power Leveling
----------------------------------------------------------------------------------------------------------------------------------
At some point, you will realize that you cannot finish a stage because you have low CP , even if your level is high. Because your gears are not enough (epic and legendary items not properly leveled up) or not enough epic or legendary items.

The best way to get past this is to farm the previous stages as much as possible. When farming this stages don't use the x2 stamina or x3 stamina because what you're farming here is sapphires for MW badges and gea 


Remember to be heart efficient, we all want some extra sapphires for refining and enhancing our items, you need to select a stage where you can get extra legendary drops, extra sapphire drop rate and more money.

----------------------------------------------------------------------------------------------------------------------------------

Maximizing Your Time Getting Resources While Having Fun!
----------------------------------------------------------------------------------------------------------------------------------
Earning Karat

25 karat from daily quests

Don't forget to do your daily quest not only you get EXP, gears, sapphires in a stage but you can also get other items while doing your daily quest and if you completed you daily quest you will be awarded with 25 karats for your hard work. Good Job!
-------------------------------------------------------------------------------

55 (possible) karat from Versus mode

Bored?! why not go to Battle and select Versus mode. While you pummel your opponents to the ground you also get 1 karat for every win and it goes up.
-------------------------------------------------------------------------------

1 Karat for each Brawler badge consumed that results in a win.

Play in Arena. 1 Brawler badge can result to 1 karat each but take note you have to win.
-------------------------------------------------------------------------------

Monster Wave

When you need money, Don't worry the bank is always open, i mean Monster Wave but you need 1 sapphire to enter. Monster Wave is the fastest way to Get Money.
-------------------------------------------------------------------------------

Tower of Tribulation

You can get inherit materials, Key gems, Gold here. But i don't recommend this to newbies or players with low CP and not enough equips, because the Tower cost 3 sapphire each that is equal to MW(Monster Wave) x3.

-------------------------------------------------------------------------------

Getting Good Items!
----------------------------------------------------------------------------------------------------------------------------------
In Getting Good Items there are two possible options:

1. Spending Cash
Not only you spend cash on getting Strong but you can also help the server in many ways. By spending cash you can get Avatars for you character that boost up your CP(Combat Power), This Avatars have stats like additional Attack, Defense, and HP also by spending real Money you can level up Fast and get good items from the start.

2. Grinding, Farming, Crafting, Opening Box and Pure Hard WORK!.
Not everyone can spend real money. This the other option in getting good items, basically from the title itself you know what it means. Grinding, Farming, Crafting , Opening Box is Hard Work. well we all know that there is always a Reward in Working hard also don't waste the karats you obtain in Daily Quest, Arena, Versus Mode, ETC. in Opening up the premium chest because even if does contain a legendary item of you choice it still contains Gold enhancing material so don't be blinded by the items it contains. spend Karats on the things that are unobtainable in any other way. There is actually quite a lot that can be done without karats. Might as well save your karats for the things that really matter.
----------------------------------------------------------------------------------------------------------------------------------
END OF GUIDE. THANK YOU FOR READING
----------------------------------------------------------------------------------------------------------------------------------

The Sexiest Morrigan Cosplay [For Ages 18+]

$
0
0
Who is Morrigan?

Morrigan Aensland (Japanese: モリガン・アーンスランド Hepburn: Morigan Ānsurando?) is a video game character from the Darkstalkers series of fighting games by Capcom. Morrigan is a succubus and a powerful princess of the demon realm Makai, who is very vain and lives for little more than the excitement of battle, but slowly takes up more of her royal responsibilities seriously despite her obsessive fascination of the human world.

Morrigan was introduced in 1994's Darkstalkers: The Night Warriors and has since appeared in every game in the series and in various related media, as well as in multiple video games outside the Darkstalkers game series. She is the central character of the extended Darkstalkers franchise and is widely perceived as one of the most iconic Capcom characters as well as one of the most popular female characters in all gaming.

Now check out some screenshots of the most sexy Morrigan Cosplay below.


Dragon Age: Inquisition Rift Mage Build Guide

$
0
0
Here's a guide on how to build a Rift Mage class in Dragon Age: Inquisition which was written by KineticGTR.

Dragon Age Inquisition - Class Build - Rift Mage Guide!

Check out the video and the quick written guide below!
Weakening attacks, pulling and pushing, knocking down and stunning, buffing party's attacks, and laying waste to groups of enemies. That's what the Rift Mage brings to a fight!

This guide focuses on how to build your class using a combination of standard skills from the Inferno, Storm and Winter skill trees, and new active and passives from the Rift Mage specialization.

This build has been put together from a fresh respec. With about 15-20 points to place, you can put together a very powerful Rift Mage that has everything it needs to dominate on the battlefield.

Storm
Chain Lightning / Stormbringer / Gathering Storm / Static Cage / Lightning Cage (Skill upgrade)
Note About Storm Skills: A few people in the comments have praised Energy Barrage as a great skill to have, particularly strong against single targets. Since it's right there at the top, it's an easy skill to pick up, and I support that! So take Chain Lightning or Energy Barrage on your adventures :)

Inferno
Immolate or Flashfire (unused either way) / Flashpoint / Pyromancer / Clean Burn (optional) / Chaotic Focus (optional) / Fire Mine / Searing Glyph (Skill upgrade)

Winter
Winter's Grasp / Winter Stillness
Rift Mage (Specialization)
Take everything! All the active skills, their upgrades, passives, and of course, Firestorm!

Gameplay Tips
As mentioned in the video, the core feature of playing a Rift Mage is weakening your enemies. All three skills, when upgraded, weaken enemies for 10 seconds. All four passive abilities in the Rift Mage specialization benefit you and your party from this debuff, so keep this active as often as possible!

Benefits of weakened enemies include: Less damage from them, increased mana regeneration, increased negative status effect duration, and our attack damage is increased! Not to mention the other awesome effects of the skills themselves that combo with other abilities!

This build has a lot of fun combos you can pull. Including the barrier bonus damage with Chaotic focus. Either by getting the Barrier skill ourselves, or better yet, have another mage in the party that casts Barrier for us. Then nuke 'em with a Fire Mine!

Pull of the Abyss and...just about anything is great! I like to combo Static Cage with it while me and the other party members are in a frenzy of attacks!

Winter's Grasp combined with Stonefist for a shatter combo!
Static Cage and Chain Lightning. Even more damage if you upgraded Chain Lightning!

Combine this and Firestorm, and even the biggest group fights will end in a very short time!

You should be constantly casting, even basic spells. Thanks to our passives like Gathering Storm, we have increased cooldown reduction. But try not to move around too much though, otherwise you negate the bonus effect of Winter Stillness, that reduces skill cooldown and mana generation bonus.

Keep an eye on your screen for when you critical hit an enemy. Your next skill will have no cooldown! This is especially great if you can make back-to-back Fire Mines!

This is just an example, and by no means an "Optimal build". Far from it probably. But thanks to the skill choice freedom, and fantastic balance in all of the basic skill trees, just about any combination of skills with Rift Mage abilities is going to make a fun build to play. I highly recommend taking the Rift Mage abilities, and then create your own combination of active and passive skills.

Dragon Age Inquisition Ultimate Tank Champion Warrior Build Guide

$
0
0
Here's an Ultimate Champion Warrior Build Guide on Dragon Age Inquisition written by KineticGtR.

Dragon Age Inquisition - Class Build - Ultimate Tank Champion Warrior Guide!

Check out the video and the written guide below! 

Looking for the Ultimate Tank build? You got it! The first one to fight, the last one standing. The Champion specialization in Dragon Age Inquisition takes more punishment than any other. Sure other specializations can tank, but nobody does it better than the Champ!

This guide focuses on how to build your class using a combination of standard skills from the Vanguard, Battlemaster skill trees, and new active and passives from the Champion specialization tree for aSword and Shield Warrior.
This build has been put together from a fresh respec. With about 15-20 points to place, you can put together a very powerful Assassin that has everything it needs to dominate on the battlefield.

EDIT: Some people have pointed out the lack of Shield Wall as a negative. Shield Wall is a great skill, but unnecessary except for a couple situations, including dragon fights. I'm not saying don't take it. In fact it's a great skill to take and could replace something like Grappling Chain for such fights.

Vanguard
Warcry / Charging Bull / Gore and Trample (Skill upgrade) / Untouchable Defense / It'll Cost You / Unbowed / Still Standing (Skill upgrade)

Battlemaster
Grappling Chain / Hamstring / Deep Reserves / War Horn / Break Their Spirit (Skill upgrade)

Champion (Specialization)
Line in the Sand / Bulwark / Resilience / Adamant / Unyielding / To the Death / En Garde (Skill upgrade) / Walking Fortress / Siege-Breaker (Skill upgrade) / Counterstrike

Other Skills worthy of the Champ

Weapon and Shield
Payback Strike - This ability is a great "get your ass up!" skill when getting knocked around by enemies. 

Unbowed also seems to help recover from knockdowns as well, but Payback Strike adds some pain to that.

Shield Wall - Each block adds to your guard at the cost of stamina while holding this skill.

Shield Bash and its upgrade, Ring the Bell - A fantastic skill for breaking enemies with too much guard. Not many enemies require this much guard breaking, but it just might be worth respecing JUST to bring this to certain fights.

Vanguard
Warcry upgrade, Call to Arms adds 200% armor bonus for 10 seconds.
Cutting Words - Taunted enemies receive an additional 20% damage from party members attacks.

Bodyguard and it's upgrade Not Today - you take 50% of the damage of the damage meant for your allies, and then resist half that damage to you!

Gameplay is fairly simple. Charging Bull your enemy(s) and Warcry. Alternatively, Grappling Chain, Charging bull, then Warcry. Do you need more Guard? Unbowed. Interrupt/Destroy enemy's guard? War Horn. Someone needs to die quick? To the Death. Getting pounded? Walking Fortress. See a straggler or someone harassing your Mage? Grappling Chain. Out of options and shit is getting out of control? Counterstrike!

With only an 8 second cooldown, Charging Bull as much as possible! Rush your enemies, knocking down and interrupt them, escape damage, generate guard - your next skill will cost no stamina!

Your main goal as a Champion is to maintain aggro, first and foremost. Second is to make sure you can take that aggro without dying. All of these skills can help you in one way or another to do exactly that. Even against the toughest opponents, nothing should kill you! Sure it'll take awhile for you to kill your enemy, especially if you're like me, and still using some crappy Tier 2 weapon....but it'll happen! Nothing is tougher than a Champion in Dragon Age Inquisition! NOTHING!
Viewing all 3220 articles
Browse latest View live