Quantcast
Channel: Web Junkies
Viewing all 3220 articles
Browse latest View live

Dragon Age Inquisition Pyro (Inferno) Necromancer Build Guide [Endless Pet Trick]

$
0
0
Below is a guide on how to build a Pyro Necromancer in Dragon Age Inquisition with Endless Pet trick written by KineticGTR.

Dragon Age Inquisition - Class Build - ENDLESS PETS! Pyro Necromancer Guide!

Check out the video and the written guide below! 


How to get Endless Pets! 


Necromancer is lacking the usual excitement a Necro offers usually in RPGs, but that doesn't mean it can't still be fun. With the right skill combos, Necro can still satisfy with damage of time spells, risen enemies fighting as your ally, and exploding corpses!

This guide focuses on how to build your class using a combination of standard skills from the Inferno, Winter and Spirit skill trees, and new active and passives from the

Necromancer specialization.
This build has been put together from a fresh respec. With about 15-20 points to place, you can put together a very powerful Necromancer that has everything it needs to dominate on the battlefield.

Inferno
Immolate / Wildfire (Skill Upgrade) / Flashpoint / Pyromancer / Clean Burn / Chaotic Focus / Wall of Fire / Fire Mine / Searing Glyph (Skill upgrade)

Winter
Fade Step / Winter Stillness
Spirit
Barrier / Peaceful Aura / Guardian Spirit

Necromancer
Horror (Unused) / Blinding Terror / Simulacrum / Walking Bomb / Death Siphon / Power of the Dead / Spirit Mark / Lingering Mark (Skill upgrade) / Haste

Gameplay Tips
As mentioned in the video, I'm using the Chaotic Focus, Barrier, and Fire Mine trick to make some powerful aoe explosions. Immolate can also be useful when it's better to have an instant blast rather than a delayed. And Wall of Fire for when you want a combination of burning and panic for a single or multiple enemies.

Flashpoint is one of the most important things to keep in mind. Whenever you score a critical hit, your next spell cast has no cooldown. This comes in handy both offensively and defensively, allowing you to for example cast back to back Fire Mines or Barrier to divided party members.
The Necromancer specialization also adds damage over time effects from Spirit Mark and Walking Bomb.

Combined with the burning from the Inferno skills, a single enemies health can drain very fast! Ideally, you want to have enemies draining from these effects as much as possible. And just as important, is to time the spells that they are still active as an enemy dies, giving you a minion and/or exploding corpse to damage nearby enemies!

Some people I've noticed disregard the benefits of Winter Stillness. I however have noticed a considerable drop in my casting speed without it. The Mana regen is very noticeable and even if interrupted, only takes a couple of seconds to reactivate.

And of course, we have the endless pets trick! It's real simple. Have a spirit minion still active when a fight is over. Save the game, and then, load that save. Your spirit minion, is now a living minion! Repeat this to create a potentially endless amount of living pets!

Results may vary. I found the best enemies to do this with are non-humanoid type. For example Great Bears and Giants. Check out this quick video for a demonstration of this trick:


One last word of advice, try not to go full force at the beginning in fights. Cast a little and then let the tank take aggro or you'll likely find yourself quickly playing defensively rather than dpsing.

Dragon Age Inquisition Tempest Archer Build Guide

$
0
0
Below is a guide on Dragon Age Inquisition which tackles on how to build a Tempest Archer in the game. This guide is written by KineticGTR.

Dragon Age Inquisition - Class Build - Tempest Archer Guide!

Check out the video and the quick written guide below! 

Tempest flasks combined with Archer skills, Stealth Skills, and a few drops of poison. This build satisfies the desire to pew-pew and shoryuken your way through mobs. And who could pass up that insane Fire Flask + Thousand Cuts combo huh? It's like bar-b-queing cheese. Shit melts real quick!

This guide focuses on how to build your class using a combination of standard skills from the Archery, Subterfuge, and Sabotage skill trees, and new active and passives from the Tempest specialization.

This build has been put together from a fresh respec. With about 15-20 points to place, you can put together a very powerful Tempest Archer that has everything it needs to dominate on the battlefield.

Archery
First Blood / Explosive Shot / Chain Reaction / Pincushion / Full Draw
Sabotage
Poisoned Weapons / Infected Wounds

Subterfuge
Stealth / Lost in the Shadows / Evasion / Evade / Ambush / Shadow Strike / Quick Blade

Tempest
Flask of Fire / Unquenchable Flames / Fury of the Storm / Thousand Cuts / Killer's Alchemy / Flask of Lightning / Quicksilver

Gameplay Tips
Stealth (30 seconds) Poisoned Weapons (10 seconds) Full Draw for the start of a battle, particularly against squishys and they're likely dead. When the backup comes charging, try to take advantage of the remaining time on Poisoned Weapons, and blast them with Explosive Shot to damage and poison the group!

From here, you can either down a Flask of Lightning and continue to pew pew from range, or start moving toward the group, Stealth and Shadow Strike to deal damage and lower cooldowns.

For big groups that just need to die real quick, like 2nd waves of Rift spawns, down the Flask of Fire and immediately activate your focus ability, Thousand Cuts. Thank the maker, you just destroyed your enemies, and it didn't cost you a single tick of your focus power!

Beware: activating anything between Flask of Fire and Thousand Cuts may result in you spending your focus!
Another fun combo with Flask of Fire, more for the lulz than anything, Flask of Fire, and then beat the crap out of your target(s) with Shadow Strike repeatedly for the duration of the flask (avg 5 seconds)

Flask of Lightning enables you to basically speed up your attacks by nearly 100% for the next 7 seconds! Fill em full of arrows with basic attacks, or perform combos while your enemies are frozen in time!
Poisoned Weapons + just about any skill is the preferred way to make use of this skill. Poisoned Weapons and just basic attacks? A waste most of the time. Combine it with Full Draw, Explosive Shot, Shadow Strike, or cast it just before the Flask of Fire+Thousand Cuts combo to deal even greater damage!

Keep firing! Pincushion is steady increasing your dps!

Feel free to unlock other active and passives from the Archery and Tempest trees. Keep in mind however, that you can only have 8 skills equipped!

Dragon Age Inquisition Guides - Crafting Weapons, Armor and Upgrades

$
0
0
This Dragon Age Inquisition guides on Crafting Weapons, Armor and Upgrades is brought to us by KineticGTR

The scope of the guide is from basics to advanced crafting, how to acquire rare schematics, farming materials, and also how to put it all together to make your perfect weapons, armor, and upgrades. Now check it out below.

SimCity BuildIt Guide: Win Without Spending Real Money

$
0
0
Below you will see a guide written by Eric Ford from toucharcade.com which will help you on how to play SimCity BuildIt like a pro without spending real money on it.

Have a Plan For Your Inventory

You might think it’s a good idea to keep a healthy supply of every item just in case. However, I think a better idea is to know exactly what you’re looking for and to play to the requirements, not to stock. If you have a bunch of residences that are looking for a certain material, go crazy on stockpiling those as at least you know you’ll be able to quickly in and spend those on actual upgrades once they are ready to go.

The Global Trade HQ Is the Best Way to Sell Excess

Once you unlock the Trade HQ, I recommend using it to sell your excess rare parts (i.e. expansion and inventory materials). The game gives you the opportunity to ‘advertise’ an item every few minutes, which means it’ll have a high chance of popping up when a player accesses their HQ. I’d suggest not only waiting until a free advertise is available (you can advertise multiple things at the same time for premium currency but I don’t think it’s worth it) but it’s probably a good idea to just sell your item at the maximum price available as someone will inevitably buy it even at that high of a price. I wouldn’t necessarily use the HQ to sell common materials, but if you manage to stockpile a good amount you can probably get a pretty decent premium simply because you’re selling a stockpile.

Make Efficient Use of Public Buildings 

When it comes to public buildings, where you place them in relation to your residential buildings becomes an important part of the game. Ideally you want one building to touch as many residences as possible in order to maximize your investment since public buildings can cost a pretty penny. During the early game, parks and fire departments are the big public businesses to pay attention to so I’d suggest early zones that have a road above three residences in a row, two residences above the road with a park and fire department in the middle of them. All five of the residential zones get access to the public buildings and road and you’re left with only a few empty spots. Obviously as you start to unlock police and specialty buildings, you’ll need to rearrange but in the beginning this is probably one of the better ways to organize your buildings.

Don’t Ever Use SimCash for Timers

This is a pretty standard tip for any timer based freemium game but it’s worth repeating: don’t ever spend your premium currency to speed up a timer. It’s almost never worth it as you’ll always get the benefit of what you’re speeding up with just a little more time. Most freemium games love tempting you with spending premium currency to finish a timer because it appeals to the instant gratification desire in most people. Just don’t listen to it and, if all else fails, go play another game until the desired timers are finished.

Don’t Overextend at the Onset

When you first start playing SimCity BuildIt, you might think you’ve been provided a decent amount of coin to start. This might feel particularly so as you start upgrading your residences and earning even more. However, I’d suggest that you really watch your spending at the onset, and choose to only focus on a few residences at the onset. As you start leveling up, you quickly unlock new requirements, such as water and sewage, that require significant capital in order to get them up and running. If you don’t have all or most of that money saved up, it’s going to take awhile to purchase them and give your buildings the ability to upgrade.
Extra Slots For Your Stores Can Go A Long Way

I’d recommend picking up at least the first additional slot for each of the stores you build. This is important for a few different reasons. First, unlike factories, your stores don’t build items concurrently which means it’s going to take a lot longer to build the materials you want. Second, the more slots you have, the less chance you have of having an empty store running if you haven’t been able to check into the game for awhile. Third, the more items you can queue up, the less items end up in your inventory, which means you can build and collect other things while your store items are in the queue. Finally, the first slot extra slot only costs four SimCash, which is a steal in my opinion.

Happy Citizens Mean More Taxes

Once you build the City Hall early on, you can start collecting taxes on a daily basis. An obvious tip is to make sure you log in at least once a day so you can collect your taxes and restart the timer (especially since coins are so important in this game). Another, less obvious step is to mind the relationship between happiness and taxes. The happier your citizens, the higher the taxes they pay, which is a proportion of the the citizens you have. Happiness is linked to making sure all citizens have access to parks, essential services, be free from pollution, and so on. This goes back to my suggestion on not overextending; make sure all the citizens you have currently are 100% happy before thinking of expanding.

Higher Capacity Factories Are Great, But Don’t Go Overboard

Once you unlock higher end factories you can bulldoze your old ones and build the new higher end factories for a price. The benefit to better factories is being able to construct more materials simultaneously. The downside is the obvious cost of coins. It’s a great idea to upgrade at least one or two to basic factories, but I wouldn’t bother moving on to mass production or higher unless you really have the spare capital (meaning don’t waste your life savings on it) and you know you have the inventory space to handle the increased production.

Build On Inventory in the Short Term, Land Expansion in the Long Term

Inventory space is incredibly important when you’re just starting out. Even when you get to the point where you can buy land expansion, you’ll probably still have a decent amount of space before you really need to start thinking of expanding. If you have lots of expansion materials lying around, I’d suggest slowly selling them through the Trade HQ (using the free advertising as needed) and using the coin towards purchasing inventory upgrades. Get to around 70 or 80 slots before pulling a 180 and then selling inventory materials to earn coin for expansion materials.

Comprehensive Knight Enchanter Build Guide on Dragon Age Inquisition

$
0
0
In this page you will read/watch an in-depth guide for Knight Enchanter on Dragon Age Inquisition which was made by KineticGTR.

Dragon Age Inquisition - Class Build - Knight Enchanter - In-Depth Guide!
Check out the video and the short written guide below! 

In-depth look at what makes the Knight Enchanter, one of the most powerful specialization classes in Dragon Age Inquisition. With this guide you'll get a clear look at the active and passive skills that combine to make a near unkillable mage that delivers pain by the truck load from melee range.

This guide focuses on how to build your class using a combination of standard skills from the Spirit, Lightning, and Fire skill trees, and new active and passives from the Knight Enchanter specialization tree for Mage. These builds can be used of course for your main character, but have also been designed to be just as viable for use with your AI teammates.

This build has been put together from a fresh respec. With about 15-20 points to place, you can put together a very powerful Knight Enchanter that has everything it needs to dominate on the battlefield.

Spirit

Barrier / Elegant Defense (Skill upgrade) / Guardian Spirit / Peaceful Aura / Dispel / Revival / Life Ward (Skill upgrade)

Knight Enchanter

Spirit Blade / Combat Clarity / Fade Shield / Knight-Protector Fade Cloak / Decloaking Blast (Skill upgrade) / Veiled Riposte / Resurgence

Please note: To make this build work, you will "need" everything shown from the Knight Enchanter and Spirit trees. However, I encourage you to use the rest of your points to unlock other helpful and fun active and passive skills from other trees. 

Inferno

Immolate / Flashpoint / Clean Burn

Storm

Energy Barrage / Conductive Current

Once you've unlocked the Knight Enchanter class and have roughly 15 points to place, focus on unlocking skills from both Spirit and Knight Enchanter. Barrier, Guardian Spirit, Peaceful Aura, Dispel, and Rejuvenating Barrier come first in Spirit. In Knight Enchanter, quickly go for Spirit Blade, Combat Clarity, Fade Shield, Knight-Protector, Fade Cloak, Veiled Riposte, and then Resurgence. That's 12 points.

Several skill upgrades are also key to unlocking more potential from skills such as Decloaking Blast for Fade Cloak, Elegant Defense for Barrier, Life Ward for Revival, Transmute Magic for Dispel, and Defending Blade for Spirit Blade. Those are listed from what I consider most important, to moderately important. Including the previous skills, that's now 17 points spent.

From here, it's all up to you. I like adding some ranged so I'm not dependent only on fighting from close up. Plus it never hurts to have some elemental attacks that some enemies are weak to like Fire, Lightning and Ice. 

Energy Barrage is one of the flashiest and effective spells with a decent cost and farily short cooldown, and also leads to a great passive, Conductive Current which increases your damage based on how much mana you're missing. Since we're fighting up close, Static Charge isn't a bad passive to take either.

From Inferno, Immolate works well to attack from afar and while you're knocking your enemies around with Decloaking Blast. This opens up more cooldown reduction possibilities to Flashpoint and Clean Burn.

The Winter tree also offers some more fun options. Winter's Grasp is always a great skill to take and locks down Rage Demons very well. 

How to Get All The Different Endings in 'Papers, Please'

$
0
0
Here is a guide on How to Get All The Different Endings in 'Papers, Please' on iOs written by Andrew Fetz from toucharcade.com.

Death

The 4 unlisted endings all involve a direct trip to the after life. Failing to disarm a bomb, touching poisonous powder, getting a grenade lobbed at you, and allowing your hut to be blown up will all get you killed. Days you can be ended are 15, 20, 21, and 31.

General Imprisonment

The easiest way to lose the game is to fail to process fast enough or accurately enough and go into debt. This is a pretty bad ending. Other reasons you can go to jail include failure to bend the rules for your supervisor, being a little too honest with a government agent investigating your ties to the rebel group EZIC, and tranquilizing civilians or rebels. You can be sent to prison at absolutely any time.

Poor Parenting

You will be immediately fired from your job if at any point your family all dies. Most of the time this is due to not being able to afford your bills at the end of each day. The game will punish you for not being very efficient and quick with your processing skills. Coming home after multiple days of being unable to afford heat, food, or medicine will result in the health of your family failing. If you cannot prove that you proliferate and care for your family, you'll be shown the door. Arstotzka is a land of prosperity after all.

Hit me with your Best Shot

Once you get weaponry available to you, You'll be expected to defend your booth from insurgents, terrorists and malcontents. Using your weaponry on others is a quick way to end the game. Depending on who you shoot, and with which gun, you will be either imprisoned or scheduled for execution. Your family usually gets questioned about their involvement. Is it too soon to make a water boarding joke?

Getting out of Dodge

If you can manage to get yourself and maybe your family members out of the country, you get one of these endings. You will have to illegally confiscate an ID and $25 for each family member you can manage to bring along. Hope you weren't emotionally attached to too many of them. Doing or not doing EZIC tasks has no impact on this win condition.

Being a Rebel

As the game progresses, you have the opportunity to complete tasks for the rebel group EZIC. If you can complete 4 or more of them, you will be able to trigger a coup d'etat. Be careful to not shoot your new brothers or you'll be left in the dust. You can actually stop the coup after orchestrating it by shooting the bomber squad as they approach the barricade. Just don't expect your current government to let you walk. It'll be jail for you if you end up foiling the plot you helped enact. Successful completion of the coup gives you one of the game's few good endings, a new Arstotzka!

Playing it Straight

If you ignore the rebels, put your head down and do your job, shoot the terrorists, and refuse to run to Obristan, you can unlock another of the few good endings with the unlock to the endless mode.

Each one of these endings plays into the overall theme of the game. 3 out of 24 possible endings that don't end in death, imprisonment or the loss of loved ones? That's grim. That's the old 80's communism propaganda I grew up with. With the propaganda and pixel graphic style, it's kind of a nostalgia overload. Now that we have established what endings are available, lets talk a little bit about how to get from point A to point B.

Watch for the Pitfalls

Poison powder, an failed bomb disarm, shooting someone you shouldn't shoot and incriminating yourself are all surefire ways to end your game prematurely. When in doubt, don't touch, don't talk and aim true. With the completely and utterly amazing save system, these one time obstacles can be pretty easily navigated just by loading up the day's save file again. Be aware that you won't be able to completely avoidable most of the time, but you'll at least be able to take it again from the start of the day.

Know the Rules

If you are serious about getting to one of the later endings, I suggest you either memorize a large amount of the rule book or print/write out bits of it. You won't have the time to casually leaf through multiple books of procedure and still make the money you need to keep your family alive and healthy. This is probably my only problem with the game and I realize that its not an easy fix to get the game to look just right, play just right and still have room for a bunch of words on screen all at the same time. If you are serious about beating the game and getting a good ending, memorize or use a peripheral. Probably the best thing to memorize is the nations and their issuing cities. It is always going to be relevant and if you dont have it memorized it means at least 2 or 3 page turns to get to the proper page in the rule book.

Leave Room for a Mulligan

I get it. You don't want to be a slave to the rules. It has been said that this is an Empathy game. I like to think of it more of as a psych evaluation. Maybe you will have empathy and maybe you won't, but the behavior you exhibit in game will tell you more about yourself than pretty much any other game out there. Did you bend the rules? Who did you bend them for and why? You almost feel like the game plants you into a psychiatrist chair and demands you answer for your failure to navigate the murky moral and ethical soup of Papers, Please. Be sure to give yourself enough leeway to throw the occasional mulligan and get cited without penalty. After you get dinged twice in one day, having a big heart will mean pain for your family. You monster.

Level 80 PVE/PVP/Hybrid Barbarian Skill Build in Dragon Nest [T4]

$
0
0
In this page you will learn some of the most preferred skill builds for Barbarian im Dragon Nest [T4]. 

Credits: This PVE/PVP/Hybrid Barbarian skill guide was written by Huwei from dnsea forum.

Pure PVE


Pure PVP
Note: Relieve is only 5/6 and not max sorry about that.

Hybrid (PVE/PVP)
More level 80 Dragon Nest guide will be posted in our blog later. So stay tuned!

Level 80 PVE/PVP/Hybrid Destroyer Skill Build in Dragon Nest [T4]

$
0
0
In this page you will learn some of the most preferred skill builds for Barbarian im Dragon Nest [T4]. 
Credits: This PVE/PVP/Hybrid Barbarian skill guide was written by Huwei from dnsea forum.

Hybrid

Pure PVE
Pure PVP
More level 80 dragon nest guide will be posted in our blog later. So stay tuned!

Dragon Nest MOBA Battlefield

$
0
0
On Dec.24th, Dragon Nest have just finished its latest update, and the MOBA battlefield finally released.

No matter if you're a MOBA expert, or knows little about MOBA, you must be wondering how the MOBA battlefield like in Dragon Nest. And today, we will introduce it to all of you.

Just like the traditional MOBA games, the system will match the other players randomly for you to make the team and start the battle. What worth mentioning is that 2 players can make a unit to start the matching. That means you can start the battle with your friend together, and you two will in the same team! When there're 12 gamers, the competition will start.

The decisive factor to the victory is the score you got. In the battlefield, there're various monsters shown up randomly. You can get the score simply by killing the monsters. The higher level of the monster you killed, the higher score you'll get. And killing some special monsters can even bring the buff to your team. Each monster shows up at different time, so it's important to remember the monster's shown time.

Of course, it's not easy to kill the monsters. If you got killed by the monster, you will lose 50 scores. And if you got killed by your opponent players, you will lose 30% of your score to the player who killed you.

Sometimes the strength gap between the 2 teams are too large. In that case the weaker team can surrender 5 minutes after the competition started. You only need to click on ESC, the "Surrender" button will show up, but it needs the agreement of 70% people in your team.

What if you drop off in the competition? Don't worry, when you drop off, you only need to login the game again and choose to back to the battlefield. But if you choose to give up the competition, you will be judged as escaping and be punished. The punishment will last for 10 minutes, during which all your attribute will be reduced by 30%, and can't apply to enter the battlefield. If someone in your team escaped from the competition, all the other members in this team can get the bonus. The bonus depends on the number of the player escaped.

What about the reward? In this battlefield, the reward depends on the result of the competition including Win, Lose and Draw. Besides these, players can even finish daily quest and weekly quest to get extra coins, which can be used to exchange some awesome items from the arena shop.

What's more, in this update, a new fishing mini-game has also be added. Meanwhile, some cool fashions and the Geraint have also been released.

How can such a big update without any event? With the Christmas coming, 6 events have been launched for all the gamers. During the event duration, you can get "The Battle Set" by winning a certain number of competition.

source: dn.mmosite.com

The Right Way to Play Skaarf in Vainglory [Advanced Guide]

$
0
0
Here is a guide on how to play Skaarf properly in Vainglory written by reaverfreed.

Preface
As a first mage in Vainglory, his popularity are not well established. Lots of player in the forum are dissapointed to bought him and called him too squishy. Many share the same voice with them...

...until you played enough match with him. If played well, he is a beast. Believe me. Just so you know, mastering him isn't easy. All of his skill require proper timing and pure skillshot. As cliche as it may seems, the only way to get better with him is to play often.

Abilities Breakdown

Fan the Flames (Heroic Perk)
Skaarf’s fire-based abilities light the target ablaze, burning enemies over time. Skaarf’s basic attacks and fire abilities will refresh the burn duration. Each of Skaarf’s basic attacks will also increase the damage of the burn. This fire does not burn turrets and deals reduced damage to Kraken.

Spitfire (Get at Level 1, 5, 10, 11 and 12)
Skaarf spits a fireball that deals crystal damage to the first enemy or creature in its path.

Goop (Get at Level 2, 3, 4, 7 and 8)
Skaarf hurls goop onto the target location. Enemies walking through the sticky substance are slowed. Skaarf’s fire abilities will set the goop ablaze with a burst of damage that extends slightly beyond the gooped area. Once aflame, a gooped location will not slow but will apply damage over time.

Dragon Breath (Get at Level 6 and 9)
Skaarf inhales deeply, slowing fleeing enemies and accelerating closing allies. Skaarf then exhales flame, incinerating enemies in a cone in front of him. While exhaling, enemies moving against the flame are slowed while allies moving with the flame are accelerated. Skaarf may move freely while spewing fire, but he cannot basic attack or use other abilities.

Items Explanation
The almighty Energy Battery will gave you spammableSpitfire to harras your lane enemy!

You should get Eve of Harvest as soon as possible. Why?

  • All ofSkaarf abilities are burst crystal damage. You can get regain lots of health withGoop and Spitfire combo, and alsoDragon Breath .
  • Did I mentionDragon Breath ?
  • Low on health?Goop andSpitfire jungle minion. You'll get 1/4 of your health back (1/3 on lane minion)
  • Increase in crystal damage, mana regeneration, and also maximum mana.
  • Amazing damage.
Secondly, getFountain of Renewal to make you much less squishy and to support your team. Don't forget that Vainglory is a team play. In my experience, support item beats damage and abilities item—because it affect your whole team. This item is important to get quickly. If you are fightingKoshka ,Adagio , Ringo or any other crystal and burst damage hero, consider buildCrucible orAegis instead ofFountain of Renewal . Don't get Atlas Pauldron orMetal Jacket , you'll be dead anyway if the enemy have reached you.

Third one, get Frostburn . Actually, in my previous build I didn't recommend this item but after I played again for a while with previous build—I notice that Skaarf doesn't have enough mana. That's why it's important to getFrostburn (I have tried it with clockwork and aftershock for mana regeneration, but it simply not last long enough. IfFrostburn is not your cup of tea, you can get anotherEve of Harvest !

Several reasonsFrostburn good for Skaarf:

  • You can slow enemy with yourSpitfire .
  • When they are burning, they are also slowed!
  • Goop when lit up will slow them from burning.
  • Dragon Breath already had slow, but you can see Frostburn effect into the action.
On late game, get anotherFountain of Renewal to support your teammates. "Why don't you get another Shatterglass orBroken Myth ?"; you may ask.

Several reasons:

  • To support your teammates.
  • Your damage is already ridiculous.
  • You'll be more less squishy!
  • If you are on winning side and very confident, then get it.
Lastly, getBroken Myth if the enemy build shields. This is important to scale your burst damage.

How to Play
If possible, get into the lane. Trust me, I almost always get 3 kills before minute 5. The secret is to maximize fan of flames. If you meetSAW , you are very lucky. He will hardly farms and forced to go back to base very often from the damage. 

  • Spitfire your enemy.
  • attack them consecutively.
  • if they hit you back, nevermind. Keep attacking them to maximize fan of flames
  • when they reached 1/4 of their health, retreat. They'll be dead from burning.
...and you get your first kill.

To keep lane hero from farming, do that everytime they surfaced. Use Spitfire then hit once (twice if you can). They will retreat and cursed you off in real life.

GetGoop ? Great. The damage will get more dangerous.

  • Spitfire your enemy.
  • If you successfully hit them, Goop .
  • attack them consecutively.
  • they'll run away.
Don't do Goop first, thenSpitfire . The success rate is low. By doing above, you will get 100% success rate of burning them off. This combo is also amazing for getting money. Go to lane and do that. Minions will instantly die and you'll get lots of money and regain health.

You can also support your team with Goop . Help your running teammates by castGoop on the way. The enemy will be slowed down. Spitfire it when they are onGoop for burst damage and heal yourself (from Eve of Harvest ).

#protip while fighting Taka , you have a high chance to win. How? Wait when you attacked withX-Retsu and Kaiten . After Taka landed, attack with Spitfire and Goop —thus you'll regain 1/3 of your health and also burn 1/3 of his health. If he kept attacking you, he will get burned by the Goop —which makes you heal at faster rate; and at the same time—damaging him overtime. Do this twice or thrice, he will target another hero and leave you alone.

Dragon Breath is the most crucial skill to win the game. Always cast it when you are sure that enemy's cathrine andGlaive have landed it's stun. Use it to slow running enemy, and accelerates teammates speed. Don't be to cocky to use it to help your teammates runaway!

Some best practice and scenario:

  • Do it from bushes while your teammates are chased.
  • Do it from bushes even when teammates are not chased.
  • Get one of your teammates buildWarhorn and activate it when you are onDragon Breath (this is absolute horror).
  • Use it to burn turrets.
Dragon Breath will make your enemies health reach zero, or if not—Goop them afterwards and keep auto attacking them. They'll be burned to death. You'll also get health lifesteal from Eve of Harvest !

Dragon Age Inquisition Artificer Archer Rogue Build Guide

$
0
0
Below you will read a guide on Artificer Archer Rogue build on Dragon Age Inquisition written by KineticGTR.

Artificer in Dragon Age Inquisition brings some interesting tricks to the rogue table. It's not a big game changer, but there are some very helpful and powerful combos that can be a lot of fun to execute!

This guide focuses on how to build your class using a combination of standard skills from the Sabotage, Archery skill trees, and new active and passives from the Artificer specialization.

This build has been put together from a fresh respec. With about 15-20 points to place, you can put together a very powerful Artificer that has everything it needs to dominate on the battlefield.

Sabotage

Caltrops... unused but leads to Looked Like It Hurt, a great passive that regens stamina with every critical hit. Artificer/Varric seems to crit very often, making this a no brainer to go for. In fact, I'd say it good for any rogue build to invest in sooner or later.

Poisoned Weapons / 
Infected Wounds (Skill upgrade) / 

Archery

Death from Above / 
Leaping Shot / 
Long Shot / 
First Blood / 
Explosive Shot / 
Chain Reaction (Skill upgrade) / 
Pincushion / 
Full Draw 

Aritificer

Spike Trap (Unused) / 
Set Them Up / 
Elemental Mines / 
And Take Them Down / 
Hail of Arrows / 
Opportunity Knocks / 
Fallback Plan / 
Tricks of the Trade

Gameplay Tips

Poisoned Weapons should be a high priority to activate every chance you get. This plus every Archery shot we perform either basic or skilled attacks, poisons and deals extra damage. Combine this especially for grouped enemies and Explosive Shot to spread poison to all enemies caught in the blast!

Leaping Shot is our bread n' butter here. If you can, craft a piece of armor with a nice Masterwork perk like Hidden Blades, and Leaping Shot will do the rest. Each of the 12 projectiles from Leaping Shot gives a chance to activate a "X on hit" skill like Hidden Blades. 

Leaping Shot also goes great with our Focus ability, Hail of Arrows, which duplicates all your Archery Shots for a given time.

Elemental Mines are fun for group fights. Throw a handful of these around and watch the sparks fly! Setting enemies on fire, chilled, shocked and more! The damage isn't half bad either.

A more situational skill, best equipped for boss or dragon fights, is Fallback Plan. This gives you a 15 second window to basically turn back time for your Artificer, resetting his/her position and health to the point it was first activated. Keep in mind, you have to manually trigger the skill again, or you get nothing at the end of the 15 seconds.

Fallback Plan is a great escape tool and at times, a big life saver. If you see someone charging you, or you know something is about to hit you hard, set this down, take the hit, and then activate the skill. It's like nothing ever happened!

Vainglory Krul: The Unstoppable Juggernaut Build Guide

$
0
0
Here's a Juggernaut build for Krul on Vainglory written by partygod.

Why use this build?

WARNING: This build is not for the beginner. you must have adequate knowledge and experience before attempting to use this build.

As you become better, your opponents become better as well and it is inevitable to have clashes where only two or one of the members of the winning team are left standing. This build ensures that YOU are that last man.

Having the core items alone will make you dominate mid-game. having the final build will ensure victory.

PROS:
  • Stable during the whole game (not a late bloomer or only strong early).
  • High HP and Energy sustain
  • Fast Jungle farming
  • Intimidating

CONS:
  • Low building damage (due to the recent krul changes, his skills now deal damage to towers. yay)
  • Moderate damage of Dead Man's rush (also due to the changes, his first skill is now weapon scaled. boo)
  • More advisable to Jungle (limitation)
  • Almost always targeted first after they realize how much of a threat you are

Skill Distrobution per level
  • Get Deadman's Rush at level 2, 4, 7, 9 and 11
  • Get Spectral Smite at level 1, 3, 5, 8 and 10
  • Get From Hell's Heart at level 6 and 12
  • Skip Shadows Emperor Me

Item breakdown

Starter:
  • Swift Shooter synergizes withSpectral Smite . The faster you make stacks, the lesser damage you take and the faster you farm.

Early Game
  • Sprint Boots will be your lifeline. use your heroic perk to initiate, sprint shoes to run away or go on pursuit
  • Hourglass this item will reduce cooldown and will replenish your energy effectively even until mid-game
  • Swift Shooter 

Core
  • Travel Boots HP regen and added movement speed. This item will help you run away and catch up to enemies before owning a frostburn.
  • Blazing Salvo increased attack speed, increased weakness stacks.
  • Reflex Block added HP. This item will save your life against stuns, slows, and heavy bursts of damage.
  • Hourglass 

Final
  • Journey Boots Armor, Shield, Regen, and speed
  • Breaking Point This is it, your money maker. Maintain your stacks. Keep in mind, stacks aren't gained per basic attack you do, you gain them every second you basic attack a hero, increasing WP and pierce. i recommend that you Build this as your first T3
  • Crucible This will help you and your team survive. Use it wisely.
  • Aftershock this works well with Dead Man's Rush . After skill damage and that bonus hp, the slice plus +50% lifesteal makes you more deadly. Especially since it is now weapon scaled
  • Frostburn energy regen, you'll be using skills more often. The slow will keep enemies close, maintaining Breaking Point and Weakness stacks. The extra CP will increase skill damage.
  • Atlas Pauldron Your anti-CP and anti-attack speed item. You will need this to combat SAW and/or Glaive. Atlas has both Shield and Armor which gives it good overall coverage, especially combined with Journey boots.

Alternate Finals
  • Tornado Trigger or any other red item (weapon power item) can replace your Atlas Pauldron if you're more aggressive.
  • You can replace yourAtlas Pauldron with either Aegis or Metal Jacket if all your enemies are Crystal builds or Weapon builds, respectively. More so if no one is building attack speed

Farming
Spectral Smite and Swift Shooter are your friends. Take note of how many stacks it takes to smite a creep dead. Stack, smite, move on. don't be afraid to use your skills. the early hourglass will replenish your energy really fast.

Steal crystal mines. You always come out of doing it with a lot or with full Hp. Don't be scared.
Balance farming with Ganking.
How do I use this build? Fighting one on one TOP
Krul's strength comes from his high sustainability and we're here to take advantage of that

If you've noticed, we've maxed out the first two skills instead of the ulti. why? because you'll only need it to disrupt other skills and to stop that running enemy.

We put our focus onDead Man's Rush One on one, never use this to initiate. use your heroic perk instead. the added movement speed and slow will be enough to initiate the fight. we'll reserve the first skill to chase and to use the extra hp barrier.

Next would beSpectral Smite , learn to time when to use it. Activate it when you have multiple stacks to gain HP and cause damage. Keep your stacks high to lessen your opponent's Crystal Power and attack speed.

UseFrom Hell's Heart as neeeded.

Strategies:

1. Fighting against CP SAW , you'll need to first dodge that Supressing Fire. Always catch him off-guard. CP Saw has high damage output, but can easily be killed. Use theAtlas Pauldron to slow his attack speed temporarily while your stacks start to increase, crippling him. WP SAW will be very easy if you shuffle between his skills. Remember Dead Man's Rush gives a bonus HP barrier andSpectral Smite heals you. You also have a Stun. Your breaking point is stacking as well. do not be afraid.

2.Petal initiate withFrom Hell's Heart make sure your sword kills the munions and immediately move in. If they manage to use the ulti, activate theCrucible , and useDead Man's Rush . The crucible reduces damage and Dead Man's Rush will absorb the rest of the damage.

3. Dealing with Adagio will depend on how the enemy uses him. If he uses a Reflex Block or any of its tier 3 variants during his ulti, use yourCrucible to at least reduce damage and prevent the stun.
Immediately follow withDead Man's Rush and make sure you use the activatedAftershock .

4. Against Burst buildGlaive , after getting hit by the burst or the ulti, follow withDead Man's Rush . Use the atlas pauldron. prevent him from gaining stacks and delaying the addedTension Bow hit if he is carrying one.

How do I use this build? Fighting against a team
Almost always useDead Man's Rush to initiate team fights. Let the HP barrier absorb all the damage.

Other than that, use the same tactics. Use your Crucible for the team. Don't use it selfishly. Use the crucible to reduce enemyPetal 's Ulti damage, to ensure your team'sAdagio pulls off his Ulti, to prevent the burn damage of the enemyRingo 's ulti, and especially to reduce tue damage fromJoule 's crippling lazer.

Your ulti,From Hell's Heart should be used more as a disruptor, especially onAdagio and SAW .

Prevent Adagio's Ulti and stop Saw from Spinning Up too quick. if he manages to useSuppressing Fire , that small time frame that he is stunned will be enough for the team to cripple him.

During clashes, always aim for the weakest hero. Catherine or the tankiest hero should always be last. try to reduce the numbers as fast as possible. Do not panic.SAW will always use his ulti after supressing fire and that's your cue to use theAtlas Pauldron .

By the middle of the clash, you'll have enough stacks of Breaking Point to decimate everyone. Your short cooldowns will enable you to useDead Man's Rush at the right time. Spectral Smite will always leave you with HP. Aftershock will help you destroy that last tankyCatherine or Adagio .

Don't be greedy! Know when to back out, and when to come in.

Dragon Age: Inquisition Mods is Possible!

$
0
0
Dragon Age: Inquisition looks like it will indeed be getting mods, contrary to popular belief, with work on a particular modding tool proceeding apace.

As stated on the Nexus Mods page, DAI Tools' goal is to make a Skyrim-alike creation kit, so anyone can modify the assets in Inquisition.
DAI Tools has been available since December 19, with the most recent update being a special Christmas present. That, or just one that happened to be on Christmas Day, who knows?

At the time of writing all you can mod is some Skyhold outfit colours, but the fact you can do this shows a promising start for a game a lot of assumed would just remain unmodded.

No word as of yet if EA is sharpening its ban-hammer, or even if it's something that needs to be sharpened. But I for one would hope everything's just left alone - let the tinkerers tinker!

Anyway, here's a brief video to give you a look and offer a tiny bit more explanation:
source: PC GAMER

How to Play Krul in Vainglory Properly [Advanced Guide]

$
0
0
Below is a guide for players who wants to learn how to properly play Krul in Vainglory. This guide is written by reaverfreed and only shared on this blog for our valued readers.

Ability Path


Item Choices
Preface
Krul is one of the most hardest hero you can master in Vainglory. Personally, I've played Krul for the last 2 weeks with much frustration—he is squishy and easily killed. After experimenting with multiple gameplay and items, I think I've found the perfect Krul to play.

FYI, I've played Krul when I first played Vainglory (Karma level 1) and it's super easy. At that time, everyone still learning, and don't understand Krul skills. As your gameplay get more advanced (also your opponent), they understand Krul abilities and also how to counter them. Right now (I'm at karma level 20), nobody use Krul because he is squishy and "weak".

If you really wanted to learn how to Krul the right way, then this guide is for you.

Abilities Breakdown

Shadows Empower Me (Heroic Perk)
Krul is empowered by the shadows after standing still in brush for 3 seconds. Once empowered, Krul moves faster and his next basic attack will slow the target.

Dead Man's Rush
Krul dashes to the target and deals damage. Activating Dead Man’s Rush grants Krul a health barrier for 2 seconds.

Spectral Smite
After learning this ability, Krul’s basic attacks apply Weakness stacks (up to 8 per target). Each Weakness stack reduces attack speed and crystal power and allows Krul to lifesteal by basic attacking the target. Spectral Smite consumes the stacks to deal damage and regain health based on the number of stacks consumed.

From Hell's Heart
Krul pulls Hellrazor from his chest and hurls it in the targeted direction. If the sword hits an enemy hero (on the way out or the way back), it stuns and slows the target and deals damage. Stun duration is longer based on the distance the sword has traveled.

Abilities Roadmap
Notice that you only need to upgrade From Hell's Heart twice. Dead Man's Rush and Spectral Smite on level 5 is upgraded massively compared to level 4

You can hover the abilities icon above to get the detailed information of each skills.

Items Explanation
Because Krul is squishy and what makes him tanky is Dead Man's Rush andSpectral Smite ; those two skills are prevalent to be maxed out. Other than that, by building oneClockwork , one Warhorn , and one Aftershock —Krul can spam those 2 skills (delay 4.87 seconds) that will makes him very tanky during the game.

p.s. note that Fountain of Renewal is not a must. You need to change it according to enemies hero and items.

Case #1: If there is SAW on the enemy team, rush Atlas Pauldron . Use Dead Man's Rush and immediately hit Atlas Pauldron to make him immobilized. (If you are SAW, useRoadie Run when Krul is attacking you).

Case #2: If the enemy team use lots of abilities, like Adagio ,Petal and CrystalGlaive ultimate, build Aegis .

Case #3: When you face withRingo andPetal (which both could easily kite you) and/or they are building Tension Bow ; replaceWarhorn with Shiversteel to make them slow—so they can't kite you. Other than that,Shiversteel makes you more tankier.

Case #4: BothSAW and Koshka (other ability focus hero) on enemy's team? Replace Clockwork and build Atlas Pauldron and Aegis . Counter-building always work.

Bonesaw is the last item to get, so stay on Blazing Salvo and focus on Clockwork .

p.s. Build Bonesaw if your team carry are focused on weapon damage. You can also upgradeBlazing Salvo toAlternating Current , Breaking Point or Tornado Trigger depending on the situation.

How To Play
It takes time to master Krul gameplay, so be patient.

Krul home is in the bushes, so engage every battle with Shadows Empower Me that slows your target for 4 second. Wait forSpectral Smite passive stacks to reach 4 or more, and hit the skill to regain health and instantly halves your enemy health.

UseDead Man's Rush to get health barrier when you are attacked or to reach valuable enemy.

Level 1 - 6: Jungle to get money and level up. You can useDead Man's Rush to steal enemy minions or useSpectral Smite and after that, run. Remember to hide in the bushes when you try to steal. This not only makes you get gold and level; psychologically it will make them furious and annoyed—which lowers their morale.

Level 3 - 6: You are powerful enough to kill enemy hero. Go to middle lane, stay on bushes, and use Shadows Empower Me (to slow),Dead Man's Rush (extra damage), and after 4 or more stacks— Spectral Smite . This combo is guaranteed to kill the middle lane hero.

Level 6 - 12: Remember to always stay in bushes. Shadows Empower Me is a very effective skill to start the gank and make your target run away. If he/she gets away, useFrom Hell's Heart to keep them on track (and it also slows them)!

Fire Mountain/Lava River Level 80 Dungeons Walkthrough Guide

$
0
0
Here's a walkthrough guide for all level 80 dungeons at level 80 cap (Monolith content) in Dragon Nest. The guide focuses on: 

1. Fire Mountain
which includes dungeons like Shadow Grave, Flame Canyon, Abyss of Heat and Relic of Fog. 

2. Lava River
which includes Wailing Wall, Eye of Goddess, Watcher's Tower and The Praying Heart.

credits: Lastly, this guide was made by Xetagonist, which was first seen on dragon nest sea forum (shared by LieutenantTemjin).

1. Fire Mountain

Additional Information for Video Guide:

Shadow Grave [00:00]:
- Areas 2, 3:
For slower classes, it is recommended to step on the light platforms found in the map every time you break the statues. This prevents you from turning to stone and leaving you vulnerable to attacks. This can be especially important for characters with below-average gears to survive since the skeleton monsters can hit hard, even so if it's Fatal / Raging Prefixed.

- Boss Stage:
After the Stomp Mechanic when the Boss is located at the Lava Pool, it will become enraged and have one of its attacks enhanced, which is its Charge. It will now spill Fireballs at the side, thus it is recommended to just wait out until it U-turns to stop and roar for DPS window.

Flame Canyon [05:54]:
- Areas 2, 3:
The "Artillery Frog" mentioned is called a Magma Shooter in-game. Upon death, it will charge up and release 4 plasma bursts in a North-South-East-West direction.

During these areas, the Flame Ogre will also be chasing you with Iron Skin. Recommended to multi-task between killing the mobs and looking out for the ogre's attacks at the same time. Do not dedicate your effort entirely to killing mobs if you are especially squishy.

- Area 2.2:
The Flame Naga Warrior that spawns at this area is especially deadly. Be wary of her Fireballs when she charges up, as it can induce heavy knockback and considerable damage and DoT debuff. Another attack to look out for is when she summons a ring of fire that expands around her. These are strictly no DPS time for squishy classes.

- Boss Stage:
Forgot to mention one more Boss Mechanic for the Flame Ogre. If you see him trying to prepare for a spin via him stretching sideways, quickly tumble out to avoid the 360-AoE spin.

Abyss of Heat [10:52]:
- Area 3:
The three Gnoll Gunners seen when you enter this area need not be manually killed. They will be automatically killed off by the nearby Lava Eruption, whereby the game will warn you of it.

- Area 4:
Every-time the Unstable Lord Ciaca splits up, you can stay at either 10 or 11 o'clock positions. You need not stay strictly at 11.

Relic of Fog [15:32]:
- Areas 1, 2:
Getting thrown up by the gush of water shooting up from the indicated platform will earn you a hidden achievement.

- Area 2:
The best strategy to get rid of the mobs here is to kill any available mobs on normal ground, then deal with the water spitflowers in the pool. This prevents you from getting ganked in an area that is constantly slowing you down.

- Area 4, Wave 2:
The Poison Golems seem to be only doing 2 kinds of melee attacks: One in which the golem lifts his right arm up before slamming down, and the other which it tilts its round body down before rising up and doing a headbutt.

2. Lava River

Additional Information for Video Guide:

Wailing Wall [00:00]

Eye of Goddess [04:35]:
- Areas 1 to 3: It is purely RNG-based on whether you're required to clear 2 or 3 areas. If you get the Eye of Goddess within 2 areas, you'll proceed on down to kill the stage boss directly. The video shown depicts the clearing of all 3 areas.


Watcher's Tower [09:18]:
- Area 3 (Not shown in this video):
Apart from the Punisher and the Dark Warrior stages, there is a third stage which brings you to the Spider Queen's Lair, where the area boss will pose as an Elf Bowmaster. There are three stages to this area, so I'll explain briefly;

Area 3.1:
The Elven Bowmaster, along with white spiders will spawn in this area. Damage 50% HP to the BM and she'll disappear before cleaning the rest of the mobs. Simple as that.

Area 3.2:
Beetles, along with Water Spitflowers, will spawn alongside the spiders. Clear as usual.

Area 3.3:
The Elven Bowmaster will transform into the Spider Queen. Kill the area boss to get the relic for placement in the middle.

- Boss Stage:
If the Punisher is assisted in your playthrough of the Watcher's Tower, he will come to aid you after the Boss splits into three lesser flame spectres.

The Praying Heart [14:54]

Comprehensive Level 80 Barbarian Build Guide in Dragon Nest [T4]

$
0
0
Here is a level 80 all-around build guide for Barbarians in Dragon Nest [T4]. This build is good for both PVE and PVP written by a DN SEA player whose IGN is Noobnesz. Check out how he build his level 80 hybrid barbarian below.

Introduction, Scope and Limitation

Hello fellow Barbarians! This is Noobnesz posting, from Springwood. This guide is primarily driven by the lack of Barbarian builds here in this forum. That being said, thank you for not posting many Barbarian builds. You people motivated me post one.

Anyway, the scope and limitation of the skill builds discussed in this guide is only on the PvE-Oriented, and Ladder-PvP builds only. The skill builds that would be presented here are not pure, since I wanted to make Barbarians as functional as possible (having utility skills like side kick, dash blow, soccer kick combo, et cetera). Also, I would not discuss anything related to "softban-PvP", since I am strongly against that kind of gameplay. Take note, I would not cover on the basic combos you can do. If you are here to know about what combos or skill rotations I do, I am sorry to disappoint you at this point in the guide, but I would not be tackling that for now. One tip, though: Play in Ladder! No matter how much they say how imbalanced that system is, I guarantee you that you will find that "imbalance" to be a challenge rather than a let down as you gradually get addicted to it. Make that as your motivation! As a Barbarian, I think there are almost hundreds of skill combination you can do to form a combo. If you have been playing as a Mercenary for some time now, I am sure that you are aware that you can follow up almost every skill you have on your skill tree with another skill, so discussing them one by one would be so time consuming.

The item build recommendations will only cover Enhancement Heraldries, Skill Heraldries and Skill Accessories. I would not elaborate much on which item set or Dragon Jades to use, although I will generalize it in the following statements.

Just make sure to maximize your STR while not sacrificing a lot of your Critical Rate Stat. You are good with 60-70% Base Critical Rate as it will just adjust after you cast Battle Howl and/or Critical Mastery (+20% Critical Rate). The Item recommendations are best suited for casual non-CC players, as it will not involve any CC-obtained items and overly expensive items such as Heraldries with 3rd Stats. If you are here for the Final Damage build, again, I am sorry to disappoint you but I will not discuss anything about FD or its damage calculation. Barbarians can achieve damage outputs almost similar to those people who are built on FD by using a method I like to call Strength Stacking, which will also be discussed on part VI.

It's up to you to whether or not you want to follow this guide religiously. It is all a matter of personal preference and playstyle anyway.

The Skill Builds
Gigantic Bomber PvE Build

Cyclone-Silence Ladder-PvP Build

Okay, Before you go "lol wtf lvl 5 relieve? only lvl 5? much w0w such n00b ur a barb but u no max? lol noob w3w. aso flying sweng? are u ghey? lol ur a noob w3w i h8 u gm please banned this ako n0t suppork", read the small wall of text at the beginning of this page, or even the FAQ section below and contemplate on your existence.

In the next section, I will be covering one and each skill found in the skill tree posted above, be it active or not. I will be discussing each skill with the help of the devices I made, or should we call it the fundamental properties of skills. These are the Damage, Support, and Utility. Also, I would add some of my opinions and insights and overview on the crucial skill point increments using the Analysis device. The number inside the parentheses "()" before the Skill Name reflects the index number of the skill, as shown on the pictures of the Skill Tree on the last section. If a slash "/" is present after the first value of the skill level, it indicates its level on the Ladder-PvP build.

I assume that you all are already aware about the basics of the skill mechanics of Dragon Nest. The levels 6, 11, 16 and 21 are the most crucial increments in almost every skill you will ever encounter in Dragon Nest. This is one proof: a Lv. 5 to Lv. 6 Rising Slash has an attack multiplier difference of 41% (from 244% to 285%) while a Lv. 6 to Lv. 7 Rising Slash has only a difference of 5% (from 285% to 290%). So this answers the question "Should I raise my [skill] to level [not 6, 11, 16]?" The answer is, If you have no other skills hanging at odd skill levels (not 6, 11, 16), go for it. But if you do, make sure to leave those skills first at the said crucial levels, either 6, 11, or 16 before on thinking about inefficiently adding levels to other skills.

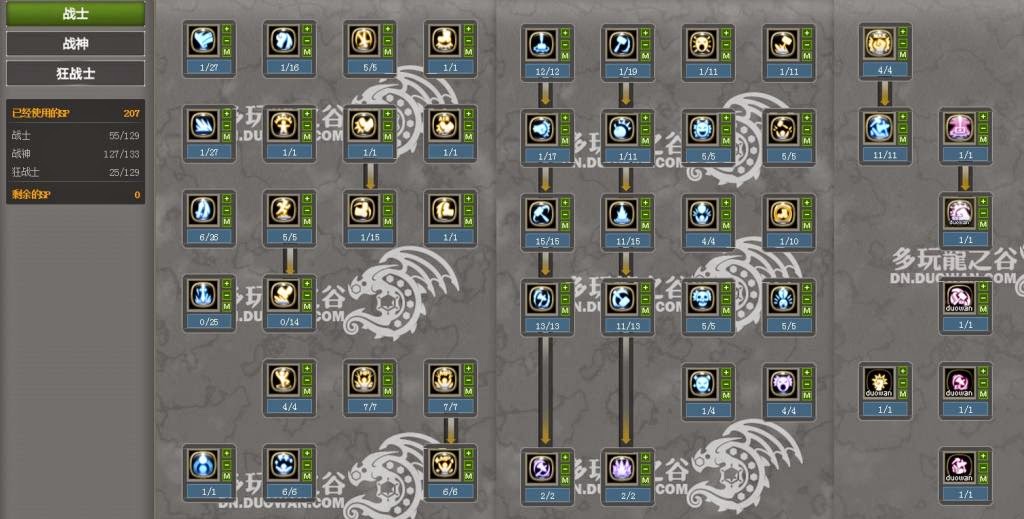
Warrior Skill Tree Analysis

(1)Heavy Slash - Lv. 1
Damage: Doesn't deal much damage
Support: No support capabilities
Utility: Flinches the opponent
Analysis: The only thing that keeps this skill in my skill bar is its ability to heavily flinch an opponent. Also, it has a very low cooldown, makes it easily spammable, and a great initiator of combos. Useful in PvP, not much in PvE. Leave at Lv. 1.

(2)Impact Punch - Lv. 1
Damage: Like the Heavy Slash, it does not deal much damage
Support: No support capabilities
Utility: Sends the opponent flying in mid air; an animation canceller
Analysis: This skill is most famous as being a follow-up skill after the heavy slash. Not only that, it has a low cooldown that makes it spammable for combos. Make it as an initiator of combos, or you can use it in the middle of a combo to send the opponent flying in mid air. Great for animation cancelling of Heavy Slash. Leave at Lv. 1.

(3)Impact Wave - Lv. 1
Damage: Not much DPS, uses magic attack as damage multiplier
Support: No support capabilities
Utility: Minor Flinch, that's all
Analysis: This skill is not active on my skill bar. Uses magic attack, useless even if it is enhanced at Lv. 6. Only edgy hipsters use this skill.

(4)Rising Slash - Lv. 11/Lv. 6(PvP)
Damage: This skill can be classified as a DPS skill, as it deals great damage when the level is raised, but deals very mediocre damage if left at a low level
Support: No support capabilities
Utility: Can hit a downed opponent; can raise a person flying in the air; can be followed-up by Soccer Kick Combo
Analysis: This skill must be left at Level 6 or above to have an extra hit on the opponent. A great combo device, and not only that, good DPS for a short cooldown. Must have skill for all Barbarians. leave at Lv. 6 , or preferrably, Lv. 11.

(5)Circle Break - Lv. 0
Damage: One of the main DPS skills in the Warrior Tree, deals good burst damage
Support: No support capabilities
Utility: Super-Armor Breaker; can down an opponent on a circular area around the user
Analysis: It's utility is only useful in PvP, as it can down an opponent. This skill can be enhanced when it reaches lvl 6. You can prefer this over the Rising Slash skill if you want a good burst damage.

(6)Highlander - Lv. 1
Damage: None
Support: Grants the whole party protection from death for 60s in PvE, and 20s in PvP
Utility: None, just a support buff
Analysis: One reason why warriors are in demand in nests and raids. Get this skill. No SP required. Why not?

(7)Relieve - Lv. 6/Lv. 5(PvP)
Damage: None
Support: None
Utility: This is an instant self buff; it removes 3 debuffs instantly at Lv. 5, for only at a short cooldown of 25s in PvE, and 45s in PvP
Analysis: Max this as you will encounter mobs inflicting you with status conditions quite often. It's cooldown is only 15s if maxed, which is very useful considering that the PvE build I have given does not include Crisis Howl. Never leave this at Lv. 2, Lv. 4, or Lv. 6 if you are doing a PvP build. Its effects are just the same as that of a Lv. 1, Lv. 3, and a Lv. 5 Relieve respectively. You will just waste 1 SP for nothing. But if you insist on maxing this one out in your PvP build, I recommend using a +1 Skill Accessory so that your investment will not go to waste. See the list below to see how the quantity of debuffs removed and cooldown improves as Relieve is incremented in PvE and PvP.

Relieve PvE Skill Increments:
Lv. 1 - Removes 1 debuff @ 45s cooldown
Lv. 2 - Removes 1 debuff @ 35s cooldown
Lv. 3 - Removes 2 debuff @ 35s cooldown
Lv. 4 - Removes 2 debuff @ 25s cooldown
Lv. 5 - Removes 3 debuff @ 25s cooldown
Lv. 6 - Removes 3 debuff @ 15s cooldown
Lv. 7 - Removes 4 debuff @ 15s cooldown (+1 skill accessory)

Relieve PvP Skill Increments:
Lv. 1 - Removes 1 debuff @ 45s cooldown
Lv. 2 - Removes 1 debuff @ 45s cooldown (same effect as Lv. 1)
Lv. 3 - Removes 2 debuff @ 45s cooldown
Lv. 4 - Removes 2 debuff @ 45s cooldown (same effect as Lv. 3)
Lv. 5 - Removes 3 debuff @ 45s cooldown
Lv. 6 - Removes 3 debuff @ 45s cooldown (same effect as Lv. 4)
Lv. 7 - Removes 4 debuff @ 45s cooldown (+1 skill accessory)

(8)Tumble - Lv. 5
Damage: None
Support: None
Utility: Provides the user a short Iframe during the duration of the skill; hold shift and forward to activate the skill Dash
Analysis: Max this one. Shorter cooldowns means more opportunities for the user to use this skill. Best used for dodging attacks.

(9)Elbow Drop - Lv. 1
Damage: Not much DPS
Support: No Support capabilities
Utility: Used to insult a downed opponent
Analysis: Since you cannot unlearn this, you have no choice but use this as a way of taunting a downed opponent.

(10)Wake Attack - Lv. 1
Damage: More of a utility than a DPS
Support: No Support capabilities
Utility: Once you are downed, press the attack key to counter the opponent with a powerful slash; can knockback opponents
Analysis: You just can't sleep around while you are in crucial moments in the Nest, can you? Also, it is very useful in PvP as it can heavily knock back an opponent in close proximity, even cancel its attack!

(11)Side Kick - Lv. 1
Damage: Not much DPS
Support: No Support capabilities
Utility: Can be used to flinch an opponent, or hit the opponent while he is in mid air. Use this skill on an opponent while he is near a wall to hit him against the wall; this will cause him to be stunned in a short amount of time
Analysis: This is my personal filler skill. Mercenaries are known to have DPS skills with such very long cooldown times. You can't just stand there and look at your party-mates struggling while you are waiting for cooldown, can you? Also, you can't unlearn this, so kick some ass while you're at it!

(12)Drop Kick - Lv. 1
Damage: More of a utility than a DPS
Support: No Support capabilities
Utility: While falling, press Right Click to perform the drop Kick. If successfully executed, the opponent will be sent flying horizontally, making him unable to attack for a few seconds.
Analysis: Small DPS, most big mobs are resistant to its utility. This is a low priority skill for PvE builds. I just learned this skill because I still have extra SP to put into this. Useful in PvP in counterattacking from an aerial position.

(13)Dash - Lv. 5
Damage: No DPS
Support: No support capabilities
Utility: Makes you run like you stole something; can be used to follow-up a forward tumble.
Analysis: Max this one. Who doesn't want to run at full speed?

(14)Sweeping Kick - Lv. 1
Damage: Not much DPS
Support: No Support Capabilities
Utility: This is a follow-up skill for side kick. Best used to deliver the opponent near a wall, if one kick is not enough to stun him.
Analysis: Treat this as a follow-up skill after Side Kick. Another filler skill: you may or may not get this one, but because I love kicking ass, I learned this. Just leave it at Lv. 1.

(15)Soccer Kick - Lv. 1
Damage: Not Much DPS
Support: No support capabilities
Utility: Can be used to powerfully kick stunned opponents, downing them
Analysis: I would not get this if this was not the prerequisite for Soccer Kick Combo. Do not get this if you are not planning to get Soccer Kick Combo (which I highly don't recommend).

(16)Dash Kick - Lv. 0
Damage: Has high DPS if maxed
Support: No support capabilities
Utility: Super-Armor Breaker; follow-up skill to dash
Analysis: If you are a mercenary, you may be familiar with Dash Blow. This skill has very similar function of that of Dash Blow, it just breaks armor. Personally, I did not get this skill because it has a long recovery time, making the character vulnerable to other attacks. Also, this skill has no follow-up skill unlike Dash Blow which can be followed-up with a Soccer Kick Combo.

(17)Aerial Evasion - Lv. 4
Damage: No DPS
Support: No support capabilities
Utility: Can be used by using spacebar after being sent flying in mid-air
Analysis: Higher level means faster cooldown. Faster cooldown means many opportunities of escape during crucial situations. Enough said.

(18)Physical Mastery - Lv. 7
Damage: None
Support: None
Utility: A passive skill, raises the Maximum HP of the character
Analysis: Max this one. Who doesn't want to be healthy? Also, you will be acting as a semi-tank in nests. You will need more HP to drown so you can achieve much less riskier STR Stacking. Most of the time, you will need your HP to be below 20% in order for your Physical Attack to be maximized right? So you don't want that 20% to be relatively small, since you will be dealing enemies in close range with that HP most of the time.

(19)Mental Mastery - Lv. 1/Lv. 7(PvP)
Damage: None
Support: None
Utility: A passive skill, raises the Maximum MP of the character
Analysis: MP consumption for Mercenaries in PvE is no problem. Our skills have longer cooldowns compared to other classes, so we won't be needing that much MP per unit time. We rely much on our normal attacks, as well. Also, when you are in parties, there's almost always a Sorceress to provide you with Meditation Buff or Bringers to heal your MP. So, Leave it at Lv. 1 or you can just skip learning this skill at all. In PvP, however, you will need every MP there is in the world. That being said, max it in your PvP build.

(20)Mind Conquer - Lv. 1/Lv. 6(PvP)
Damage: None
Support: None
Utility: A passive skill, raises the amount of MP recovered per second
Analysis: Just as I have said earlier in the analysis of MP Mastery, Sorceresses and Bringers would aid you in your MP needs in PvE, so you can just leave this at Lv. 1, or completely skip this skill. I learned this due to the fact that I stil have extra SP. In Ladder-PvP however, every drop of MP recovery is very crucial in winning a match so max this one for your PvP build.

Mercenary Skill Tree Analysis

(21)Stomp - Lv. 6/Lv. 12(PvP)
Damage: Decent damage output on a circular area around the user
Support: No support capabilities
Utility: Flinches the opponent; Slows down opponents
Analysis: Leave it at Lv. 6 in PvE just to make the EX version unlocked. Also, it provides slow for minor mobs. Because some of the Bosses in Nests and Dungeons are resistant to its slow debuff, its level is not recommended to be raised higher than 6. In PvP, however, this must be maxed as it provides movement speed reduction for opponents. I also recommend using a skill accessory for this skill if you are following the PvP build. See the list below to see how the slow percentage and duration increase as Stomp is incremented in PvP.

Stomp PvP Skill Increments:
Lv 1. - Slows opponents by 6% for 1.5s
Lv 2. - Slows opponents by 8% for 2s
Lv 3. - Slows opponents by 10% for 2.5s
Lv 4. - Slows opponents by 12% for 3s
Lv 5. - Slows opponents by 14% for 3.5s
Lv 6. - Slows opponents by 16% for 4s
Lv 7. - Slows opponents by 18% for 4.5s
Lv 8. - Slows opponents by 20% for 5s
Lv 9. - Slows opponents by 22% for 5.5s
Lv 10. - Slows opponents by 24% for 6s
Lv 11. - Slows opponents by 26% for 6.5s
Lv 12. - Slows opponents by 28% for 7s
Lv 13. - Slows opponents by 30% for 7.5s (+1 skill accessory)

(22)Demolition Fist - Lv. 11/Lv. 1(PvP)
Damage: Deals great damage on a small area in front of the character
Support: No support capabilities
Utility: Flinches the opponent; knockback
Analysis: This is a must-have skill for all Barbarians. Fast cooldown while having a decent AoE, this skill proves to be one of the most required skill for Barbarian. Leave this at Lv. 11 in PvE. In PvP however, it is unreliable due to its slow casting time. It gives the opponent to escape just before this skill is cast. Execute this in the middle of a combo you wish to conclude. Never start a combo with this skill, as its too unreliable and risky.

(23)Circle Swing - Lv. 15
Damage: Deals heavy damage on opponents in a large area around the character
Support: No support capabilities
Utility: Sends the opponents flying in mid-air; Super-armor breaker; flinches opponents; can hit a downed opponent, provided that the initial cast position is near the downed opponent
Analysis: This is one of the Big Four skills of Barbarians, the others being Whirlwind, Ring Bombs, and Rolling Attack. This is my favorite skill. Not only it provides much greater damage and much lower cooldown time than Ring Bombs, this skill is very reliable in both PvP and PvE: You do not need to aim this anywhere, just press the key, and the next thing you will see, is mobs flying in mid air! Since this is one of the main DPS skill of a Barbarian, Max this one. I also recommend adding +1 skill ring to this one for a whopping 80% difference in damage multiplier! (from 773% to 853% in PvE). See the list below to see how the damage increases as Circle Swing is incremented in PvE.

Circle Swing PvE Skill Increments:
Lv 1. - Physical Attack: 407% + 832
Lv 6. - Physical Attack: 556% + 9930
Lv 11. - Physical Attack: 705% + 25417
Lv 15. - Physical Attack: 773% + 37025
Lv 16. - Physical Attack: 853% + 48257 (+1 skill accessory)

(24)Whirlwind - Lv. 13
Damage: Does maximum damage to opponents near the whirling rage of the Barbarian
Support: No support capabilities
Utility: Flinches the opponent; can hit a downed opponent, provided that the initial cast position is extremely near the downed opponent; can be maneuverable, meaning, you can control which way the skill will be going (can be acheived by panning the screen using the mouse)
Analysis: This is one of the Big Four skills of Barbarians, the others being Circle Swing, Ring Bombs, and Rolling Attack. Max this one. Even provide a skill ring if available. No need to further elaborate on this skill. See the list below to see how the damage increases as Whirlwind is incremented in PvE.

Whirlwind PvE Skill Increments:
Lv 1. - Physical Attack: 750% + 1612
Lv 6. - Physical Attack: 1012% + 21866
Lv 11. - Physical Attack: 1274% + 47598
Lv 13. - Physical Attack: 1334% + 57366
Lv 14. - Physical Attack: 1364% + 62859 (+1 skill accessory)

(25)Cyclone Axe - Lv. 1/Lv.2(PvP)
Damage: Deals ultimate damage to opponents around the cyclone
Support: Great crowd control
Utility: Sends the opponents whirling around the eye of the tornado, making them vulnerable for further attacks on the outside; provides Iframe for the user
Analysis: Barbarian's Ultimate skill. In PvE, Leave this at Lv. 1 just to unlock the Barbarian skill tree. Your main Ultimate skill in PvE is Gigantic Bomb from now on. Just use this skill for utility: crowd control. For DPS, especially, burst damage, see Gigantic Bomb. But since you will need as much utility and Iframe in PvP as possible, you need to max this. You have no reason to use Gigantic Bomb in Ladder as it can be cancelled and dodged effortlessly by the opponent.

(26)Flying Swing - Lv. 1
Damage: Deals much burst damage to enemies in front of the character
Support: No support capabilities
Utility: Super-armor breaker; sends opponents flying through high air; provides Super-armor and 70% Damage Reduction to the user; maneuverable, can be aimed a few seconds right after the initial cast
Analysis: Although this skill has lots of utilities, and not to mention, decent damage output, it does not fit my playstyle. It has a very long casting time, making me vulnerable to attacks if not used in the right time. I believe this skill is not that reliable compared to other skills, that's why, like the Demolition Fist, I do not use this skill. If you are good enough and aiming for more burst damaging skills, invest on this one. But personally, I won't recommend it since there are better skills out there than this one (although it has higher damage output than its counterpart, Stomp). In PvP, I use this skill to tank heavy damaging skills such as Tracking Arrows EX.

(27)Punishing Swing - Lv. 1
Damage: Not much damage output
Support: No support capabilities
Utility: Flinches the opponent; the only long-range damaging skill in the Barbarian Skill Tree
Analysis: Leave this skill at Lv.1, for utility/prerequisite purposes. Not very reliable, since you need to aim and approximate the angle first to make sure it hits (considering the physics engine for Dragon Nest is corny. Yes, I'm taking a piss at you, devs ;]).

(28)Ring Bombs - Lv. 15
Damage:Deals great damage to short-medium range in front of the caster
Support: No suport capabilities
Utility: Sends opponents flying in high-air; can also be used to hit downed opponents; maneuverable for a short period of time after the initial cast, it can be directed at what lateral angle from the character will it explode
Analysis: This is one of the Big Four skills of Barbarians, the others being Circle Swing, Whirlwind, and Rolling Attack. Since this is considered to be one of the main DPS skills of a Barbarian, max this one. This skill is not as reliable as Circle Swing (since you have to correctly estimate the range on where it would explode and has a longer cooldown time in PvE), but it provides better burst damage if it hits successfully. Just like the Circle Swing, I recommend using a skill accessory for this one if you are planning to max it and raise it further to Lv. 16. See the list below to see how the damage increases as Ring Bombs is incremented in PvE.

Ring Bombs PvE Skill Increments:
Lv 1. - Physical Attack: 381% + 480
Lv 6. - Physical Attack: 521% + 5729
Lv 11. - Physical Attack: 661% + 14664
Lv 15. - Physical Attack: 725% + 21361
Lv 16. - Physical Attack: 800% + 27841 (+1 Skill accessory)

(29)Rolling Attack - Lv. 13
Damage: Deals severe damage if all hits are successful
Support: No suport capabilities
Utility: Sends opponents flying in high-air with the caster; can be used to hit downed opponents (provided that it is cast at the right position and at the right time); maneuverable only at the initial time of casting (use directional keys to aim the skill right after it is cast)
Analysis: This is one of the Big Four skills of Barbarians, the others being Circle Swing, Whirlwind, and Ring Bombs. This skill is not reliable, and very hard to master. But when mastered, it could deal severe damage to all entities that are hit with it. This is a great skill to cast before Whirlwind. Max this one, this is a main DPS skill, and provide Skill Ring if available. See the list below to see how the damage increases as Rolling Attack is incremented in PvE.

Rolling Attack PvE Skill Increments:
Lv 1. - Physical Attack: 785% + 2358
Lv 6. - Physical Attack: 1060% + 31978
Lv 11. - Physical Attack: 1334% + 69609
Lv 13. - Physical Attack: 1397% + 83896
Lv 14. - Physical Attack: 1429% + 91943 (+1 Skill accessory)

(30)Gigantic Bomb - Lv. 2/Lv. 0(PvP)
Damage: Deals great burst damage to all opponents in front of the user
Support: No suport capabilities
Utility: The initial hit will flinch and down all the opponents that are hit, and the second hit will send them flying through mid-high air
Analysis: The mother of all burst damaging skills of a Barbarian. If executed correctly, synergized with offend hit, enhanced taunting howl, toughness buff, bone crash, party support buffs, and all the energy in the known universe and beyond, it could achieve ridiculous amounts of burst damage. Max this in your PvE build. Do not learn this if you are planning a Ladder-PvP build. Why? Reasons: Slow casting time, can be cancelled easily by opponent, one shot only therefore casting this will be a huge waste if it misses, can be dodged effortlessly, no Iframe, the list goes on.

(31)Crisis Howl - Lv. 0/Lv. 1(PvP)
Damage: Not much damage output, more of a utility
Support: No support capabilities
Utility: Flinches the opponent; possibly stuns them, depending on the amount of Stun stat
Analysis: Do not get this skill for PvE. If you are following this guide religiously, you might be aware that you have maxed your Relieve. Use that instead of this. It will be kind of difficult or awkward not to have this at first, but you will get a hang of it. Also, 3SP isn't worth it. The only acceptable reason to get this one is if you are not aiming for Devitalizing Howl, which also consumes 3 SP upon learning. So make a wise decision. In PvP, however, it can save your life as tables can be turned around during clashes by this one simple skill. I recommend learning this if you are planning a PvP build.

(32)Taunting Howl - Lv. 5
Damage: Not much damage output, constant at 100% Physical Attack regardless of level
Support: Can used to provoke mobs, since it provides 12000 threat to the user at Lv. 1, and 22800 if maxed
Utility: Flinches the opponent, reduces its Physical, Magical, and Critical Rate Stats for 10 seconds; in PvE, if enhanced by Critical Mastery, it consumes 5% of the user HP when used, but raises his own STR for 50% for 10 seconds (see Critical Mastery on the Barbarian skill tree for further explanation)
Analysis: This is like a "mini Havoc Howl", just that it can be cast quickly, it reduces Critical Rate of the opponent and gives threat to the user. You will need this skill for your STR Stacking routine, enhanced by the Critical Mastery passive. Max this for 13 a second cooldown on PvE. Just be careful not to use this much if you are going solo, since it consumes 5% of your HP every time you use it (assuming you learned Critical Mastery). So if you do not have a healer around, or you do not have health potions with you, doing a little math, you can only use this for only 20 times before you are dead (20 x 5% = 100% HP, derp).

(33)Havoc Howl - Lv. 4
Damage: Fairly high damage output
Support: No direct support capabilities
Utility: Reduces the opponent's Physical and Magical Attack stats by 60% for 20 seconds both in PvE and PvP; maneuverable, can be aimed around the user after casting
Analysis: Max this one. No class is resistant to its debuffs, so again, max it.

(34)Devitalizing Howl - Lv. 1/ Lv. 4(PvP)
Damage: Not much damage output
Support: No direct support capabilities
Utility: Removes an opponent's buffs, and restrict it from using skills
Analysis: Leave this skill at Lv.1 in PvE, solely for use against the Minotaur's infamous berserk buff in Black Dragon Nest. If you don't want to dedicate in Dragon Nests, do no get this one and invest in other skills, such as the Crisis Howl or Ring Bombs. Treat this one like the Havoc Howl, use this in appropriate situations. It is not maneuverable (it cannot be aimed once you cast it!), so make it count. You will need to max this one if you are planning a good PvP build. It can disable your opponent completely for 4.2 seconds, leaving you room to attack, or stack more debuffs depending on the situation. I consider it a game changer, if you ask me.

(35)Battle Howl - Lv. 5
Damage: None
Support: Provides 2250 Physical Attack, 20% Stun Rate, and 6200 Critical Rate for 180 seconds for the user's teammates
Utility: Oh, I forgot, see those stats up there? Yeah. You also get them after you cast this baby.
Analysis: Max this and definitely add a skill ring for this one (5886 Physical Attack and 11480 Critical Rate at Lv. 6! Holy Meatballs.). Treat this as a permanent party buff since it provides the buff for 180 seconds at a 10 second cooldown. Cast and Forget!

(36)Iron Skin - Lv. 4
Damage: None
Support: No support capabilities, selfish buff
Utility: Provides maximum super-armor and 60% damage reduction for the user for 30 seconds
Analysis: This is a "selfish" Howl Charging. Max this one for maximum damage reduction. Best used in rotation with Howl Charging for permanent super-armor.

(37)Dash Blow - Lv. 1
Damage: Not much damage output
Support: No support capabilities
Utility: Sends the opponents in front of the user flying in mid-air; Can hit downed opponents; Can be followed-up with Soccer Kick Combo
Analysis: Leave this skill at Lv.1, unless you consider "tumbling and uppercutting everyone you see every 2.6 seconds" as a hobby

(38)Soccer Kick Combo - Lv. 1
Damage: Not much damage output
Support: No support capabilities
Utility: Downs the opponents around a small area of the user
Analysis: Leave this skill at Lv.1. This skill is pretty nifty as it can be used once every second (in theory, of course, since it has only 1 second cooldown!). Use this skill by right clicking after you have finished using either of the following skills: Soccer Kick, Rising Slash, Dash Blow, and Circle Swing EX.

(39)Toughness - Lv. 5
Damage: None
Support: No support capabilities
Utility: A passive skill providing 15% Physical Damage reduction to the user immediately after it has been learned; if the user is hit while his HP is below 50%, provides the user with a buff that adds 20% more Physical Attack Power for 60 seconds
Analysis: It is recommended to max this one, since mercenaries are considered to be semi tanks. Mercenaries are also combo-based both in PvE and PvP. Why am I saying all of this? It is because you can't afford hide and disrupt your combo just because you want to cower from all those heavy damage right? Right. Max this one. You are really missing out if you do not do so. Also, you should be doing damage while tanking instead of running away, considering the cooldown time of your skills are so long! Make each second count by doing some damage instead of hiding like Gosuk! But if you really insist on not getting this one, just at least leave it at Lv. 1 for the buff that provides 20% physical attack. I know you want that... Don't you? See the list below to see how the physical damage reduction increases as Toughness is incremented in PvE.

Toughness PvE & PvP Skill Increments:
Lv 1. - Physical Damage reduced by 3%
Lv 2. - Physical Damage reduced by 6%
Lv 3. - Physical Damage reduced by 9%
Lv 4. - Physical Damage reduced by 12%
Lv 5. - Physical Damage reduced by 15%

(40)Howl Charging - Lv. 5/Lv. 1(PvP)
Damage: None
Support: Provides teammates with "practically maximum" super-armor in PvE, and 30% physical/magical damage reduction
Utility: You get the stats mentioned above, plus 99.76% HP in PvE, 1% in Pvp.
Analysis: Now this is what I call awesome. Not only it provides your teammates with support, it also raises your maximum HP by 99.76% your current HP, practically double! Take note, this does not "heal" your HP, but rather "drowns" your current HP. For example: you have 100 HP, and after you cast the buff, you will now have 200 HP due to the buff (99.76% of your current 100 HP is 99.76, add it to itself, [100 + 99.67] you get 199.76, rounded off to 200). You will now notice that there is a big black empty space on your HP bar. Do not fret. It did not eat your HP, it just "drowned" it, so to speak. You will see similar results when you expose yourself to the Spirit of Genie provided by Kali. As a matter of fact, you can stack them to achieve more than a million HP! I've done that myself. Now if you do a little more math, you would also notice that your current HP is now 50%. You know where I am going here right? It means that you just now need to be hit by the opponent to in order for your Toughness and Offend Hit Buffs to activate (+20% Physical Attack from Toughness, and +40% STR from Offend Hit). Synergize this with Bone Crash and Taunting Howl, you get ludicrous amounts of Physical Attack gains. This is the very essence of STR stacking. In Ladder PvP, however, you will just be fighting all alone, so its support capabilities are somewhat useless. It's MP consumption is getting larger if you raise its level, and you do not want large MP consumption in Ladder, so leave this at Lv. 1 for emergency purposes only. Also, STR Stacking does not work in PvP either, so again, leave this at Lv. 1.

Barbarian Skill Tree Analysis


(41)Offend Hit - Lv. 4

Damage: Pure Damage is added to a hit if this skill activates successfully
Support: No support capabilities
Utility: Passive skill that provides a 40% chance of dealing additional pure damage to opponents based on the current maximum Physical Attack power; provides additional STR to the user depending on how much HP the user currently has
Analysis: Max this skill. Considering it has only a 2 second cooldown, matching it with a higher percentage of activity means dealing mini-burst damages every 2 seconds provided that you attack fast enough that you do not let it be idle for even a short moment. This provides pure damage, so it neglects any defence stat your opponent is having. The amount of damage done is dependent on the exact number of your Physical Attack power. Not only that, it also provides the user with a buff that adds +90%, +60%, or +40% STR, provided the user is hit while having only 20%, 40%, or 60% HP, respectively. A good rule of thumb: the lower the HP, the better. This is why we need Toughness. We wouldn't want a risky way to maximize Physical Attack Power. Got it?

(42)Bone Crash - Lv. 11
Damage: Very High Burst Damage
Support: Provides a "Bone Crash" debuff to every opponent that is hit, regardless if the attack is blocked or not
Utility: Bone Crash debuff for 15 seconds: pure damage for every hit on the opponent having the debuff; provides the user with additional Physical Attack Power equivalent to 50% of his current STR for 30 seconds in PvE; maneuverable, it can be directed where to land after casting
Analysis: The Barbarian's Signature Skill. You are not called a true Barbarian if you do not have this one maxed. This is a great support plus burst damage skill that provides +4400 pure damage to anyone who has the Bone Crash debuff. It is ultimately recommended to have a skill ring on this one so it could achieve a whopping +4800 pure damage per hit at Lv. 12. Yes, you read it right, pure damage. This means even though you play in adjusted maps (Lagendia Exploration, Dark Lairs, Treasure Stages, etc.), you will still get the same pure damage per hit you can as in non-adjusted ones (Nests, dungeons, etc.). And this is not even the fun part. After being cast, it provides the user with an additional Physical Attack Power equivalent to 50% of that of his current STR for 30 seconds, regardless whether or not the attack hit or missed. Yes, you heard me. Thirty seconds. You just need two seconds after the buff is depleted before casting this again, since Bone Crash has only 32 seconds cooldown. That is like practically having a permanent Physical Attack Power Boost! And you do not even need to harm anyone to have the buff activated! You could just basically hit the ground with this skill and still have the Physical Attack Power Boost. Best synergized with Whirlwind, Cyclone axe, and other similar multiple-hitting skills (ehem... Arrow Shower), making the Barbarian objectively better than it's tankier counterpart, the Destroyer, in providing support plus DPS in raid parties. Pure damage also applies in PvP, just that it is adjusted. Max it anyway, because I don't see why not.

(43)Stomp EX - Lv. 1
Damage: Extra range damage is +2% of that the original stomp
Support: No direct support attributes
Utility: Slow, 5 meter version
Analysis: Learn this skill. Wider range means a better potential for higher damage output and debuff range.

(44)Demolition Fist EX - Lv. 1
Damage: +30% additional damage on top of the original Demolition Fist
Support: No support capabilities
Utility: Passive: enhances your ordinary Demolition Fist; 70% stun chance when hit successfully using the Right Click button after casting
Analysis: Absolutely zero SP required, so get this one!


(45)Circle Swing EX - Lv. 1

Damage: Additional +30% damage on top of the original Circle Swing
Support: No support capabilities
Utility: Passive: enhances your ordinary Circle Swing; Sends opponents flying in mid-air after doing an uppercut using the Left Click button after casting; Can be followed-up by Soccer Kick Combo using the Right Click button after the uppercut
Analysis: Again, zero SP required. What's your excuse for not learning this one? Plus, it utilizes the Soccer Kick Combo. Also, it makes your ordinary Circle Swing 20 percent cooler by adding that awesome crimson red visual effect after you cast this. So, there's that.

(46)Whirlwind EX - Lv. 1
Damage: +30% full hit damage
Support: No support capabilities
Utility: Passive: enhances your ordinary Whirlwind; increases hit count, damage, spinning speed, and AoE of Whirlwind
Analysis: Learn this skill. Why? Because.

(47)Critical Mastery - Lv. 1
Damage: None
Support: No support capabilities
Utility: Passive skill that provides a buff that increases in Critical Rate by 20% in PvE, and 10% in PvP for 10 seconds after using either Battle Howl, Taunting Howl, or Havoc Howl; Passive: enhances Taunting Howl (see Taunting Howl for further explanation)
Analysis: This skill is appealing not because of its ability to provide additional critical rate, but because it enhances Taunting Howl. This is also one of the reason why Barbarians are much more superior compared to Destroyers in terms of STR Stacking. The Verdict? Learn this skill in both PvE and PvP. That +10% critical rate in PvP is much more than you think it is.

(48)Bone Crash EX - Lv. 1
Damage: +50% Extra Damage
Support: No support capabilities
Utility: Use left-click after using Bone Crash to lift enemies up in the air. Very useful in PvP, as it can give you an oppotunity to reset your combo cycle.
Analysis: Learn this one. Deals extra damage, does a utility of lifting your opponents, what's there to hate?

Item Build Analysis

This section of the guide will be dedicated to my own personal recommendations for the items best suitable for a Barbarian in both PvE and PvP environments. No set combinations, suffix, potential, and dragon jades recommendations will be given here as I will only discuss Enhancement Heraldries, Skill Heraldries, and Skill Accessories. As said in the introduction of this guide, no expensive items, nor CC-exclusive items will be involved. The following analyses are made in conjunction with the given skill build above. Therefore, maximum effectiveness of the following item builds will only be experienced if the skill build was exactly followed.

General Enhancement Heraldries

  • Bear - Raw STR is needed by any Barbarian. Top priority heraldry.
  • Destruction - Barbarian is P. Attack based. Another Top priority heraldry.
  • Wind - This works best with Fatal, increases P. Attack and Critical Rate & Resistance.
  • Fatal - Provides higher critical rate on top of Battle Howl and Critical Mastery.
  • Iron Wall - Provides Higher Physical Defense on top of Toughness.
  • Tent - Barbarians are very vulnerable to M. Attacks. Tent nullifies magic.
  • Health - Provides HP, works best with Howl Charging.
  • Life Vitality - Provides even more HP, works best with Howl Charging.

PvE Skill Heraldry and Accessory Configurations
PvE Skill Heraldries:

  • Whirlwind +20% Damage
  • Gigantic Bomb +20% Damage
  • Circle Swing +20% Damage
  • Ring Bombs +20% Damage or Taunting Howl -12% Cooldown

PvE Skill Accessories:

  • Whirlwind +1 Necklace or Ring Bombs +1 Necklace
  • Circle Swing +1 Earrings
  • Battle Howl +1 Ring
  • Bone Crash +1 Ring or Taunting Howl +1 Ring

Analysis:

  • Since Whirlwind is the main DPS skill of the Barbarian, you will need to raise its damage even further. The best way to do this is by using a Skill Necklace in conjunction with a skill enhancement heraldry.
  • If you do not have plans to increase Whirlwind further, you can use a Ring Bombs +1 Necklace to achieve its peak increment of Lv. 16.
  • In order for a Barbarian to maximize his burst damage capabilities, Gigantic Bomb must be raised a step higher by using a +20% damage heraldry.
  • Because Circle Swing is hanging on Lv. 15, we must raise its level to the peak increment of Lv. 16 by using a Skill Earring. To further raise its DPS, we must use a +20% damage heraldry.
  • Battle Howl Provides the user and his party members with a pseudo-permanent buff that increases raw Attack and Critical. We would want to raise the said stats even further. To do this, we use a +1 Skill Ring.
  • If one wants to achieve permanent Attack Power Buff provided by Critical Mastery-Enhanced Taunting Howl, we must lower its cooldown time to 10 seconds. To do this, a +1 Skill Ring is sufficient, but if this is not enough for some reason, use a -12% cooldown heraldry in conjunction with it to further reduce the cooldown time to 8.8 seconds.
  • Bone Crash is best used against mobs with special resistances. Raise Bone Crash's pure damage output by using a +1 skill ring.

PvP Skill Heraldry and Accessory Configurations
PvP Skill Heraldries:

  • Whirlwind +20% Damage
  • Cyclone Axe -12% Cooldown Time
  • Circle Swing -12% Cooldown Time or Devitalizing Howl -12% Cooldown Time
  • Rolling Attack -12% Cooldown Time or Havoc Howl -12% Cooldown Time

PvP Skill Accessories:

  • Whirlwind +1 Necklace
  • Stomp +1 Earrings
  • Battle Howl +1 Ring
  • Bone Crash +1 Ring

Analysis:

  • Since Whirlwind is the main DPS skill of the Barbarian, you will need to raise its damage even further. The best way to do this is by using a Skill Necklace in conjunction with a skill enhancement heraldry.
  • Cyclone Axe is considered to be the best utility skill of Mercenaries in PvP, and we need more opportunities to cast this rather than damage. To do this, we must reduce its cooldown by using a -12% Cooldown Time Heraldry.
  • Not only it gives superior damage output, Rolling Attack also gives the Mercenary another means of escaping or mobilizing during a Ladder-PvP Match. To have more opportuities to cast this, use a -12% Cooldown Time Heraldry.
  • To do more combo routines, we need to reduce the cooldown time of our "uppercut" skills. One such skill is Circle Swing. Not only it provides SA-breaking abilities, its damage is also decent. Use a +1 skill Earrings in conjunction with a -12% cooldown time heraldry.
  • Battle Howl Provides the user with a pseudo-permanent buff that increases raw Attack and Critical. We would want to raise the said stats even further. To do this, we use a +1 Skill Ring.
  • Pure damage is very vital to winning a Ladder-PvP match, especially when the opponent has ridiculous equipments with special resistances. Thankfully, we have Bone Crash. Raise it's skill level by using a +1 skill ring, as it is very well synergised with Whirlwind EX or Cyclone Axe.
  • For more opportunities of casting Devitalizing Howl in a time-critical Ladder-PvP match, use a -12% Cooldown Time Skill Heraldry. It reduced its cooldown time from 27s to 23.8s, best used in synergy with Stomp which only has 18s cooldown (5.8s waiting time).
  • In mirror matches, being the one to cast the first skill gives you the upper hand. That being said, If you are against a fellow Mercenary, to make sure you are the first to cast Havoc Howl, equip a -12% Cooldown Skill Heraldry to reduce its cooldown from 125s to 110s. That's just 20s after the opponent can use his Ultimate (Cyclone Axe or Gigantic Bomber). So if in 20s after his Ultimate has cooled down and he does not use it yet, you may have the chance to weaken the blow by using this skill.

Strength Stacking (STRacking)

This section of the guide will be dedicated for the discussion of the best thing about a Barbarian. This is the very reason why anyone would love to play a Barbarian. This is the thing that separates a Barbarian from all other classes in the game, the very definition of superiority of damage output over a Destroyer: a Barbarian's ability to do Strength and Physical Attack Stacking.

So what exactly is STRacking? STRacking is just a fancy word I have come up with, a spoonerism of STR and stacking. Basically, this is the process of casting and activating STR and physical attack boosting buffs through certain methods and ultimately achieving a significant boost in Physical Attack. This is only exclusive for the Barbarian class, and its significant effect only works in PvE.

To put it into perspective, STRacking allows a Barbarian to boost his stats from this:
Before STRacking, Town Stats

To this:

After Perfect STRacking

"So what is this so-called method?"
"What should I do in order to achieve perfect STRacking? Does it have to be in order?"
"What are the skills necessary to achieve this?"

All of those questions will be answered! Read on!

Firstly, you have to be educated about both the active and passive skills that come to play when you execute this technique. They are:
  • Toughness Buff
  • Critical Mastery-Enhanced Taunting Howl
  • Bone Crash
  • Battle Howl
  • Howl Charging
  • Offend Hit Buff

Second, you must know how to "drown" your HP and what is its significance in the routine. There are two categories of HP Drowning: Absolute and Additive HP Drowning.
  • Absolute - Your current HP value is absolutely affected. This is achieved when you are damaged by monsters, when you do self-inflicting damage such as the Critical Mastery-Enhanced Taunting Howl, or if you unequip your set.
  • Additive - Your current HP stays the same, but it is drowned relative to the amount of new HP added. This is achieved when you cast Howl Charging, or expose yourself to the Spirit Genie Buff by Kali, or if you put on new equipments while in dungeon.

The significance of HP drowning is that it is the only way to activate two significant buffs involved in the STRacking routine. Toughness Buff only activates when you are hit while having less than 50% HP left, and Offend Hit Buff is only maximized when you are hit while having less than 20% HP left.

Lastly, you must know the method. Now this is the most important part. To achieve "Perfect STRacking," you must perform these 10 easy steps:
  1. Unequip your whole set, from helmet to secondary weapon.
  2. Re-equip your set. You will now notice that your HP is now drowned.
  3. Cast Battle Howl (+5886 P. Attack for 180 seconds at Lv. 6).
  4. Cast Howl Charging (Extra defense, because you want to get hit; further HP drowning to make sure the Offend Hit buff activates at its full potential).
  5. Your HP should be below 20% by now. Always double check this.
  6. Cast Iron Skin for extra protection (optional).
  7. Be hit to activate Toughness Buff (+20% Physical Attack for 60 seconds).
  8. Be hit to activate Offend Hit Buff (+90% STR for 20 seconds; buff will refresh everytime you get while while having HP lower than 20%).
  9. Cast Critical Mastery-Enhanced Taunting Howl (+50% STR for 10 seconds).
  10. Cast Bone Crash (50% the current STR that was stacked is converted to Physical Attack for 30 seconds)
This is a video of me casting Gigantic Bomb without any buffs:

This is a video demonstrating the true potential of Gigantic Bomb with Perfect STRacking.

Honestly, the raw values shown in the video does not impress me, nor have I aimed it to impress other people. It is the significant difference in damage that is to be appreciated.

What do I consider "Perfect STRacking"?
Simply speaking, Perfect STRacking is achieved when all STR and attack power enhancing buffs are activated in their most highest potential. Imperfection occurs when even at least one of the many buffs are not optimized. For example: a Barbarian's HP did not drop to 20%, so his Offend Hit Buff will not provide +90% STR that it is supposed to give.

CAUTION: This method is not advisable if running solo on a long dungeon or if no healer is present in the party because using Taunting Howl while in the state of Additive HP drowning practically increases the amount of HP consumed directly proportional to the amount of HP added by the skill that causes the said HP addition (Spirit of Genie, Howl Charging, et cetera). See videos below for proof.

Normal use of Taunting Howl, no additive HP drowning, absolutely 5% of HP consumed.
466218 HP [100%]  to 442907 HP [~95%]


Taunting Howl while in the state of Additive HP drowning (Howl Charging)
466218 HP [100%] to 420373 HP [~90%]

What the heck happened?
HP consumption of Howl Charging is not fixed in terms of raw value, and is dependent of the current total HP of the user. It will always consume 5% HP of the current total HP, and not 5% of the original HP of the user. That being said, always anticipate an increase in Taunting Howl HP consumption every time you are executing additive HP drowning (e.g. Howl Charging, Spirit of Genie, et cetera).

Frequently Asked Questions 

Do you follow you own builds religiously? 
In terms of skill builds, yes I do. I actually own a skill expansion just to accomodate those two builds I have presented. In terms of item builds, not quite. I have a hybrid configuration of heraldries to accomodate both of my PvP and PvE needs. I would sometimes swap out heraldries for new ones for me to experiment on, same goes with the accessories.  

The MMOsite DN Skill Simulator says that Taunting Howl does not change cooldown per level increase but in-game, it is otherwise. Why is that?
It is just an error. Always test in-game, and do not depend blindly on third party simulators. 

What's with all these HP coditions in STRacking? I'm confused! Any tl;dr versions? 
Lower your current HP to as low as 20%, get hit once, or if you want, twice to make sure, cast Taunting Howl, Bone Crash, and DPS away! Congratulations, you just performed a perfect STR Stacking on a Barbarian! 

How much is the Critical Rate cap now? How can I achieve it? 
As far as I know, the critical cap is somewhere at 121,000. If you want to achieve this without any doubt, make sure your town stats is at 69%, and as you cast Critical Mastery (+20% critical rate) everytime, your critical rate will be adjusted to reach the cap of 89%. Which Elemental Conversion Jade is strongest for Barbarian? None. Generally speaking, Elemental Conversion Jades make Barbarians weaker due to the fact that it subtracts 30% Elemental Attack from the moment you equip it. When going solo, it is still advisable to go pure Physical Attack rather than to equip an elemental conversion jade. In parties, however, it is advisable to study the party composition first before equipping an elemental conversion jade. If most members have Light Buffs or Light Resistance debuffs, then go for Lightning ECJ. If most members have Dark Buffs or Dark Resistance debuffs, then go for Abyss ECJ, and so on. To answer your question briefly, there is no universally strong Elemental Convesion Jade. 

How do I achieve a perfect Mercenary tree (133 SP allocated in Mercenary tree)? 
Allocate 49 SP on the Warrior tree and 25 SP on the Barbarian Tree. 

Why is Relieve on an awkward skill increment (Lv. 5) on your Ladder-PvP Build? Why not max it? 
If you have read the whole guide, Relieve Lv. 5 gives the same effect as Relieve Lv. 6 in PvP. So don't waste that 1 SP! 

Where do I grind from Lv. 70 to Lv. 80? 
Fortunately, you are a Barbarian. There no problem in soloing dungeons because of your inherent Toughness, and Dash that makes you clear them faster. You can go solo Hard mode on these dungeons: 

Lv. 70-75: Abyss Of Heat 
Lv. 75-80: Wailing Wall

Level 80 PVP Gladiator Build Guide in Dragon Nest [T4]

$
0
0
Here's a level 80 Gladiator build guide on Dragon Nest which is PVP-oriented. This guide is written by one of the guys in Dragon Nest SEA forum which has an IGN of vvvgod.

80-Cap Skill Build:

Heraldry Plates: 

1. Halfmoon Slash +50% Animation Speed
2. Evasion Slash +20% Damage
3. Line Drive +20% Damage
4. Sidekick +50% Animation Speed

Skill Accessories (Left to Right): 
1. Line Drive + 1
2. Eclipse + 1
3. Provoking Slam + 1
4. Hacking Stance + 1

(unmentioned skills are not used) 

WARRIOR TREE SKILL NOTES 

  • Heavy Slash, long range and hits the ground 
  • Impact Punch, lifts fast and cooldowns fast 
  • Tumble, saves your life 
  • Elbow Drop, hits the ground 
  • Impact Wave, pushes fallen enemies away 
  • Wake Attack, i-frame and causes rollback 
  • Side Kick, mobility and speed 
  • Sweeping Kick, 180 combos 
  • Drop Kick, surprise rollback 
  • Rising Slash, up and up you go 
  • Dash, run to a safe place 
  • Circle Break (Lv 6), shatter that super armor 
  • Aerial Evasion, rise again 
  • Passive Max HP Boost, stay healthy 
  • Passive Max MP Boost (Lv 1), some extra MP 
  • MP Recovery (Lv 5), never run out of MP 
  • Relieve, brush it off Highlander, it's now or never 

SWORD MASTER TREE SKILL NOTES 

  • Triple Slash, interruptor 
  • Cyclone Slash, take you for a spin 
  • Dash Slash, cancel that skill 
  • Aerial Combo, death from above 
  • Moonlight Splitter, paper cuts 
  • Crescent Cleave, Impact Wave on steroids 
  • Halfmoon Slash, adios 
  • Dash Combo, wall combos 
  • Deep Straight, pierce fiercely 
  • Eclipse, hit all around you 
  • Hacking Stance, out for murder 
  • Brave, toughen up 
  • Line Drive, this is going to hurt 
  • Provoking Slam, this is the opposite of anesthesia 
  • Counter Exile, X from above 
  • Infinity Edge, saving grace 

GLADIATOR TREE SKILL NOTES 

  • Evasion Slash, annoying isn't it? 
  • Finishing Attack, explode 
  • Triple Slash EX, it gets worse 
  • Deep Straight EX, better faster stronger 
  • Hacking Stance EX, I told you it gets worse 
  • Line Drive EX, this is overkill 
  • Physical Attack Mastery, feed the bloodlust 
  • Finishing Attack EX, another one bites the dust

Dragon Age Inquisition Dual Dagger Assassin Rogue Build Guide

$
0
0
Here is a Dragon Age Inquisition Dual Dagger Assassin Rogue Build Guide written by KineticGTR.

One of the most complicated and rewarding classes to play in Dragon Age Inquisition, a dual dagger Assassin Rogue! Timing, position, and resource management make playing this class a test of focus more than any other I've played. 

This guide focuses on how to build your class using a combination of standard skills from the Subterfuge, Sabotage, and Double Dagger skill trees, and new active and passives from the Assassin specialization tree for Rogue. 

This build has been put together from a fresh respec. With about 15-20 points to place, you can put together a very powerful Assassin that has everything it needs to dominate on the battlefield. 

Double Dagger 
Twin Fangs / 
Ripping Fangs (Skill upgrade) / 
Flank Attack / 
Skirmisher (Skill upgrade) / 
Dance of Death /
Sneak Attack / 
Deathblow 

Sabotage 
Caltrops (unused, but necessary) to get to the passive Looked Like It Hurt 

Subterfuge
Stealth 
Lost in the Shadows (Optional skill upgrade) / 
Evasion / 
Evade / 
Ambush / 
Shadow Strike / 
Quick Blade (Skill upgrade) 

Assassin (Specialization) 
Hidden Blades / 
Overkill (Skill upgrade) /
I Was Never Here /
Knife in the Shadows / 
Mark of Death /
Throatcutter 

Here are some other skills worth investing in and replacing Evade with. 

Hook and Tackle - A great skill that can help you reach archers and mages on the outer edges of battle. And with it's upgrade It Beats Walking, it costs no stamina and has no cooldown. 

Knockout Powder/Knockout Bomb, and the passive Mercy Killing could also be worth taking and applied in certain situations. You will automatically critical hit a target this way.

Poisoned Weapons and it's upgrade Infected Wounds. A decent damage builder, but with you other skills, your target is most likely dead way before the poison even works its duration.

Gameplay: There are basically two plans of attack that I use and I'm almost always positioned if possible behind my target(s) 

Method 1 for normal encounters, single or multiple targets - Stealth, move behind target, Hidden Blades, Flank attack for Stealth, Shadow Strike, Stealth, Twin Fangs. At this point, something is probably dead. If not, Deathblow. Now it's definitely dead. ;) 

Method 2, recommended for targets with high HP - Mark of Death, Flank Attack for Stealth, Hidden Blades, Stealth, Shadow Strike, if enemy is 25% health or less, trigger Mark of Death. If not, consider Twin Fangs and/or Deathblow, then Mark of Death. Probably dead. ;) 

For extremely high HP enemies (ex: dragons) your priority skills are Mark of Death, Hidden Blades, Flank Attack, Twin Fangs, Shadow Strike (to reduce cooldowns of previous skills) When enemy drops below 50% health, start using Deathblow.

As many chances as you get, attack from Stealth. HOWEVER! Do not stand around doing nothing, waiting for Stealth to attack. If you're waiting for Stealth, and/or low on stamina, use basic attacks. You should always be attacking or moving into position to attack from behind! 

Also, unless you have aggro, don't go into Stealth and then wait more than 2-3 seconds to use a skill. Instead, use basic attacks, and when you're skills are off cooldown, then go into Stealth and attack with Skills.

A Brief Guide on How Damage Reduction Works in Dragon Nest

$
0
0
Here's a short but informative guide written by vinter888 of DN SEA forum on how damage reduction works in the game.

To show how damage reduction work. there is few groups of damage reduction

Defend and magic defend of a character, cappd at 85%. most obvious way is wear armor, int give Mdef, vit give def.  so ****tail and genie that give int% and vit%  indirectly improve def and mdef too. int class will naturally have high mdef by stacking int(sorc,priest,screamer,ml,art). so there is pattk/mattk by bosses as well, pattk reduce by def, mattk reduce by mdef.

Damage reduction by buff and defend buff on action. capped at 75%. skill included: iron skin, howl charging, ice/fire shield, heal of chakraEX, miracle relic, protection shell, fiery vortex, rolling attack,Eraser,mechanic mode.

Additional notes from Vaporizer:
Just wanted to point out that the damage reduction from skill action will not take effect on the hit that breaks the skill SA (unlike buff clearing skills, the damage from these skills, if any, will still take into account the buffs that were present on the character before being cleared by said skill).
Damage reduction by reducing boss attack(debuff). capped at 80%. 3 skill only in DN, taunting howl, Havoc howl and mecha bomber. it work by reducing the attack power of attacker. with the natural of these skill, it work wonder in map(BDN) have alot buff clearing mechanic

Elemental defend. capped at 90% skill included:conviction aura(light def), elemental aura(fire and ice def), blessing of light(light def). can reduce damage of corresponding element attack.

Transition Damage. exclusive skill of engineer.has own mechanic to reduce damage. it work by transfer away 60% (max level)of the damage received to alfredo. and this buff still work even the alfredo is not on field, as long the buff is there.

Phantom Guard, work similar as TD, but is transfer 22% (max level) of damage received to MP.

Defend buff with durability. skill included: Guardian force and bubble bubble. adsorb fix value of damage received.

A mathematical formula to show how they work together. 

Raw damage x (100%-reduce boss attk) x (100%-def/mdef of char) x (100%-dam reduction by buff ) x(100%-elemental def) x (100%-TD) x (100%-phantom guard) - (defend buff with durability) = damaged received/hp reduced

if final value is negative value it mean 0 damage received cause adsorb by GF/bubble and still have durability remain to absorb next attack.

Example 

1. boss deal 1 000 000 raw damage, there is taunting(20%), HOC(50%), phantom guard(22%) and character defend 40%

damage received = 1000000 x (1-0.2)x(1-0.4) (1-0.5)x(1-0.22) = 187 200 hp reduced

2. boss deal 1 999 999 raw damage, there is havoc(60%),taunting, howl charging(30%), hoc and phantom guard. char defend 40%
hoc and hc is same group so 50%+30%, but is capped at 75%. 
taunting and havoc is same group so is 20%+60%
damage received = 1999999 x (1-0.8) x (1-0.4) x (1-0.75) x (1-0.22) = 46 799 hp reduced.

3. boss deal 2 888 888 light elem raw damage, there is TD(60%), mecha bomber(36%), protection shell(24% def),MR(70% def) , blessing of light(24% light def) and char def is 60% (cleric)
MR + protection shell =70%+ 24% = 94% but capped at 75%
damage received = raw damg x(mecha bomber)x(char def)x(def buff)x(light def)x(TD) = hp reduced
damage received = 2888888 x (1-0.36) x (1-0.6) x (1-0.75) x (1-0.24) x (1-0.6) = 56 206 hp reduced

4. boss deal 1 000 000 raw damage, no any others reduction, char def 40%
damage received = 1000000 x (1-0.4) = 600000 hp reduced 

5.  1 000 000 raw damage. with HOC, char def 40%, GF(max level=112 192 durable)
damage received = 1000000 x (1-0.5) x (1-0.4)- 112192 = 300000 - 112192 = 187808 hp reduced

extra note: some mobs attack come with clear buff effect. it doesn't mean def buff not work. that 1 hit of clearing buff still affect by def buff and have reduced damage. 

If there is any error or anything missing and question.feel free to comment

Comprehensive Level 80 Artillery (PVE and PVP) Build Guide in Dragon Nest [T4]

$
0
0
This is a comprehensive level 80 Artillery build in Dragon Nest written by Rylaine from DN SEA forum. It will tackle the recommended pvp and pve skill builds for Artillery at level 80 and also, the different types of recommended gears, accessories, plates and more. Lastly you will be given insights on some of the FAQs of an Artillery.

Enjoy guys!

Artillery class
- Upper Tier DPS
- Consistent high damage
- Spam-able skills
- Highly Mobile
- Lower critical % than Sniper
- High critical damage than Sniper
- Low defense stats
- Up to 35% Debuff, 20% Critical Buff

Bowmaster Skills

*Important Skills to Note for Bowmaster

Archer Tree
Twin Shot - Spammable 2-hit Skill
Magic Arrow - Triggers like Rapid Shot EX but 1 arrow only *PVP FLINCHER*
Multi Shot - Weak Damage, requires close range *PVP FLINCHER*
Wise of Owl - 20% Critical to everyone in party
Rage of Owl - 50% Critical Rate to everyone in party

BowMaster (NON EX SKILLS)
Charged Shot - Filler Skill, not very necessary to Artillery
Siege Stance - Filler Skill, not very necessary to Artillery
Aerial Chain Shot - Burst Damage for Artillery, can use as Aerial Evasion
Arrow Shower - Decent DPS skill for Artillery especially when out of skill rotation
Scope Arrow - Main DPS Skill
Swift Shot - Main DPS Skill (Close Range)
Rapid Shot - Main DPS Skill
Tracking Arrows - Main DPS Skill
Revolution Ballista - Ultimate Skill
Arrow Barrage - Sniper's Ultimate Skill, good for PVP only
Ankle Shot - Utility Skill mainly to bind enemies, not necessary in PVE
Bulls-eye - Very good all round debuff. Max for PVE
Spiritual Excel - Max for PVE, boosts Agility and Intellect
Sylph Aid - Max for PVE, boosts Damge and Movement Speed

Artillery Tree
Detonating Arrow - Fires a high SA Break Arrow which explodes after 3 seconds
Magical Breeze - Boosts Magic Attack by a %. Coverts PATK skills to MATK using the same amplification
Magical Attack Mastery - Boosts Magic Attack damage by 10%

EX Skills
Scope Arrow EX - Damage Boosted, leaves an Extension Coreat the center of the explosion
Swift Shot EX - Damaged Boosted, additional jump back shot added. Swift Arrow can be fired from Extension Core
Rapid Arrow EX - Damage Boosted. More Arrows and Range Increased
Tracking Arrow EX - Damage Boosted. Explosions at the end of arrow. 20 Critical hits trigger Red Tracking Arrows with double damage.

Longbow VS Crossbow

The topic is quite the debate amongst Bowmasters, especially the Artillery class, Sniper shouldn't hesitate and go for Longbow, since Sniper excels at range however, no one will stop you if you prefer the spammable 3-hits from crossbow. Here are some things to consider regarding your choice of bows.

Longbow
- Further Range
- Higher Critical
- Larger Potential Damage
- Lower Consistency
- Single Hit normal attack with 3rd consecutive attack being piercing

Crossbow
- Shorter Range
- Lower Critical
- Consistent Damage
- 3 hit normal attack

These are things to consider regarding longbow and crossbow choices
1) Do you Need Critical Badly
2) Do you prefer hitting at range or hitting close-combat

Personally, I use a Longbow mainly due to carrying a Darkness Longbow costume. However, Longbows would benefit just a bit more in PVP for longer range attacks. For PVE, personally I recommend using Crossbow. As an Artillery, you probably won't need so much extra critical from the longbow.

*Black Dragon Legend Crossbow +12 VS Black Dragon Legend Longbow +12


Player VS Environment (PVE) Skill Build

Base Build

The Skills above are the skills that you MUST have for PVE

Archer Tree
1) Level 1 Twin Shot BECAUSE Magic Arrow provides better DPS at Level 21 onwards
2) Level 21 Magic Arrow BECAUSE Magic Arrow Level 25 damage increase is not as significant unless Level 26
3) Level 1 Mana Mastery and Mind Conquer BECAUSE Artillery have high INT stat = High Mana Regen Rate and Pool

Artillery Tree
*NO EXPLANATION REQUIRED*
Possible Additions for PVE
1) Rage of Owl can can be added to Level 1 if you have extra SP and your party members are lacking in critical.

Burst DPS Skill Build
The skills below are in reference to when the respective skills are at their EX. SP consumption 130/133. Crossbow Mastery and Longbow Mastery can be used interchangeably.

Bowmaster Tree
1) Level 16 Aerial Chain Shot - This is the main difference of the 2 DPS Builds. ACS Burst Damage is still considerable.
2) Level 16 Scope Arrow EX - Only kept at Level 16 if SP in sufficient BECAUSE it deals the least damage compared to others

Explanation
The Burst DPS skill build focuses on higher DPS in a short period of time, often during 8 Man Raids. This build works better with "Beyond Time" as ACS is a fast-cast skill as well. However, by just normal skill rotation, you will run out of skills to cast for a short period of time.

Consistent DPS Skill Build
The skills below are in reference to when the respective skills are at their EX. SP consumption 133/133. Crossbow Mastery and Longbow Mastery can be used interchangeably.

Bowmaster Tree
1) Level 11 Aerial Chain Shot - Compared to the previous build, ACS is only Level 11 to make way for Arrow Shower
2) Level 18 Scope Arrow EX - Added 2 SP points to Scope Arrow EX BECAUSE there are honestly nothing else to add to
3) Level 1 Arrow Shower - Still a strong filler skill, but weaker in damage output compared to ACS (tested)

Explanation
The Consistent DPS skill build focuses on DPS constantly. For this build, unless Arrow Shower is cancelled, all major DPS skills should be available for cast. Arrow Shower must be cast a distance and requires casting time, avoid using it when alot of dodging is required.

Artillery Equipment (PVE) Magic Attack Build 
The Magic Attack Build is still the general basis of building an Artillery for damage for Level 80 Cap The Following will be covered in this section:
1) Skill Heraldy
2) Plate Heraldy
3) Talisman
4) Armor Choice
5) Weapon Choice

1) Skill Heraldy
This build is for maximizing damage for Artillery. These are your options.
- Scope Arrow 20% Damage
- Swift Shot 20% Damage
- Tracking Arrows 20% Damage
- Revolution Ballista 20% Damage
- Revolution Ballista 12% Cool down

2) Plate Heraldy

For Artillery, your dodging skills should be good, prioritize damage boosters instead of defense first. MUST HAVE
- [ATK] Magician / Intellect
- [DEF] Life Vitality / Health

RECOMMENDED
- Ultimate BECAUSE Final Damage 5% is a great boost in PVE even your don't carry Final Damage on armor/weapon
- Tent BECAUSE Magical Defense reduces the damage you take in case you make mistakes
- Iron Wall BECAUSE Physical Defense reduces the damage you take in case you make mistakes
- Fatal BECAUSE Critical maxed is an important part of the game, an Artillery that can't hit 69% Critical without buff, GET THIS! OPTIONAL (Only if you have extra Heraldy Spaces left over after the above 7 plates)
- Wind, if 69% Critical cannot be achieved even with Fatal Plate
- 3rd Stat Junk Plates, use Magic Attack or Vitality 3rd stats unless you can afford Final Damage
- Bear, use ONLY IF it manages to boost your Critical Damage by 1%

3) Talisman
This are the list of Talismans you should get in the following priority, how you arrange them is up to you. But preferably, Attack, Defense then Junk.

HIGHEST PRIORITY (Put at 200% or 175%)
- Intellect / Magician / Life Vitality / Health / Ultimate (If you can afford)

MID PRIORITY(Put at 175% - 125%)
- Tent / Iron Wall / Fatal / Mana Regen (If you have Level 0/1 Mind Conquer

NOTES:
1) If your Junk Talisman contains Final Damage, maximize it if you wish
2) Talisman order can be switched on situation

4) Armor Choice
This is the list of armor choices Pre-80A sets. Keep in mind Level 80 nest is made for people using Level 70 Unique Gear (70S). Armors below Level 70 are NOT RECOMMENDED. Armors should be carrying [1 Skill Jade, 1 Intellect Jade, 1 Life Vitality Jade]

1) New Moon / Saviour (70A) - Cheap, Minimum for survival, [+8 Above] Cost Price => Under 5k Gold for Full Set Armor 70A is the lowest benchmark for nesting armor-wise. Using armor under level 70 with no jade options will probably result in instant fatality.

2) Hero (70S) - Free but time consuming, decent defense [+6 Above] Cost Price => Free 70S just got released with Level 80 patch, it is pretty easy to get and takes time partially do to it being non-tradeable. If you can PVP well, get this.

3) Black Dragon (70S) - Expensive, decent defense, more damage oriented than Hero. [+6 Above] Cost Price => Roughly 40k Gold for Full Set Armor More attack bonuses and works in a 7 piece bonus with weapons. Looks good but defense wise it is the same as Hero (70S). Recommend to do BDN Memorial or BDN 8-man and just craft your own instead of buying. 

4) Black Dragon (70L) - Very Expensive, above decent defense, Good stat bonuses [+10 Above] Cost Price => Prepare at least 50k Gold MINIMUM This set as a full armor set is NOT RECOMMENDED since Level 80A will make most of this set redundant. Only use the Upper Body and Leg portions of the armor if you wish in conjunction with using the weapons for a 3pc or 4pc.

5) Volcanic (80A) - Updated when release

5) Weapon Choice
This is the list of Weapon choices Pre-80A sets. Keep in mind Level 80 nest is made for people using Level 70 Unique Gear (70S).

Weapons should be carrying [1 Skill Jade, 1 Intellect Jade, 1 Magician Jade]

1) New Moon (70A) - Cheap, Minimum for decent damage, [+10 Above] Cost Price = 10k Gold (+10) This is the lowest Tier of weapons to use in conjunction with the set as it doesn't give additional damage boosters compared to Saviour Weapon Set (70A). Aim for at least +10 if you want to be decent in Level 80 Nest.

2) Saviour (70A) - Slightly more FD oriented, relatively cheap [+10 Above] Cost Price => 10k - 15k Gold (+10) This is the lowest Tier of weapons to use however it beats New Moon as it grants additional 308 FD which will boost damage by a considerable amount. However since the grade is same as New Moon, get a +10 at least.

3) Hero / Black Dragon Unique (70S) - Good Raw Damage, Free (Hero) or Expensive (BDN) [+8 Above] Cost Price =>Free // 50k Gold Stats and set bonuses wise granted by the 2 different sets is about the same. Hero Weapon set requires 2000 Ladder rating though and would require about 5 weeks to accumulate enough Ladder Points to unlock both weapons. If you can't PVP, get BDN Unique weapons.

4) Desert Dragon Legend (60L) - Good Damage, 2 PC FD Bonus, Very Expensive (BDN) [+12/13] Cost Price => 30k - 100k+ People who don't have a budget of 80k DON'T USE THIS. At the introduction of level 80 cap, I do not recommend people crafting and upgrading this from scratch. People using this probably made this long ago since they can afford the enhancement fluctuations. Still grants good damage at +12/13.

6) Accessories
Accessories for a Magic Attack Artillery is pretty straightforward. Go for either Generic Intellect Boosting 2 Stat Necklace/Earring or Intellect Main Stat Skill Necklace/Earring. For rings, use Skill Rings.

Rings should be carrying [1 Magician Jade]
Necklace/Earrings should be carrying [1 Life Vitality Jade or Intellect Jade]

1) Regular Epic or Unique Grade Intellect Necklace/Earring (2 Stat preferred) Cost Price => Dependent This is the most basic to get for damage boosting. Uniques can only be obtained from Dragon Fellowship (Level 70) unless you use BDN Unique Accessories. Epics drop from "Anu Arendal Ordeal Nest" Equip them with Intellect or Life Vitality Jade as per your requirement.

2) Skill Accessory (Intellect Base) Cost Price => Dependent Stat would be abit weaker defense wise compared to "1" but grants better damage for skills. Skill Accessory to get:

3) Skill Rings (Bulls-eye and Magical Breeze) Cost Price => Dependent These 2 rings are a must have for any good Artillery. Bulls-eye increases armor debuff on monster by 5% and Magical Breeze increases magical damage (not reflected) by 3%

Light Attack Build
The Light Attribute Artillery is only achieved with the use on a Elemental Conversion Jade Since the current ECJ has a -30% Elemental attribute, to use the Light-Attack Build, it is optimum to have at least 1 of these characters on your team.

Light Fury / Inquisitor / Crusader
The following characters can be Light Attribute Boosters but come in only second to the 3 mentioned above due to them not reaping the maximum benefits from a full light-based party. Abyss Walker / Saint / Guardian

This section we will discuss the following
1) Light Attribute Buffs and Debuffs
2) Equipment for Maximum Light Damage output

1) Light Attribute Buffs and Debuffs These are the beneficial buffs and debuffs specific to light-attribute attacks that are afforded by Bringers / Priests and Paladins.

Buffs
1) Bringer - Blessing of Anja (+14% Light %) [+1 Skill = 16% Light]
2) Priests - Blessing of Light (+24% Light Attack)
3) Paladins - Conviction Aura (+30% Light Attack)
4) Priests - Cure Relic (+5% Light Attack)

DeBuffs
1) Paladins - The following skills have -15% Light Def on Monsters Charge Bolt, Lightning Zap
2) Priests - The following skills have -15% Light Def on Monsters Charge Bolt, Chain Lightning, Lightning Bolt
3) Priests - The following skill has above -20% Light Def on Monsters Heavenly Judgment
4) Inquisitor - The following skills have at least -15% Light Def on Monsters Mind Breaker EX (15%), Consecration (20%)

For Light attribute debuffs, Lightning Bolt & Chain Lightning overwrite each other, however, that still leaves a total of 98% Light Defense

For Light attribute buffs, the maximum obtainable Light Attack % at any one point is 75% Light Attack with Cure Relic on.

2) Equipment for Maximum Light Damage Output
For this calculation we we assume that 60L sub weapon is out of the picture so only jades will be included. The following below are maximum amount of light attack (Excluding pre-level 70 set accessories like Twisted Obsession and Manticore Accessories which are almost non-existent)

1) Light Attack Jades on Sub Weapon and Rings (8.05% x 3 = 24.15%)
2) Title: Overcoming Limits (5%)
3) Costume Rings: Blue Sparkling Rings x2 (5%) OR Brilliant Fragment Rings x2 (4%)
4) Elemental % on Skill Rings (3.55% x 2 = 7.1%)
5) Elemental Conversion Jade (-30%)

Counting Blue Sparkling Rings over Brilliant Fragment Rings, the total Light % you can achieve as an Artillery is:
24.15% + 5% + 5% + 7.1% - 30% = 11.25%

With the 3 Light Princes your Light Attack would total up to:
11.25% + 75% = 86.25%

Even with just 1 Light Attack booster around, your light attribute damage will still do much better than Normal Magic Attack. Magic Attack maximum gain % from Weapons and Rings is only 16%. UNLESS the monster has high light attribute defense.

*Did not include Magic Attack Bonus % from Plates/Costume because Light Artillery will still benefit from

Light Attribute Calculation example:
Magic Attack = 30,000 | Light Attribute = 40% | Final Damage = 20% [(30,000 x 140%)] x 1.2 = 50,400

Dark Attack Build
The Dark Attribute Artillery is only achieved with the use on a Elemental Conversion Jade Since the current ECJ has a -30% Elemental attribute, to use the Dark-Attack Build, it is optimum to have at least 1 of these characters on your team.

Abyss Walker / Light Fury / Majesty / Dark Summoner. Mainly Bringer.

All these characters are innately Dark-based except for Light Fury which boosts Dark a little less than Abyss Walker but still fits in pretty well.

This section we will discuss the following
1) Dark Attribute Buffs and Debuffs
2) Equipment for Maximum Dark Damage output

1) Dark Attribute Buffs and Debuffs These are the beneficial buffs and debuffs specific to light-attribute attacks that are afforded by Bringers / Majesty and Screamers.

Buffs
1) Bringer - Blessing of Anja (+28% Dark %) [+1 Skill = 32% Dark %]
2) Dark Summoner - Sadism Pleasure (+20% Dark)
3) Abyss Walker - Incarnation of Darkness (+25% Dark) [+1 Skill = 30% Dark]

DeBuffs
1) Majesty - The following skills have -20% Dark Def on Monsters Gravity Ascension Ex

Other Dark Team Benefits
1) Abyss Walker has a "Dark Burns Damage" which causes a 10% damage over time amplified by Dark % on the AW's attacks

Skills involved: Illusion Strike. Night Explosion, Plasma Burst, Line of Darkness

For a Dark Build, unlike a Light Build which depends on having a few Light Attribute Boosters, the main draw of the Dark Build is that you mainly require a Bringer on your team, better if its an Abyss Walker. Other characters that are Dark Based will mainly benefit and supplement the strength of the Abyss Walker. Players can also get Tough Accessories to boost Dark Attack unlike Light Attack. I will explain this later.

For Dark attribute debuffs, the maximum Dark Defense Reduction obtainable is -20% Dark.
For Dark attribute buffs, the maximum obtainable Dark Attack % at any one point is 82% Dark Attack

2) Equipment for Maximum Dark Damage Output
For this calculation we we assume that 60L sub weapon is out of the picture so only jades will be included. The following below are maximum amount of dark attack (Excluding pre-level 70 set accessories like Twisted Obsession and Manticore Accessories which are almost non-existent) However, Dark Attack is readily available via Tough Accessories but those cost easil 70k Gold ++. However it is still a worth it investment.

1) Dark Attack Jades on Sub Weapon and Rings (8.05% x 3 = 24.15%)
2) Title: Overcoming Limits (5%)
3) Costume Rings: Blue Sparkling Rings x2 (5%) OR Brilliant Fragment Rings x2 (4%)
4) Elemental % on Skill Rings (3.55% x 2 = 7.1%)
5) Elemental Conversion Jade (-30%)
6) Tough Necklace and Earring (~10% + ~9%) = 19%
*Tough Accessories vary depending on which grade you use, I just rounded it off*

Counting Blue Sparkling Rings over Brilliant Fragment Rings, the total Light % you can achieve as an Artillery is:
24.15% + 5% + 5% + 7.1% - 30% + 19% = 30.25%

With the maximum Dark Attack Boosters your Dark Attack at any one time would total up to 30.25% + 82% = 112.25%

By using Tough Accessories, even without a Bringer you can use Dark-Attack as your main mode of damage UNLESS the monster has high Dark Defense. That being said, a light-based party would generally by more favoured in level 80. However, with the correct class pairing, Dark attribute Artillery could still be efficient. *Did not include Magic Attack Bonus % from Plates/Costume because Dark Artillery will still benefit from that Percentage.

Player VS Player (PVP)

Player VS Player PVP Skill Build (Colosseum VS Ladder)

While the know-how of combo-ing in Colosseum and Ladder is similar. The 2 PVP Arenas differ greatly in several aspects. Personally, I am a Ladder PVP Artillery. I'm looking for an experienced Colosseum PVPer especially Bowmasters for assistance for this section. For PVP, the builds are more varied according to each individual's play-style. What I share here, is what I use

Here is a list of things that I feel is different between Colosseum and Ladder
1) Colosseum Damage is Standardized VS Ladder Damage is Equipment Based
2) Colosseum Mana Pool is almost limitless VS Ladder Mana Pool drains rapidly
3) Colosseum skills can be spammed VS Ladder skills have to be rationed to save mana
4) Dodging consumes a huge amount of mana in Ladder

Sadly in Ladder, unlike PVE, some of our skills have been nerfed such as:
1) Scope Arrow EX does not leave an Extension Core
2) Since no Extension Core, Swift Shot must be cast in close range
3) Tracking Arrows EX still collects critical counts but no Red Tracking Arrows will be fired. Once "20" has been hit, it will just reset with no benefit
4) Detonating Arrow EX shoots 2 explosive arrows instead of 3.

Keeping the above conditions in mind, I formulate my builds accordingly.
*Artillery Tree is maxed in both builds for obvious reasons.

Ladder PVP Build

*This build has 1 SP left over, personally, I add it to make Level 2 Arrow barrage, if you don't want Arrow Barrage feel free to allocate your SP elsewhere

Skills
- Twin Shot Level 26: Good Amount of Damage in a small 2-hit skill and it is spammable. Damage boosted at Level 26
- Multi Shot / Magic Arrow Level 1: Just to use to flinch or knock down opponents
- Mental Mastery/Mind Conquer Maxed: To cope with mana issues
- Aerial Chain Shot Level 1: Use it mainly for utility hang time or to knock down aerial opponents
- Scope Arrow EX Level 11: Not enough SP to Level 16. Very Linear attack easy to miss in PVP if lag, I choose to add other DPS skills over it
- Swift Shot EX Level 18: Extremely high burst damage but have to be used at very close range. Might want a +1 Skill - Rapid Shot EX Level 16: Decent AOE skill with good damage. Must get to Level 16.
- Tracking Arrow EX Level 13: Honestly, EX or not, doesn't feel much better but its a bread and butter combo starterl
- Ankle Shot Level 9: A Must have to hold down opponents, higher level means longer hold time
- Stun Shot Level 1: Just to stun opponents when they have no Super Armor skills.
- Arrow Barrage: I left 1 SP out in the build above, it went to Arrow Barrage, I prefer it over Revolution Ballista because RB can be easily dodged via i-frame. Arrow Barrage if correctly positioned will deal full hits.
- Revolution Ballista: Good Ultimate, but can easily be dodged.

Ladder Specific PVP Equipment 

Important Skill Plates 
50% Mana Reduction Twin Shot 
20% Damage Rapid Shot 
20% Damage Swift Shot 
20% Damage Tracking Arrow 

Skill Accessories Necklace 
- Earring 
- Rings 
- Magical Breeze 

PVP Extra Skill Plates 
Manticore Gravity Ball - Still Provides great Super Armor Break, deals up to 4k damage 
Fujinorth Laser - Minor suction followed by a laser beam, deals up to 10k damage 
Poison Mushroom - Summons 3 mushrooms that explode on contact, deals up to 15k damage if all hit.
Viewing all 3220 articles
Browse latest View live


Latest Images