Quantcast
Channel: Web Junkies
Viewing all 3220 articles
Browse latest View live

Best Inferno Wizard Build in Diablo 3 [Guide]

$
0
0
Hello guys! It has been awhile since I have posted a guide on Diablo 3...

But here we are, looking to another Diablo 3 guide in Web Junkies Blog!

This time around, we will be discussing all the things a Wizard needs to survive until the last act of Inferno mode in Diablo 3.

In this guide, I will be showing to you some of the builds that I have ADAPTED for my Wizard in Diablo 3, meant for surviving every level and every act of Inferno mode. Now, we will not be tackling about just one build for Wizard. Oh by the way, when I say I have adapted, this means that I did not originally made this guides. They are from other players of Diablo 3, and I have tested it and so far, I can say that the ones you will see here are the best Inferno builds for Wizards in Diablo 3.

Why not? It is because IMO, there are two things that Wizard can do to survive Inferno Mode. One is the usual doing of a mage and that is KITING. As we know it, range classes like Wizard are often seen doing this kind of strategy. What we do here is like hitting and running. So far, it is the safest way to survive in Inferno but, here is the big catch.... You need a lot of practice doing Kiting in Diablo 3. Inferno mode pose a lot of threat especially to squishy class and that being said, knowing when to kite enemies must be implemented if you want to go with what I called "KITING" build (guide made by Absolute copied from  diablo3blog.blogspot.com).

The other build is the one I called "MASSIVE DAMAGE" build (guide made by PKCarwash copied from diablo3blog.blogspot.com). In this build, we will try to inflict as much damage as often as we can before the enemy can get close to us. How do we do this? The key here is getting as much crit as possible! Remember that aside from boosting the magical attack power of a Wizard, you also would want to maximize her crit to do more damage. And of course, in this build, we need to stack as much Attack Speed also. Remember that the faster we hit, the more damage per second we do. In addition, there are two variation in this build: The AOE focus and the Single Target focus. And yes! you will be changing you tree with this one depending on the situation. The AOE focus variation is best use of course to wiped out a crowd. When I say I crowd here, it means that average mobs in Inferno mode that we can pawn. While the Single Target focus is for the Elites and Bosses in Inferno mode.

Now that I have summarize what you will be seeing in this guide, let us then proceed to the best Inferno Wizard Builds in Diablo 3...

KITE UNTIL THEY DROP DEAD!

SKILLS

Primary
Shock Pulse with Piercing Orb Rune-  This skill is really good because of its versatility and power. Not only does it deal good amount of damage (105% weapon damage) to the enemy but it also pierces not only through all enemies it pass, but also to objects such as some rubbles, columns and walls and, it may reach enemies which are out of sight.  It should also be mentioned that because the orbs sway from side-to-side as they fly towards enemies, a pseudo-splash effect exists--meaning that all enemies within the limits of the orbs' reach are hit.

Force
Blizzard with Snowbound Rune- Nearly self-explanatory, Blizzard does what blizzards in general tend to do: pelt the soft-bodied flesh constructs with icy shards and death-inducing winter-cold winds (in this case, enemies--although they are not always so soft-bodied). It deals 210% of weapon damage over 6 seconds in a particularly small target area and tends to slow mobs down to a point.

As the Wizard gracefully kites and moves around and/or away from the enemy on sure footing, he or she will pause for approximately 1 to 2 seconds to cast and re-cast Blizzard and Hydra. The former activates instantly and therefore deals damage the second it's cast (unlike an alternative, like Meteor) and slows them down, while the latter dishes out the main body of damage.

Important: Blizzards do NOT stack. If one were to cast two Blizzards in one area, the damage dealt would NOT double.

Snowbound is not part of this build--it is merely a preference. It reduces the cost of Blizzard from 45 to 20, which is extremely significant for a build that only has a max of 80 Arcane Power.

Force
Hydra with Venom Hydra Rune- A skill loved by all who understand its marvelous secrets. A skill that if nonexistent would make the Wizard a class so useless the only reason to actually use one would be nostalgia. On paper, it looks ridiculously under-powered and only advisable to players with some sort of upper limp handicap. In actuality, this is the most prominent skill when damaging champion packs.

It deals 18% of weapon damage a second by the way of a poison pool (horrifyingly acidic poison) and spews poison spit at enemies for (what is assumed) 28% weapon damage. The strategy used here reflects that of what was said in the above Blizzard's informational bubble.

Alternative: There are certain users who prefer to use a different type of Hydra. So far, Arcane is the only other considered choice. Where it lacks the damage possessed by its venomous counterpart, it makes up for it by having instant splash-damage effects and a potential part in a combo that deals with passives. The latter is really the more important, as one of the passives (Temporal Flux), slows enemies hit by Arcane spells down by 30% for 2 seconds.

Conjuration
Magic Weapon with Force Weapon Rune- Another skill that's now practically synonymous with "Wizard." Its 15% increase in damage to your weapon may increase damage by up to approximately 25% with low-end gear and significantly more with high-tier gear. The 2% chance of a force-push must also be mentioned, as it stacks up with other equipment; and therefore may be used to (if the collected force-push % is high enough) keep mobs at a distance--so that Jedi friends are given enough time to reinforce the young Wizard during their time of peril.

Conjuration
Energy Armor with Force Mirror Rune- Once the epitome of perfection, a pale hope in the blight that Inferno spreads throughout the Diablo world. Before Blizzard took it upon themselves to redesign this skill, it was the most overpowered defense possible. It is no longer what it once way; but in no way does that mean it's unusable. Arguably, it is still the preferred choice for Wizards who do not possess titanic pools of health--50k and higher, or akin. Energy Armor itself increases armor by 65%, but that is not the reason for its use.

Force Armor: Many misunderstand how this was nerfed. Many believe that this is how it works:

Luke has 20k Hp. Suddenly, he loses his footing as the ground under his feet trembles and welts, sending a shroud of sand so thick no eye could hope to see. A roar that breaks spines into pieces could be heard. Luke peers through the now dispensed dust and sees something too terrifying for words--three skeletal beings linked by chains that stared right into his eyes.

Death, it meant. Before he could escape, one hits him with an attack intended to deal 10k damage. His magical barrier, however, holds up, and his life only drops by 35%, to 13k hp. He flees for an instant, chewing on an energy bar and healing up to his full 100% health. The beings, however, would not give up, and chased him down. This time, a critical shot of 21k damage landed right into Luke's face--instakill.

How it actually works:

Ex. 1: Luke has 10k Hp. Luke is hit for 9k damage. Force Armor reduces that to only 35% of his health--leaving him with 6500 Hp. Ex. 2: Luke has 10k Hp. Luke is hit for 15k damage. Force armor absorbs 10k (the maximum amount of Hp Luke has) of that 15k damage and leaves him with 5k Hp. Ex. 3: Luke has 10k Hp. Luke is hit for 20k damage. Force armor absorbs 10k of that 20k damage--leaving him with 0 Hp.

Defensive
Diamond Skin with Crystal Shell Rune- Short, but sweet. Tough as nails, and yet as fragile as glass. Hated for its necessity, and yet loved for its accessibility. The Diamond Skin is yet another one of those skills that's simply a part of what the Wizard is. For 6 seconds, it absorbs 21,707 damage. On its own, it would almost be unimpressive. It is when combined with the following skill that it shines like the brightest star in the galaxy and beyond (and a long, long time ago--far, far away).

Passives

Glass Cannon- Increases all damage by 15% and decreases armor/resistances by 10%. It is a must. As simple as that. A must.

Galvanizing Ward- Increases armor duration by 120 seconds (on top of the two minutes already present) and provides a life-regeneration rate of 310 a second at level 60.

Cold Blooded- Cold damage done to chilled and/or frozen enemies is increases by 20%. This is to build on the relatively low damage that Blizzard as a skill provides. At the very least, it will kill more efficiently.

CHOOSING YOUR ITEMS!

How to choose a weapon 

To avoid spending currency on a weapon that would be better suited for a melee class, one must first understand how utterly worthless on-screen DPS is to a Wizard in Inferno. 

White monsters may be massacred by any means at hand--from a basic attack to a combination of several spells. Whichever way it's done, white mobs are of no consequence and should never be taken into consideration when building the Wizard both skill-wise and gear-wise. It is the elites that one should always consider. It is the mobs with ridiculous health pools and infinitely better and more damaging attacks than you, yourself, have at your disposal. 

When dealing with such champion packs, a Wizard does only what he or she can: cast Hydra, Blizzard, and kite like they've never kited before. While the Wizard is on the move, and the dark forces of the Sith on the Wizard's tail, the greatest percentage of damage dealt is channeled through Hydra--whose damage is dependent on weapon damage (not the damage done per second, but the damage done per hit). 

Average weapon damage is calculated simply by taking the minimum, (say, 500) the maximum (1000), adding them up (1500) and dividing by two (ending in an average damage per hit of 750). It is that 750 that skills like Hydra and Blizzard use as base. 

A weapon with lower DPS and slower attack speed may provide much more damage than a weapon with higher DPS and faster attack speed if the right condition are met--that condition being that the average damage of the former weapon is higher than the latter. 

It may also happen that a weapon with a high DPS and fast attack speed has a high average damage. Simply put, when a search for weaponry is afoot, one must seek out the highest average damage accessible--within limits, of course, as will be explained below. 

Since attack speed not only affects the time between attacks, but also the animation, a Wizard with a low enough attack speed will not last long enough to dish out the potential damage at their finger tips. He or she must be quick enough to spam Hydra and Blizzard with barely a break in stride as they move out of the way of attack. Taking that into account, weapon speed cannot be too low. 

A total character attack speed of approximately 2.0 should be reached to safely allow a Wizard to cast both Hydra and Blizzard in nearly an instant. This 2.0, however, may be reached in ways beyond just the attack speed of a particular weapon. If, for example, a weapon's attack speed rests at 1.30 (which is too low for comfort), necessary steps must be taken to increase it to that desired 2.0. If we take the 1.30 weapon as an example, one would need approximately 55% combined increased attack speed from equipment such as rings, amulets, gloves, helmets, shield, etc. to reach it. Any more attack speed, and the Wizard is getting nothing out of it. Any less, and he or she might as well just sign that Will the Sith have been asking to be signed. 

Armor 

Into detail, this little green one shall not dwell. 

Let it just be said that 12% faster running speed is highly advised for those tricky little kiting adventures. The Wizards know--they knows how to run well. 

Sockets are practically mandatory--especially with the low prices of Flawless Squares and below. 

Resistances a Wizard must work out on his or her own. Work, it is not of the little green one. 

The higher the HP, the safer a Wizard is. Simpler than that it cannot be. 

A shield's blocking chance may save you once in a hundred encounters, while an orb will serve you continuously with a significant increase in damage--upwards of 8k (8k DPS, which may not mean much--but damage is damage, and an orb with 100-400 damage adds 250 damage to weapon damage) if chosen wisely.

MASS DAMAGE DIABLO 3 WIZARD BUILD!

PROS
+ Unquestionably the best AoE build for Wizard
+ VERY high survivability, and CC output.
+ Can solo easily, but also provides massive utility to co-op play
+ Very fun to play
+ You don't have to kite things for half an hour

CONS
- Ranged units can be trouble
- Item dependent later on (what isn't?)
- RNG (Can be overcome with items)
- Requires high level skills

BUILD EXAMPLES:

AoE Focus Build 

Single Target Focus Build

The Basics

The gist of this build is to stack as much attack speed and crit as possible, and use the Critical Mass passive to reduce the CD's of the rest of your spells. With good items you can literally cast long CD spells like frost nova, and diamond skin more than once per second.

As a secondary goal, you will stack as much HP regen/Life on hit as possible with NO VITALITY to make full use of the force armor rune.

The goal is to have enough HP regen to heal back 35% of your life per second or more, while having as little HP as possible, so attacks against you take down less of your diamond skin.

With zero +vitality, you diamond skin can take around 20 hits before running out, which gives you plenty of time to reduce the CD and cast it again.

Required Passives
  • Critical Mass (Reduces your CD's by a ridiculous amount)
  • Paralysis (Main nuke is high hit/second lightning nuke, so it porcs often)
SITUATIONAL PASSIVES
  • Glass Cannon (You wont take any more damage due to diamond skin, so it's free damage, only use if you have good gear)
  • Galvanizing Ward (If you need more HP regen)
  • Arcane Dynamo (Makes Explosive Blast do 75% more damage)
  • Evocation (More CDR, better if you don't have good gear yet)
REQUIRED SKILLS
  • Shock Pulse [Living Lightning] (Highest rate of attack so it procs literally dozens of crits per second, costs 0 AP)
  • Diamond Skin [Crystal Shell] (This becomes your HP bar)
  • Frost Nova [Cold Snap for single target, Deep Freeze for AoE] (Perma-Freezes enemies)
  • Energy Armor (Force armor makes your diamond skin able to tank a ton of shots before it goes down) (Pre-Inferno, you can use pinpoint barrier for the extra crit, since you don't need the damage reduction as much)
SITUATIONAL SKILLS
  • Wave of Force ("OH CRAP" button + extra stuns...highly recommended)
  • Hydra [Venom] (deals MASSIVE DoT with attack speed, great for champion packs and single target) Explosive Blast [Chain Reaction] (No cast animation, so you dont have to stop spamming to use it. With critical mass, you can cast this multiple times/second, best for AoE)
  • Enchant Weapon [Force Weapon] (15% more damage, but honestly not that great in this build.)
ITEMIZATION
Int, life regen, and sockets are always something to look for on any item, but some items can't get certain stats...here's what to look for.
  • Amulet - Crit chance, Attack speed, Crit damage
  • Belt - Chance to freeze Boots - Chance to immobilize
  • Bracers - Crit chance, Chance to knockback
  • Chest - Nothing special
  • Gloves - Attack speed, Crit chance(huge), Chance to stun, Crit damage
  • Helm - Crit chance, Chance to fear, Bonus crit to explosive blast, Arcane power on crit (good for co-op, lets you spam high cost spells)
  • Pants - Nothing special Ring - Attack Speed, Crit chance, Crit damage
  • Shoulders - Nothing special
  • Dagger (For fastest base attack speed) - Attack speed, Chance to CC
  • Off-hand - Increased shock pulse damage, Crit chance, Extra damage
FOLLOWERS
Followers are mostly personal preference.
  • Scoundrel - 3% passive crit, some CC (crowd control)
  • Enchantress - good AoE CC's
  • Templar - extra healing, and some CC
TIPS
  • Try to peg ranged enemies with your first frost nova, so things don't get spread out. If you get them with the first one, it is easy to keep reapplying the freeze.
  • For single targets, only use your nova, and WoF to stall for time for your Diamond skin to come back up again. Your CD's will be longer for single targets, so try to chain your CC's as efficiently as possible. Use them to interrupt telegraphed attacks.
  • If you are in too deep, its better to stay and try to tank it than to run. Not attacking = no CDR, and your defensive skills are no good while they are on CD.
THEORY CRAFTING TIME 
With items I could buy on the auction house right now, I could get these numbers.
Crit chance = 44.5%
Attack speed = 2.685/s
Chance to CC on hit
  • Stun- "up to" 10.2% (Im not sure exaclty how much power surge gives) 
  • Freeze - 4.5% 
  • Fear - 5% 
  • Immobilize - 4.5% 
So there you have it guys... This are the item and skill build I am currently using on Inferno mode on Diablo 3 as a Wizard. Atm, I am currently using build 2 in Inferno mode and I am currently on Act III and so far, so good. I hope you will learn from these wall of text and I hope that what I have compiled here will help you on your journey to the last act of Diablo 3 in Inferno mode.

HAPPY GAMING WEB JUNKIES!

Barathrum Spirit Breaker DOTA 2 Hero Guide and Strategy

$
0
0
Hello guys! Welcome to another DOTA 2 guide in Web Junkies Blog!

This time, I will be sharing my insights on one of my favorite DOTA hero, Barathrum: The Spirit Breaker...

Well, I know that a part of your heart tells you that this is one of your favorite hero too :D.

We all know how powerful Spirit Breaker is and, his name itself tells what he can do to his enemy.

The reason why many love Barathrum is that he is easy to use, fun to play and very versatile in battle. And in the hands of a pro, I am pretty sure he will be more than GODLIKE!

So anyway, we all know Spirit Breaker so let us end the chit-chat about him and proceed to my guide. 

Remember guys... This is only a guide. Some of my points may differ from your point of view and, I would like to hear them also. If you have some comments or suggestions, go write a few words on the comment box below.

The Role of Spirit Breaker in a Team

In my opinion, Barathrum's role in a team is to be the gank initiator in the game. When I say gank initiator, he will be the one responsible on starting a gank. Why not say just a ganker? Well, Spirit Breaker will have hard times especially in early game (mostly below level 6) successfully killing an enemy when he is the only one ganking it. Remember that most players who are facing Spirit Breaker will be wary of him by always checking where he is on the mini map. When he's not on the lane, opponents will tend to tower hug until he appears on a lane but others will just continue farming but, they will expect that Barathrum is coming on their way. So basically, at early games, you will need to have a well coordinated plan on ganking one opponent with your team. So yes!, solo ganking isn't really recommended (unless your opponent's is really bad at map awareness that is :D) as failed ganks will often get you left behind in terms of levels.

Skills of Spirit Breaker

Charge of Darkness [Q]- Breaker fixes his sight on an enemy unit and starts charging through all objects. All enemy units passed through will be hit by a Greater Bash, and the targeted unit is stunned upon impact. If the targeted unit dies, Spirit Breaker will change his target to the nearest enemy unit to that location.

Charge Speed: 600 / 650 / 700 / 750
Stuns on Contact: 1.2 / 1.6 / 2 / 2.4
Range: Global
Mana Cost: 100
Cooldown Time: 35
Comment: This is your main ganking skill. you need this on level 4 to start ganking. Why at level 4? Because you need first Empowering Haste at least at 2 levels and Greater Bash at least at 1 level. Remember that this skill has no base damage. We only rely on the bonus movement speed and the bash when it hits the target, from this skill. That is why we need first Empowering Haste to deal a significant damage to the enemy. And of course, we need to pair it with Greater Bash for increase of damage also and of course, for the chance to Bash to successfully kill an enemy in a gank.

Empowering Haste [W]- Causes the Spirit Breaker to gain power with higher movement speed, allowing him to deal extra damage based on his movement speed. His presence increases the movement speed of nearby allied units.

Increased Allied Movement Speed: 6% / 10% / 14% / 18%
Movement Speed Aura Radius: 900


Comment: For me, I rather pick this skill first than Greater Bash. The movement speed and as well as the damage is really good at early levels especially on farming for creeps. What the increase of movement speed gives you is the ability to maneuver your way on both last hitting and denying your creeps. Also, the extra based damage this skill gives is indeed very helpful at early levels.

Greater Bash [E]- Gives a chance to stun and knockback an enemy unit on an attack, as well as gaining bonus movement speed after a bash occurs.

Chance to Trigger on Attack: 17%
Damage: 10% / 20% / 30% / 40% of movement speed.
Knockback Duration: 0.5
Stun Duration: 1 / 1.2 / 1.4 / 1.6
Increased Movement Speed: 15%
Increased Movement Speed Duration: 3

Comment: When I have Empowering Haste, I then pair it up with this passive skill. The chance to stun enemies is really good and when it does stun an enemy, it does significant damage to them. Not only that this is good in ganking, but this is also good at early levels, killing and denying creeps.

Nether Strike [R]- Spirit Breaker slips into the nether realm, reappearing next to his hapless victim. Upon reappearing, a Greater Bash occurs and deals bonus damage.

Damage: 150 / 250 / 350 Range: 400 / 550 / 700 (550/700/850*)
Mana Cost: 125 / 150 / 175
Cooldown Time: 75(20*)

Comment: The ultimate of Spirit Breaker. It provides a short blink, a great stun and if used to it's fullest, you can even use it to disjoint enemy attacks. It is improved through Aghanim's Scepter, which gives Spirit Breaker the ability to use this attack multiple times in a single fight. You would be a fool to not pick it up as the game progresses. Preferably at 6, Go get it and pound those BIT**ES!

So basically, my skill distribution per level for Spirit Breaker is:

Level 1- Empowering Haste
Level 2- Greater Bash
Level 3- Empowering Haste
Level 4- Charge of Darkness
Level 5- Charge of Darkness
Level 6- Nether Strike
Level 7- Empowering Haste
Level 8- Empowering Haste
Level 9- Charge of Darkness
Level 10- Charge of Darkness
Level 11- Nether Strike
Level 12- Greater Bash
Level 13- Greater Bash
Level 14- Greater Bash
Level 15- Stats
Level 16- Nether Strike
Level 17- Stats
Level 18- Stats
Level 19- Stats
Level 20- Stats
Level 21- Stats
Level 22- Stats
Level 23- Stats
Level 24- Stats
Level 25- Stats

So now that we have discuss the skills of Barathrum, let us proceed to my recommended items for this beast!

Starting Items

Gauntlet of Strength x2- Spirit Breaker is a strength hero. So it would be wise to pick Gauntlet of Strength over Slippers of Agility. Remember that GoS gives not only HP to Strength Hero but a bit of boost in damage, to give you a little bit of an edge over your opponents at early levels.

Tango- We all know that melee class is at the front of battle always and, when times of facing range enemies, it's really hard to get some gold from creep kills when you are low in life. You will be indecisive with your moves. Most of the time, you will just back up... So yes, you need Tango for sure to replenish that lost life in early game. And, it is a good counter to heroes like Furion, especially when you don't have the Charge of Darkness yet.

Healing Salve- Just like tango, this is a consumable which will save your arse in extreme cases where your life is below 100 and you need an instant life recovery to get back in battle.

Core Items

Power Threads- The most recommended boots for Spirit Breaker is Power Threads. Believe me, you will not benefit from other boots and only Power Threads can give you that edge you need to be more efficient in ganking. Remember that you can switch this boots in accordance to the situation: If you need the damage and attack speed, switch the boots to AGI, if you need damage and a bit of tankiness; switch to STR and when you need mana, then switch the boots to INT. In short, this gives you the ability to be versatile in battle when you are Spirit Breaker.

Urn of Shadows- Others don't see the usefulness of this item. This item is really great for Spirit Breaker as you will be ganking a lot and roaming around. It provides strength which increases your damage and mana regeneration to keep your mana flowing. The bonus damage on a fleeing target and ability to heal yourself afterwards is fantastic. Any hero that is put into the role of ganking and gets up close a lot, should have an Urn of Shadows as a desired item.

Sange- A boost in attack speed, damage and as well as movement speed, as Barathrum will be a big pain in the arse of the enemy. There is no way that you want to miss on building this item right after Power Threads and Urn of Shadows.

Point Booster- Probably you will say "Whoa?! Point Booster? for what?". Point Booster is amazingly good for it's price: A huge increase to both mana and HP pool will definitely worth the cheap price of this item. In addition, when you buy this, you will now have the option to build Aghanim's Scepter down the road, boosting Nether Strike from a minute long cooldown, to a short twenty seconds. That means instead of just using it once per fight, you will be using it at least twice.

Important Note: After you bought Point Booster, you do not have to head straight into Aghanim's Scepter, only that it is an option later down the road.

Luxury Items

Assault Cuirass- It is with just about every melee hero that deals any kind of damage, is Assault Cuirass. While Greater Bash and Nether Strike may not do physical damage, it sure helps with the some fifty to eighty additional damage from Empowering Haste. Enjoy the large attack speed and armor boost as well.

Aghanim's Scepter- As I have said before, this item will be the key to shortening the cooldown of your SS from a minute to only twenty seconds. The key here is not build this item early. Not until you have hard times winning battles like one-on-one with heroes. If you think you need the two usage of SS in a fight or even in a clash, then go build Aghanim's as fast as you can.

Heaven's Halberd- If you think that Assault Cuirass isn't enough, then go pump it up with this item! It gives you that extra damage and STR and as well as the evasion you need to win fights. Plus, your attacks have a 15% chance to slow the target's movement and attack speeds by 20% for 4 seconds and of course, it has this active skill which can remove a target's ability to attack. This effect lasts 4 seconds on ranged targets and 3 seconds on melee targets.

Situational Items

Vanguard- We all know that there are times when opponents are really good in terms of countering Spirit Breaker, that every time we gank, it fails. So basically, when you can't gank that often, don't push your luck on pursuing Urn of Shadows. Instead, go with Vanguard. Pick it up and if you cannot find a lane to get some decent farm, start stacking jungles and farming off the small camp between ganks/pulls.

Black King Bar- I put this item in situational cases rather than core. Why? It is because sometimes, the effectiveness of this item is voided when your opponents are carry or basically and auto-attack Carry hero. However, in times when the opposing team has a lot of heroes with disables like stun and slow, then this item will be your key to making them look silly.

Mask of Madness- Most of the match that I am with a player using Spirit Breaker, Mask of Madness is there very first Core item. Well, I can't blame them as the life steal and increased chance to activate Greater Bash is really good. However, the trade off in using the effect of this item is that you will absorb damage. Just only pick this item when you think that you won't have problems with heroes. Meaning, only pick it up when most of the heroes on the opposing team is squishy and they have no disables. In short, those heroes which are easy to gank!

Blade Mail- When you are facing a tough auto-attack Carry hero, then this item is for you!


Game Strategies as Barathrum the Spirit Breaker

Early Game
In this stage, focus your concern on killing as many creeps as you can and getting the desired amount of gold to build you core items. Spirit Breaker is one of the DOTA heroes which has good animation. This means that you can time well last hitting creeps. Compared to Lina's attack animation, Spirit Breaker has way more faster attack animation that you can time it very well. Aside from attack animation, Spirit Breaker is also great in terms of dealing damage so I think you will surely build your core items fast: Power Threads.

Middle Game
Once you have your core item, it's time to gank! At the early of level 4, you can gank the middle lane if your team mate at the middle has disable skills. However, I don't suggest if he/she doesn't have! The most recommended gank level is at level 6 where you already have your Nether Strike.

However, at this level, DEFINITELY, the opposing team will be more wary of your location. This is the time when you will decide to go with Vanguard or Urn of Shadows. If you can gank successfully (probably for me 3 times or more), then go with Urn of Shadows but if you can't and more worse, you are getting owned in every gank, then it is time to decide to go with Vanguard and farm at you lane and jungle a little bit. However, don't forget to gank or kill heroes if you have Vanguard. When you have this item, you will have that extra tankiness so it is great also for killing heroes you are facing on the lane or, when a ganking opportunity comes!

Your goal here is to farm as many gold as you can to get Point booster or, you can first build Assault Cuirass or, build Black King Bar first to have the advantage if you are up against disablers.

There are two ways to attain this goal: It's either to gank and kill or, to farm and kill on lanes. Or you can combine the two for maximum benefit!

The only thing I will suggest at middle game is that DON'T CHARGE RECKLESSLY! At this stage of the game, it is better to coordinate a gank with your team than to go ganking alone. Remember that failed ganks are really costly especially on levels as you will be left behind if you just charge and charge when your Charge of Darkness skill is off cooldown.

Late Game
At this stage of the game, probably the opponent has enough fire power to counter your as a Spirit Breaker. It's time for team play! Like the middle game, your role now is to initiate a gank. Go with your team in every fights and DON'T GO ALONE. Spirit Breaker doesn't have those escape mechanism so he will be vulnerable when he is up against 2 to 3 opponents, especially with disables.

In here, you will try to upgrade your SS. This means that you will now get Aghanim's Scepter to activate your Nether Strike every 20 seconds. And of course, it is good that you build Heaven's Halberd at this point.

Another suggestion that I will share to you is that when you are facing a auto-attack carry... One way to counter him/her is to get Blade Mail.

So there you have it guys, this is my Barathrum Spirit Breaker DOTA 2 Hero Guide and Strategy. Like I have said before, this is only a GUIDE. You can follow this or you can modify it for more effectiveness and so that it will suit your playing style.

For comments and suggestions, write it on the comment box below.

HAPPY GAMING WEBJUNKIES!

Sex is NOT Love. Love is NOT Sex.

$
0
0

Sex is NOT love. Love is not sex.

You can have sex and not be in love.

You can be in love and not engage in sex.

A man may hate you and still have sex with you. Be wise.

Using sex to manipulate a man will eventually fail.

It is self deception to think that giving him sex will make him love you.

True Love will never force you to engage in sex.

A man who doesn't love you will not change his mind because of sex.

If he tells you to ‘prove your love’ by having sex with him. He is only using you.

If he is in it for the sex, ‘better sex’ will take him away from you.

Making yourself his ‘sex slave’ is foolish. Love will never shame or degrade you.

If you have made the mistake of trying to use sex to buy this man, now is the time to re-assess your relationship and build it on the right foundation.

If he gets married to you because ‘the sex is good’, it will be fatal to your marriage.

Let him get married to you because he loves you, honors you, feels a strong emotional, mental and spiritual connection with you and wants you to spend the rest of his life with you...

-Candy ramsey carter

Drop Dead Cosplay Beauties of 2013!

$
0
0
Just when I'm about to log out my account on blogger and finish my daily blogging routine, a friend of mine of Facebook has liked a page which features a collection of hot and cute cosplay!

Well, you all know that we at Web Junkies Blog really love cosplay, especially if there are done by GIRLS!

So far, I can say that this is the most latest Cosplay on 2013 and I would like to thank Ms. Calvi for liking this page..

If it weren't for her, we won't see this in the first place. Thank you Maam :D

So now that we have our introduction and thank you phrase, let us feast our eyes with this HOT new cosplay of 2013 WEB JUNKIES!
Ayane (Dead or Alive)
Cammy (Street Fighter)
Kuro and Shiro
Serika Takatou (Original)
Touko Aozaki (The Garden of Sinners)
Tandem Twin Animal Sister Panthera Pardus: CUROE
Asuka
Black Hanekawa
Boa Hancock
Stocking Anarchy [Catfight Club]
CATHERINE
Chocolate Girl
Hitagi Senjogahara [BAKEMONOGATARI]
Juliet- LOLLIPOP CHAINSAW
Juliet Starling
Kunoichi- Sengoku musuo 3
Luka Megurine cosplay (VOCALOID)

Madoka Kaname
Sakuya Izayoi (Version: Race Queen)
MacrossFrontier Sheryl Nome
Stocking
Supersonico Cosplay
Tiger and Bunny, Bluerose
Tengen Toppa Gurren Lagann
I am Shiro Cat
Murata Range's Original Character
Vocaloid Megurine Luka


Reblogged From: http://otakumode.com/51ad6dbf69dd63b25c007c82/suki

50 Hottest Cosplay as of June 2013

$
0
0
In this page, I have compiled some of the hottest cosplay that I have seen so far in this year. 

Take note that the materials you will see below aren't mine.

I have originally seen it on Otakumode.com and has compiled some of it here on Web Junkies Blog to share how hot these girls are on their cosplay costumes!

So let's cut to the chase guys and on to seeing these girls on their hottest cosplay dresses!

-CATHERINE-Catherine ◎HIKO

Cheerleader Shinka Nibutani (Mori Summer)
Evangelion 3.0 You Can (Not) Redo
Fatestaynight-RinTohsaka
KurokonoBaske MomoiSatsuki
Lollipop Chainsaw - Juliet Starling ◎HIKO
Lollipop Chainsaw -Juliet Starling ◎HIKO
Macross Frontier - Sheryl Nome ◎ HIKO
Miki Hoshii
Mikoto Urabe 【nazokanoX】
Miku Hatsune Cosplay
ONE PIECE - Princess Shirahoshi ◎ HIKO
One Piece - Nami ◎ HIKO
Panty (Panty&Stocking with Garterbelt)
Panty - Panty and Stocking with Garterbelt (PSWG)
Panty&Stocking with Garterbelt - Stocking ◎HIKO
Roromiya Karuta 【inuboku SS】
Samurai Spirits  Majikina Mina
Siesta 45 (Umineko( Cosplay By Calssara
Soryu Asuka Langley Neon Genesis EVANGELION
VOCALOID - Hatsune Miku ◎HIKO

Chocolate Girl
Fresh Maid
Heart Maid
K animate Neko Hiko
Kasane
LOLLIPOP CHAINSAW
madoka magica- mame 
One Piece Boa Hancock
Original Cosplay
panty 【Panty & Stocking with Garterbelt】
racing miku 2013
ranka lee
reimu@Ringomitsuki
ririchiyo
Sexy Police Stocking
Sheryl Nome Nurse
Sheryl Nome Nurse
Skarlet from Mortal Kombat
Stocking
Stocking
Supersonico Cosplay

umeniko-beatrice
Panty (Panty&Stocking with Garterbelt)
Stocking
Stocking
Originally seen from: Otakumode.com

Level 60 Sniper Skill Build in Dragon Nest [T4]

$
0
0
Level 60 Cap has finally arrived in Dragon Nest SEA. This Cap update brings a lot of things to the game. Some good ones and some bad ones. The good ones are the new ex skills dungeons and new items of course and some example of the bad ones is the COLESSEUM EXPERIENCE AND RANK RESET. Once you have log in to your account, if you are already an Imperator in the level 50 cap, you will be an egg at level 60 cap. :D.

Well, let's not make that a big issue because like it or not, we can't do anything about it. Let's just focus on the good stuff and one of them is the level 60 skills.

There are two skills available to each class at level 60 cap in Dragon Nest SEA and both of them are Ex version which only means that it is an improvement of your current 2nd job skills.

You might say that... "aw,, that's pretty boring". Well, that what's I think at first but then I realize that it is better to get ex version than active skills as it will surely be hard for players if there are many active ones.

In this page, we will be discussing about Sniper at level 60 in Dragon Nest SEA [T4].

Firstly, let's determine the two new Ex skills of an Sniper. Here they are:


Aerial Chain Shot Ex- Aerial Chain Shot is enhanced to increase explosion area and when Special Attack Button is entered, numerous arrows can be shot at once.
Seige Stance Ex- Siege Stance is enhanced. When normal attack button is entered, attack area is increased and a bigger damage is given at once. Additionally, enter Special Attack Button to give a shorter distance but bigger damage to more enemies by firing many arrows at once.

Now let us proceed to the level 60 skill build for Sniper.
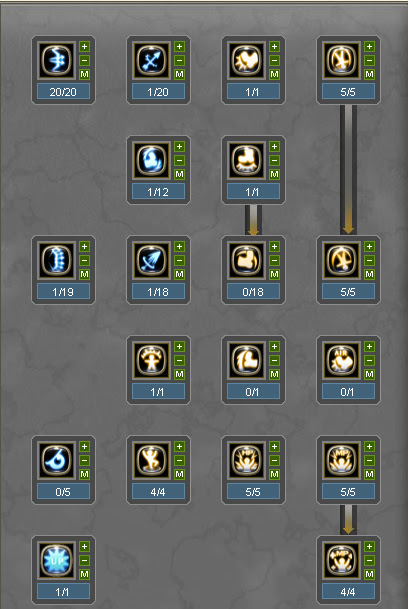
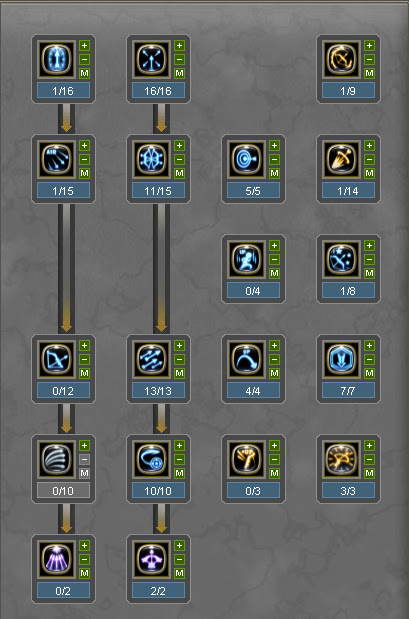
Archer Skill Tree
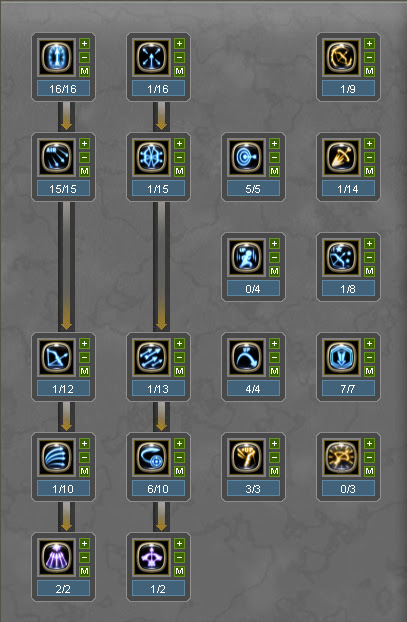
Bowmaster Skill Tree
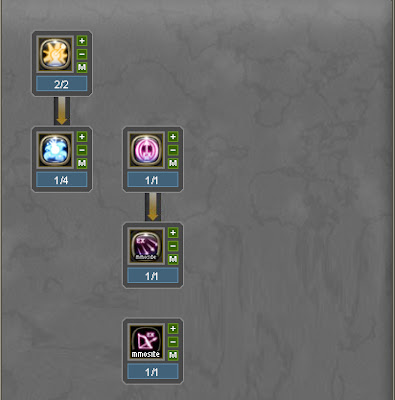
Sniper Skill Tree
I hate to say this guys but I did spend a skill reset scroll for the level 60 build... There goes my 10k gold :(. 

Well, anyway. let's see the changes that undergo-ed from level 50 to level 60 Sniper skill build..

On the Archer tree the only thing that have changed is the redistribution of 1 point from Multi Shot to Twin Shot. As you all know, Twin Shot is one of the BM skill which can deal the most DPS. With that being said, I think it would be wise to max it to the fullest level. In terms of Multi Shot, I only use this skill when enemies get close to me. Take note that this skill has the ability to destroy the Super Armor of the enemy and it can flinch them. It is best use for utility than damage as a BM.

And of course, the passive enhancement is at max level. These are the HP, MP and MP recovery. MP is special mentioned to be at max level as you notice, the MP consumption at current level 60 cap is really fast and, you don't want to have mana problems, especially in ladder matches.

And lastly, Aerial Evasion, Tumble and the power Tumble are a no-brainer must max skill.

On the Bowmaster skill tree, Charged Shot is at max level. Since this is our staple skill as a Sniper and we really mainly on this, it is at max level for the maximum damage output. 

Also, Aerial Chain Shot is at max level. One of our main DPS skill as a Sniper and, with the Ex version which enhances this skill with the larger explosion and more arrows, it is without a doubt, a highly recommended skill to be max.

You might be wondering why I did not add some points on Seige Stance. Even though it has an ex version now still, the time spent on casting this skill is really long. You will just use this skill in times when your opponent is down in PvP or he/she stays in a certain location due to, you manage to hit him/her with Ankle Shot or Stunning Shot. While in PvE, it is a big risk casting this skill especially on big bosses. 

If you followed my level 50 skill build for Sniper, then you will notice that I have just left it to level now at level 60. Well, the reason behind this is I need the points intended to level this skill to 11, and distribute it on Aerial Chain Shot and Charge Shot. Meaning, I need to sacrifice points on this two maximize my two main DPS skill. 

Then there's the longbow mastery at max level. Why did I max this skill at this current level? Well, by now, I prefer using Longbow as a Sniper than Crossbow. It is deciding which you want most Critical (Longbow) or increase in magic attack power (Crossbow), and I have decided to go with more critical. Do remember that the critical cap at level 60 is increased and for me, I would prefer depending on Longbow to increase my Critical. In line with this, Longbow mastery is a great asset for Longbow user, especially to Bowmaster. You would want that extra range and additional damage from this passive. The range is special mentioned as ton's of improvement has undergone on Dragon Nest SEA at level 60 cap, especially on AOE. That is why we need to get as much range as possible.

Now again, the explanation on why to sacrifice Spiritual Excel. At level 60, I rather sacrifice this skill to get the most needed one.. So you are saying that Critical isn't needed for Sniper? NO.. I am not saying that. What I am trying to imply here is that you can get as much critical as you want with the help of weapons, armors, accessories and as well as heraldries. I think these things are sufficient to get your desired critical. 

And lastly on the Sniper tree, I did max out Critical Break for that extra percentage of critical. Why Cheating point is left at level 1. The increase per level is good but the fact is, you are not using this skill every time. Unlike other skills like Aerial Chain Shot and Charge Shot which is basically part of your main skill rotation, Cheating Point is use only in certain situation. Do remember that it has long cooldown so instead of adding points on this, I better add those points to the ones which can do more DPS.

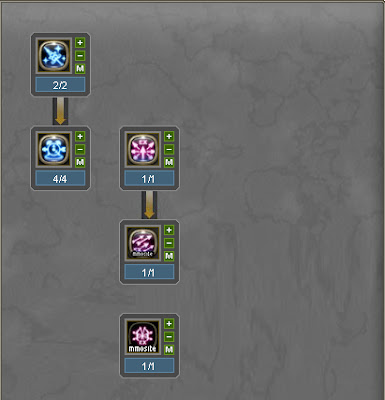
Charge Shot Ex is a must get as not only that it is a prerequisite but the enhancement for the Charge Shot is really crucial. Remember that this passive enhancement lowers the casting animation. Paired with a skill plate which hasten the action speed of Charge Shot, it may cut up 1.07 seconds on casting time.

While the two new Ex version is a no-brainer get also. Take note that this doesn't cost any SP and a bit of enhancement to Siege Stance is good while getting Aerial Chain Shot Ex is a big boost to you.

So there you have it guys... This is my recommended level 60 skill build for Sniper in Dragon Nest SEA [T4].

For comments and suggestions, feel free to write down a few words on the comment box below.

HAPPY GAMING WEB JUNKIES!

Level 60 Artillery Skill Build in Dragon Nest [T4]

$
0
0
Level 60 Cap has finally arrived in Dragon Nest SEA. This Cap update brings a lot of things to the game. Some good ones and some bad ones. The good ones are the new ex skills dungeons and new items of course and some example of the bad ones is the COLESSEUM EXPERIENCE AND RANK RESET. Once you have log in to your account, if you are already an Imperator in the level 50 cap, you will be an egg at level 60 cap. :D. 

Well, let's not make that a big issue because like it or not, we can't do anything about it. Let's just focus on the good stuff and one of them is the level 60 skills. 

There are two skills available to each class at level 60 cap in Dragon Nest SEA and both of them are Ex version which only means that it is an improvement of your current 2nd job skills. 

You might say that... "aw,, that's pretty boring". Well, that what's I think at first but then I realize that it is better to get ex version than active skills as it will surely be hard for players if there are many active ones. 

In this page, we will be discussing about Artillery at level 60 in Dragon Nest SEA [T4]. 

Firstly, let's determine the two new Ex skills of an Artillery. Here they are:
Rapid Shot Ex- Rapid Shot is enhanced to shoot more arrows quickly. Additional arrows give continuous explosive damage while they fly.
Swift Shot Ex- Swift Shot is enhanced. Number of arrows shot around oneself is increased to become denser. Additionally, enter normal attack button after the attack to jump backwards and shoot 3 arrows to the front.

Now, let us proceed to my recommended level 60 skill build for Artillery...  
Archer Skill Tree
Bowmaster Skill Tree

Artillery Skill Tree
Now, onto justifying my skill distribution on each tree. First is the Archer tree... In this tree, the skills you need to maximize prioritizing first is the MP mastery and Mind Conquer. Due to the current patch which drains mana fast when using skills (all classes are affected by this), we need the boost we can get from both this passive enhancement (boost in MP percentage and MP regeneration). In terms of DPS, you would want to enhance Twin Shot at least at level 16 for the highest DPS output of this skill. And of course, Aerial Evasion, Tumble and the power Tumble of this class should be at max level to lower the cooldown of this skill. 

Now let us proceed to the Bowmaster tree... If you have followed my level 50 build for Artillery, then I know that you are raising your eyebrows right now. As you can see at level 60, I have decided to just level Aerial Chain Shot to 1 and decided to max Swift Shot. Why? It is because of its Ex version. The enhancement it gives this skill is really great. The casting motion is now change, making it more hit-able and, the damage is increase due to the number of arrows added by the Ex version and as well as the explosion, significantly boost the damage of this skill. The final verdict is, MAX AT ALL COST!

How about Rapid Shot Ex? Why didn't you increase it at max level knowing that it has its ex version also? The thing about Swift Shot is it doesn't give that much of a damage to smaller enemies (like in PvP) as the shots aren't headed on one direction. They split to north, east, west and south and you can't do that much burst damage to player and small enemies. If only Aerial Chain Shot is a magical sided skill, then I would have chosen ACS than this skill but, IT'S NOT! I prefer focusing more on magic attack power that is why almost of the skill I maxed is at magic side. Well, I think it is better this way for Artillery as focusing more on physical side won't do any good for us. 

Now let us talk about Aerial Chain Shot.... Why I left it at 1? One reason is what I have said earlier, to increase Swift Shot. The other reason is, based on experienced, as an Artillery it is better to use this skill as a  mobility skill than a damage skill at level 60 cap. Sniper can benefit the most from this skill as it they have the Ex version but for an Artillery, it would be unwise to max this skill. Do remember that we also have Ex skills which are in our favor because they are magically sided skill.

Tracking Arrow, Ankle Shot, Sylph Aids are a no-brainer must max skill for Artillery. But for those who doesn't believe or don't know why we should max this skills, let me give a short explanation why...

  • Ankle Shot- For longer immobilization effect
  • Tracking Arrow- One of the prettiest and wicked skill of a BM and, we have the luxury of maximizing its full potential as an Artillery because we have its ex version.
  • Sylph's Aid- More attack speed and more movement speed means more fire power and, you have more of an advantage in range as you can outmaneuver enemies which will come near you (Keeping that long range you have).

Now about the Spiri Excel buff... As you can see, I still haven't distributed points on it at level 60 build even though a lot of people are suggesting me to do so. Well, in reality, you really don't need that extra boost in critical at end game where you have full set of item, heraldries and accessories. Even at level 60 where the critical cap is increase still, you can manage to attain that without relying on this skill. And in reality, the AGI isn't that much to boost a high value of your critical and then of course, talking about INT, well, it isn't that much also to boost your magic attack. Better rely on items and release the points intended to get this skill, and put it on those with FIRE POWER!

And lastly about Crossbow Mastery. We all know that the main weapon of Artillery is Crossbow as this is the recommended item for them, to boost their magic attack more and, getting Crossbow Mastery will be a good for you to increase that magic attack more and as well as your range.

Now lastly, let us discuss the distribution of points on the Artillery tree... In this tree, you can see that all active skills are at max level and all Ex versions are at max level 1 also. You probably will question me on why I max Magical Breeze even the increment is not that great. Well, the things is, I have extra points to spend and, at the BM tree, I have already allocated enough points for my most needed skills and it will be unwise not to use it. So, it's a choice between Twin Shot and Magical Breeze and I picked Magical Breeze because of personal preference :D. 

While the Detonation Arrow skill is surely a must max skill as we need that extra fire power on this skill to inflict more damage to our opponent.

And last but not the least... The ex versions of some BM skills. Well, Tracking Arrow Ex is a pretty no-brainer must get enhancement as Tracking Arrow is one of our main skill on our rotation while the other two new enhancement don't cost any SP so, it is pretty unwise not to help yourself by clicking the + button on these two :D.

So there you have it guys... This is myrecommended level 60 skill build for Artillery in Dragon Nest SEA [T4].

For comments or suggestions on my build, feel free to write a few words on the comment box below...

HAPPY GAMING WEB JUNKIES!

Level 60 Shooting Star Skill Build in Dragon Nest [T4]

$
0
0
Level 60 Cap has finally arrived in Dragon Nest SEA. This Cap update brings a lot of things to the game. Some good ones and some bad ones. The good ones are the new ex skills dungeons and new items of course and some example of the bad ones is the COLESSEUM EXPERIENCE AND RANK RESET. Once you have log in to your account, if you are already an Imperator in the level 50 cap, you will be an egg at level 60 cap. :D. 

Well, let's not make that a big issue because like it or not, we can't do anything about it. Let's just focus on the good stuff and one of them is the level 60 skills. 

There are two skills available to each class at level 60 cap in Dragon Nest SEA and both of them are Ex version which only means that it is an improvement of your current 2nd job skills. 

You might say that... "aw,, that's pretty boring". Well, that what's I think at first but then I realize that it is better to get ex version than active skills as it will surely be hard for players if there are many active ones. 

In this page, we will be discussing about Shooting Star at level 60 in Dragon Nest SEA [T4]. 

Firstly, let's determine the two new Ex skills of an Shooting Star. Here they are:
Alfredo Stomp Ex- Alfredo Stomp is enhanced to increase attack area and give additional damages.
Mine Thrower Ex- Mine Thrower is enhanced. A bigger bomb is shot in the air to increase damage and explosion area.

Now that we know what are the two new level 60 skills of Shooting Star, let us proceed to my level 60 skill build for this class.

Academic Skill Tree
Engineer Skill Tree
Shooting Star Skill Tree
Now let me explain my skill distribution...

On the Academic Tree, well, I think it is pretty standard. The things you should max in this tree are Wax, MP Mastery, Mind Conquer, Stun Grenade, Summon Alfredo, Aerial Evasion, Tumble, Power Tumble and HP Mastery. If you still don't get it why you should max all the skills I have mentioned, let me make a brief reason for each below:

Wax- To increase the possibility that enemies will slip.
MP Mastery- More mana as we know that using skill at level 60 cap really consumes a lot of mana especially in Ladder matches.
Mind Conquer- For more mana recovery. See explanation at previous skill.
Stun Grenade- Max probability to stun an enemy. 
Summon Alfredo- For more HP for Alfredo. At level 60 cap, Alfredo can be a key to a teams survival from big boss hits on PvE.
Aerial Evasion- Lowering the cooldown of this skill.
Tumble/Power Tumble- Your main evasive skill which should be max to lower the cooldown. Lower cooldown means more uses.
HP Mastery- a bit boost in HP will be a lot helpful. And anyway, you have extra SP to spend.

Now let us proceed to the Engineer tree...

In this tree, a lot of change has happened. When you have followed my level 50 Shooting Star build, I am sorry to say, but you will be buying a skill reset scroll just like I did if you want to follow my level 60 Shooting Star build thoroughly. 

The very first thing you want to max at this tree is Pingpong Bomb of course. This will be your key to doing great damage to the enemy. Shooting Star are known because of this skill as with its Ex version, the skill do wonders at max level.

The other skills that you want to max for more DPS are the Gauntling Tower and Ice Pump Tower. As far as I'm concern, the key to an Engineer's DPS are these two. Gauntling Tower does a lot of damage to the enemy specially at close range while there's no question that Ice Pump Tower can do the same. Believe me guys, you would want to max this skill first and don't spend your points maxing Alfredo's Hurricane as what others will suggest on doing. In reality, Alfredo Hurricane don't do that much DPS compared to these two towers. In fact, in PvP, you only need Hurricane to 1 for utility instead of damage. Once you can perfect recalling Alfredo while he is Whirlwinding, you will definitely catch the enemy off guard and give you time to set him up.

And here's the big question that you will be asking with this build: Why did you not max Alfredo Stomp or Mine Thrower? They have the ex version which makes them look cool and great? Well, they make look cool and awesome in paper but in reality, it doesn't give that much of a benefit to Shooting Star, maxing these two skill in my opinion.

First is Alfredo Stomp.... If you want to max this skill, I would ask you: What is the main purpose of Alfredo Stomp? Is it for damaging opponent? is this skill great in terms of DPS? Probably for those experience player, they will say NOT. This skill is only use to aggro enemies away from you, flinch the enemy and then now, with the ex version, it is used to down enemies. Basically, it is used mainly for utility rather than damage that is why I only level this to 1.

Second is Mine Thrower. Yes, it is a good skill to max with its ex version now as the damage and as well as the AOE are increased. Now, you have more probability to hit every target you aim with this skill as with the ex version, there is an explosion effect. However, based on my experienced playing as a Shooting Star for almost a year now, this skill isn't really a part of my main rotation. And now, even though it has added AOE and explosion, still, the damage isn't that significant as other Engineer skills like Towers and Ping pong bomb. That is why I prefer leveling this skill to 1 despite of the fact that it has its ex version now.

You will probably question me of why I did level up to max level Mecha Shock. Well, the damage is really great at max level and in fact, its damage is way better than Mine Thrower. Plus, don't forget that when you level this skill high, you will have longer duration of electrocution which is quite helpful in PvP. 

Oh yes of course. Being a Shooting Star doesn't mean that you rely that much on Alfredo. You still need Ducks (until Mecha Siren). In terms of PvP, our there's that skill called Tracking Arrows which pose a lot of trouble for us squishy class. And that is why I decided to take the ducks along with me and in fact, level up Mecha Shock to its maximum level at level 60 cap.

Then there's Biochemical Missile. It does give out good damage in PvP but in PvE, well it is really not good. If you are going to build a fun build, which is mainly a hybrid (like mine), you will need to sacrifice points on the skillls which is only good for one side (PvP or PvE) and this is one of that skill. PvE-wise, THIS IS NOT ONE OF YOUR DPS SKILL. That is why I prefer to level it to 1 for the debuff it gives. Anyway, the damage at level 1 is pretty good if you want some PvP action.

And last thing that I would like to explain in the Engineer tree is its ultimate at level 1. Well, it may look cool but when you are a Shooting Star and already have a tons of experience using it, you will probably see how awful this skill is in terms of damage. Instead of leveling it to 2, I prefer allocating that 1 point to the tower of an Engineer. 

And the last tree would be the Shooting Star Tree...

In this tree, I have maxed all active skills namely Alfredo Beam and Splash. Well, the decision of maxing this skill is based on personal preference. Alfredo Beam can be left at level 1 and allocate the points on the skills you like on the Engineer tree. The splash however is a good skill to max especially that it is cap at 6. Remember that there is a large increment in damage at level 6, 11 and 16 on t4 skill tree. 

Pingpong Bomb Ex is a no-brainer must get skill as we know that as a Shooting Star, PP bomb is our main skill. And of course, the two new ex version is a steal as it don't cost any SP. So go on and try them!

So there you have it guys.... This is my recommended level 60 skill build for Shooting Star in Dragon Nest SEA [T4].

For comments or suggestions, feel free to write a few words on the comment box below.

HAPPY GAMING WEBJUNKIES!

My Mom Has the Best Job in the World....

$
0
0
GOD in heaven said to a 9 month baby you are going to be born on earth tomorrow . . . 

Baby cried & asked how I will talk with people . 

God:" I had already sent an angel to earth she will teach you . 

Child:" how will i pray to you?  

God:" The angel will teach u, 

child:" How will I learn good words? 

God:" angel will teach you. 

child:" if I suffer from sorrow??

God:" angel will be there to listen.. . . 

child:" how do I find that angel?? . 

God:" It's very simple! . 

Usually people call that Angel as.. ."MOTHER"


Level 60 Physician Skill Build in Dragon Nest [T4]

$
0
0
Level 60 Cap has finally arrived in Dragon Nest SEA. This Cap update brings a lot of things to the game. Some good ones and some bad ones. The good ones are the new ex skills dungeons and new items of course and some example of the bad ones is the COLESSEUM EXPERIENCE AND RANK RESET. Once you have log in to your account, if you are already an Imperator in the level 50 cap, you will be an egg at level 60 cap. :D.

Well, let's not make that a big issue because like it or not, we can't do anything about it. Let's just focus on the good stuff and one of them is the level 60 skills.

There are two skills available to each class at level 60 cap in Dragon Nest SEA and both of them are Ex version which only means that it is an improvement of your current 2nd job skills. You might say that... "aw,, that's pretty boring".

Well, that what's I think at first but then I realize that it is better to get ex version than active skills as it will surely be hard for players if there are many active ones.

In this page, we will be discussing about Physician at level 60 in Dragon Nest SEA [T4].

Firstly, let's determine the two new Ex skills of an Physician. Here they are:


Disease Ex- Disease is enhanced to throw three flasks and increase damage given to enemies in a shorter period of time.


Poison Charging Ex- Poison Charging is enhanced. After executing the skill, enter "Normal Attack Button" while descending to move backwards and throw the poison on the floor to give damage to enemies. Can use [Dodge] again after additional attack.

Now that we know the two new Ex skill of Physician in Dragon Nest, let us then proceed to my level 60 skill build for this class guys...

Academic Skill Tree
Alchemist Skill Tree
Physician Skill Tree
Now onto explaining my skill distribution for this class...

On the Academic tree... Well, I think there is no need for further explaining on this tree... What you need to know here is distribute most points on the most needed skills, to suffice the SP requirement. More likely in this tree, you will max out Aerial Evasion, the two Tumble skills, the passive enhancement and the two active skills: Wax and Stun Grenade. Also, there's the option on getting Alfredo as well as in my skill build, you will have extra SP to spend which you can only spend on the Academic tree as the skill distribution on both Alche and Physician tree is on the limit.

For the Alchemist tree, a lot of change has been made. If you have followed my level 50 skill build for Physician, and want to follow this level 60 build, then you have to spend a skill reset scroll guys like I did. On this tree anyway, what you will need to max is the skills on the left of the Alchemist tree. As you can see, drastic changes has been made by me as at level 60, I find the poison skills more appealing to a Physician than the Ice and Fire skills but of course, I did max some of the Fire skills on the right side of this tree. The big change here is the Poison Charging skill (you can just leave it at 11 anyway). The ex version of this skill really help this skill a lot and in fact it pumped it up, leaving me no option but to max it. Personally, I love this skill now as it does decent damage (especially very useful in PvP) and because of the safer way you can use it now. Remember that you will have the option to use Dodge and back away if you want...

And there's Disease... The skill now does have decent AOE which means more chances of hitting more enemies...The poison effect it does add on the skill, with the help of the ex version is quite impressive and I think it would be wise to max out this skill.

Now... the things that I haven't included on the build is the Sacrifice skill which heals you bit by bit for a certain period of time. At level 60 Cap, Bit by Bit healing isn't really that useful, especially when you have a Saint in a party which does massive heals to your members. Instead of distributing points or even maxing this skill, just leave it to 0 and focus on your DPS. The job of a Physician is to give as much damage while, they have the ability to heal the party if the Saint fails. Well, for me, they are just 3rd class healers... Don't forget that Inquisitors are still there...

Now... here's a very useful tip that you will get from me for reading my explanation on my skill distribution... If you don't like Magma Wall that much, you can allocate the points on Magma Punch... If you value more DPS than burst damage, then go for Magma Punch and just level Magma Wall to 1. In fact, you can do max Magma Punch and just leave 1 point on both Magma Wall and Magma Wave if you really do value DPS that much for this class. However, be wary of the fact that Magma Wave is such a good skill in terms of burst damage and AOE. Well, I leave the final decision to you guys... :D

The last tree we will be discussing is the Physician Tree... I have decided to max all skills on this tree... Why? It is because you don't have a choice anyway... If you do save up points for the Alchemist tree, still, you won't be able to distribute that points as you will definitely be over the SP limit... Plus, does the additional damage that Love Virus and the additional heal that Heal Shower gives doesn't impress you? So yeah! max max max, including the Ex versions of course, as the passive upgrade it gives your skill is really beneficial for your Physician..

So there you have it guys, this is my level 60 recommended skill build for Physician in Dragon Nest SEA [T4]...

For questions and suggestions, feel free to write a few words on the comment box below...

HAPPY GAMING WEB JUNKIES!

Heroes of Newerth MODS (Play HoN with ALT Avatars, Announcers and More for FREE)

$
0
0
Hello guys.... It's been awhile since I have posted a guide on MMO games on my blog...

Well, I have been busy at work but at my free time, I usually play Heroes on Newerth this month. Well, I think most of you know HoN and those of you who are playing MOBA games like DOTA will definitely be on familiar territories.

One of the most addictive feature of the game is the HON Store. It is the shop where you can purchase some good stuff on HON like purchasing your favorite heroes, unique skins or what we often called as ALT Avatars, HON announcers, and many more. In fact, this feature kept me from playing HON every time I have a free time.

However, it isn't easy earning those prices as you need to play a lot of Match Making matches to get as much coins needed to buy those stuffs, especially the ALT Avatars and Announcers. Well, I myself is pretty pissed off with this fact and decided to find a way of getting those ALT Avatars for free. hehe

On my research, I found out that there is no other way to get those stuff legally without purchasing them BUT, there's a legal way to see them personally! What is this way? MODS!

Yes! Heroes of Newerth has mods which you can use to see your heroes favorite alt avatars or even hear the announcers you like.

I know you are pretty excited so I will go on to the guide on how to use HEROES OF NEWERTH MODS!

How to Install and Use Heroes of Newerth Mods

Step 1: Go to Google.com and search for your desired mods. You can search on Google "Heroes of Newerth Mods" or to be more specific, you can search "Heroes of Newerth Annnouncer Mod"/"Heroes of Newerth Hero Mod".
Step 2: Once you have find and ensured that the you have the right MOD, then go download the resource.s2z file. The usual format on downloading the file is that you will have to skip the adserving first before you can go to the download page. Just check the example below.

Step 3: Once finish downloading the .s2z file, it's now time to install it to your HonLauncher folder.

Step 3.1: Find HonLauncher .exe.

Step 3.2: Once you have found it, right click the app then click "Properties" and then "Find Target."

Step 3.3: Then navigate through "GameData" then "Apps", then "HoN" then lastly on "game". In the "game" section, this is where you will copy and paste the .s2z file you have downloaded.

Step 4: Once you have finished doing the process on Step 3, launch heroes of newerth and then you now can use Red Raja nomad. 

FAQS on Heroes of Newerth MODS

Does the other player can see the MODS?
No they can't. The MOD can only be seen by you. Other players wil see just a normal skin of a certain heroes.

The MOD that I install again does not work.
Well if you have problems like this, then you may have wrongfully install the MODS or, the MOD itself is the problem. Not all MODS are working so you need a trial and error process before you can have what you want. Also, if you want to install another MOD, be sure to exit first HON and then install the mod, and then relaunch it again.

Is this legit?
I don't know if this is legit but as far as I know, Heroes of Newerth Modding has been live for more a very long time now and, you are the only one that can see it and here what the heroes and announcers are saying.

Why are all the other players have the same announcer as mine?
That is the downside of MODDING. It overrides the normal announcer and probably, once you are playing with players who only enable the normal announcer of the game, then they will have the same announcer as what you have.

I think I have covered all the information about Heroes of Newerth Modding. If you have further questions though, please write a few words on the comment box below.

Before you leave this page guys, you can check out some of the expected images and the actual images in the game, to prove that Modding in Heroes of Newerth does exist and it works!

Happy Gaming Web Junkies!

Expected Output of Red Raja Nomad Heroes of Newerth MODS

 Actual Output of Red Raja Nomad Heroes of Newerth MODS (in-game)

Just Give me a Reason -Cover by Mochagirl Mae & Climax

$
0
0
Just when I thought that Bamboo and Sarah G. have made the best cover on the famous P!nk music, Just Give Me a Reason, a video from one of the pages I liked in Facebook suddenly popped out of nowhere, exceeding my likability on the video of Bamboo and Sarah G. 

The cover was made by Mochagirl Mae & Climax and you can watch the video below.

  
Very good cover don't you agree?! This thus show that Mocha girls aren't only hot and sexy, they are also talented and really gorgeous looking!

NEVERMORE The Shadow Fiend DOTA 2 Hero Guide and Strategy

$
0
0
One of the most favorite and most prominent hero in DOTA is Nevermore the Shadow Fiend. Well, who doesn't know and who doesn't love this hero?

He is considered as a powerhouse and often times, he is the one carrying his team to victory. However, that doesn't mean that if you ho Shadow Fiend, you are ensured of a win every time.

Using Shadow Fiend in DOTA 2 needs a lot of practice. Yes, he is considered by many as the best farmer in the game but, it takes a lot of practice and knowledge to use his skills properly.

In addition to learning his skills, we also need to know the items we should pick on building first in a certain scenario as we all know that Shadow Fiend is a squishy hero (and this is the trade off for his superior damage) and, equipping him with the wrong items will be very costly and will often lead to a loss.

To help you resolve all that problems, I have decided to put up a guide here in Web Junkies that will help you understand more Shadow Fiend in DOTA 2. Do remember that this is only a guide though. Some points that I will mention here may differ from your own perspective and that is why I encourage you to share your points of view also by typing a few words on the comment box below.

Now, let us proceed to the Shadow Fiend DOTA 2 Guide...

Caution: WALL OF TEXT :D

Know Your Role

Shadow Fiend can fill-in a lot of role in DOTA. He can be a ganker as his damage really outshines other heroes even at early levels. The logic is: High damage means faster way to kill which basically means more successful ganks. However, his damage depends mostly on his Shadowraze skill. You will need to hit at least 2 of them to do significant damage to the enemy. This needs a lot of practice by the way and if you are planning to use SF a lot in DOTA 2, then I suggest to practive using his Shadowraze skill as early as now.

Aside from being a ganker, he can also be the Carry of the team. SF can be a very deadly hero especially when he is fully equipped with his core and luxury items. Plus, the base damage and the damage you'll get from the acquired soul will be a very big boos on inflicting as much damage to the enemy as possible. In addition, Shadow Fiend has this scary ultimate which does a lot of damage to the enemy and slow them for a few seconds. The devastating power can become a turning point in battles if you land it correctly to all enemies during clashing.

However, don't every build Shadow Fiend as a Support or a Tank. SF is a squishy hero that he will be the worst tank in your team if you do build him as a Tank and, he has no staple DISABLE skills other than his ultimate (which has slow effect), which makes him a bad Support. Well, I know that you are well-educated in DOTA, and I think you won't do this mistake.

Skills of NEVERMORE The Shadow Fiend

Shadowraze- Shadow Fiend razes the area in front of him, dealing damage to enemy units in an area.
Range: 200(Q) / 450(W) / 700(E)
Radius: 250
Damage: 75 / 150 / 225 / 300
Mana Cost: 75
Cooldown Time: 10 seconds

Comment: This skill is one of your main source of damage. Do take note that level 4 of this skill does 300 damage each. If you do manage to hit all three Shadowrazes, then that means that you will inflict 900 damage on the enemy. However, hitting this skill ain't easy. It takes a lot of practice and to be honest, I can only manage to hit 2 at average, even if I have been playing DOTA for 5 years. Well, I am not really a pro in DOTA but, I think I have enough experience to share something about this skill, concerning on how can you land at least two of them...

So, here's some tips on landing Shadowraze...

1. Know the range of the two Shadowraze- This is the most important part of making these three skill hit: KNOWING THE RANGE OF THE THREE.Well, we know that the closest Shadowraze is ranged at 200 while the farthest is ranged at 300 but, how do they really look like in reality?

To give a very brief insight of this skill in real play, you can check out the video below to find the exact range of the three razes in actual game. Oh yeah, the video isn't mine guys. Too lazy to make one so I just picked the most reliable videoon youtube, which shows you the range of Shadowraze


2. Prediction of Enemy Movement- This the hardest thing to do: predicting enemy movement. However, this is the most important part that you need to learn to make those Shadowrazes hit the enemy. It does need a lot of practice and I suggest that you start it now. Other DOTA players has this thing called as "Blind Raze" where you cast your Shadowraze like a Blind. You can watch an example of a Blindraze on the video below later.


3. Knowing what is Shadowraze- The thing that I almost forgot mentioning on how to land Shadowraze more often is to know the skill itself. Well, you won't be able to use it well if you don't know it well. Here the thing about Shadowraze: Aside from knowing that it has three ranges which is seen on the description below and, from the fact that it can deal 300 damage each, this skill is allocated on Q, W and E hotkey. Q has the closest range, W has the middle range while E has the farthest range amongst the three. In addition, the three Shadowraze doesn't share the same cooldown which means you can combo them well together. Also,    Shadowraze nukes in front of Shadow Fiend, meaning you need to be facing the target. And lastly, there is around a 0.5 second animation delay casting a Shadowraze so be wary of that.

Necromastery- Shadow Fiend steals the soul from units he kills, gaining bonus damage. If the killed unit is a hero, he gains 6 souls. On death, he releases half of them from bondage.
Maximum souls: 12 / 20 / 28 / 36
Bonus damage per soul: 2


Comment: In my opinion, this is the very first skill you must take to give you an edge against enemy players at early levels. Do remember that this skill has the ability to grant you souls, which then grants you bonus damage. How will you acquire these souls? Simple... Get kills from creeps or enemy heroes, and you'll get them! Also, you can get souls from denying your own creeps. Aside from your Shadowraze skill, this is the skill which is in passive form, which will keep you farming fast and getting your core items in a jiffy. In fact, this is one way of avoiding, spamming Shadowraze at early level. Nevermore has a low pool of MP and at early level, you need to conserve Shadowraze for killing heroes or killing a group of low-life creeps.

Presence of the Dark Lord- Shadow Fiend's presence reduces the armor of nearby enemies.
Radius: 900
Armor Reduction: 3/4/5/6


Comment: Yet another passive skill that grants negative armor debuff to enemies nearby. In my opinion, this skill is best taken when Necromastery and Shadowraze is at full level. In early fights, this passive may be a good pair to Necromastery but, sacrificing the damage you will inflict to enemies, coming from Shadowraze isn't really suggested. Oh by the way, this skill does stack with other armor reducing items, effects or even skills.

Requiem of Souls- Captured souls are released to deal massive damage, as well as slowing and reducing the attack damage of nearby enemy units. Requiem of Souls creates one wave of damage for every 2 souls stored by Necromastery. The closest enemy units are hit the hardest. Requiem has a 1 second cast time before it is activated. Also, the half the souls you lose on death are released in as if the spell was cast. Damage Radius: 1375 / 1425 / 1475
Damage Per Line: 80 / 120 / 160
Slow Radius: 700
Slow Duration: 5
Slow: 20%
Attack Damage Reduction: 50%
Mana Cost: 150 / 175 / 200
Cooldown Time: 120 / 110 / 100 (in seconds)
Comment: One of the best nuke skill I have seen and I have used so far in DOTA 2. Shadow Fiend really looks cool with this skill especially at clashing. The damage of Requiem of Soul is dependent on the number of souls you acquired from Necromastery. And yes, that is why Necromastery is really important and you should prioritize maxing that skill first. This skill explodes waves of damaging lines around Shadow Fiend with 1 line per two souls stored, for a total of 10 waves of lines. The skill lowers the movement speed and as well as the attack damage of the enemies withing the explosion but here's the catch: The skill has a 1 second casting time which basically means there's a chance that Requiem of Souls can be countered by a perfectly timed stun. Also, when you cast this skill while in Windwalk State, your invisibility will break but, the skill has little chance to be cancelled. So yeah, Shadow Blade is a good item for Shadow Fiend, for positioning and catching your enemy off guard with your ultimate.

I think I have covered everything about Shadow Fiend's ultimate and it don't need any further explaining but for those who are looking for some real time action on this skill, you can check out a few videos I have copied from youtube and embedded on this page to show you the desctructive power of Requiem of Souls.


The second video shows the change that has been made by the developer on Requiem of Souls at patch 6.75. As you can see, once you have successfully casted your ultimate then you have died, you will then release another wave of RoS. The damage dealt by this additional wave is half the amount of souls you have so yeah, it also can kill enemies especially those who are low in life.

Learning from the PROS

Here are other videos showing how good these two players are in controlling Shadow Fiend. And yeah, while watching, try to learn something from them on both using Shadowraze and Requiem of Soul. My idol, YaphetS is a pro himself and I think his the best Shadow Fiend user in DOTA. I tried to search some of his videos on youtube but it only give me a DOTA gameplay of SF. So, that is why these two are just the one's in here...


Skill Distribution Per Level

Level 1- Necromastery
Level 2- Shadowraze
Level 3- Shadowraze
Level 4- Necromastery
Level 5- Shadowraze
Level 6- Necromastery
Level 7- Shadowraze
Level 8- Necromastery
Level 9- Presence of the Dark Lord
Level 10- Requiem of Soul
Level 11- Requiem of Soul
Level 12- Presence of the Dark Lord
Level 13- Presence of the Dark Lord
Level 14- Stats
Level 15- Requiem of Souls
Level 16- Stats
Level 17- Stats
Level 18- Stats
Level 19- Stats
Level 20- Stats
Level 21- Stats
Level 22- Stats
Level 23- Stats
Level 24- Stats
Level 25- Stats

Recommended Item Build for Shadow Fiend

Now this is the hardest part of the guide and I think that we will differ in opinions with this one but hey, this is a guide remember.

Starting Items

1x Slipper of Agility


3x Ironwood Branch

3x Tango


1x Healing Salve


Now why the hell would I start up with this item and not go to Bottle? Anyway, I can afford it at the very start of the game. The key to Nevermore's farming at early game is his damage. Yes, you can do have Bottle at the very start of the game but for me, I prefer these items at the start of the game and I will just farm for Bottle. I have choose to have these item as at the very first, like you have notice earlier, I will be getting Necromastery at the very first. Slipper of Agility and as well as Iron Branch is one key of boosting my damage a bit to help me farm for soul fast and easy. In short, it will give me a decent damage to last hit enemy creeps or my own creeps. While the 3x Tango and 1x Healing Salve is purely for sustainability. At early game, you don't want to leave your lane (except you want to gank) as you will let the other hero have the advantage in terms of level. In times when your health is getting low, you can use Tango while if you need instant heal as your health is near death, then use Healing Salve. Just be sure that no one will attack you when you use Healing Salve as it will cancel the healing effect.

Core Items


Bottle- Now this is the key to winning battles at early game (when you have Necromastery at least at level 3 and Shadowraze at level 2). This will not only give you the sustainability that you need to be at lane always and not go back to town, but this also gives you the ability to gank efficiently. Why the heck would I be able to gank efficiently with this item?! RUNES BABY!

Now, let us pause discussing item builds first, and tackle the runes which will help us in battles. Here they are:

Haste - Provides a 100% bonus movement speed for 30 seconds. Maximum movement speed is 522. This rune isn't only useful to Shadow Fiend on escaping and chasing, it also provides great positioning to Shadow Fiend as, the more faster you move, the more quicker you can adjust your position and landing Shadowraze or your Requiem of Soul.

Invisibility - Grants invisibility for 45 seconds. This rune competes with haste for rank 1 in runes but after invisibility is gone, you can't chase if an enemy happens to get away. If there's one thing I can say about this rune, that is it provides Shadow Fiend that ability to surprise enemy in battles. You can set them up with your SS with this rune.

Regeneration - Regenerates 100hp/67mp per second for a total of 30 seconds. If you do take damage the regeneration buff will dispel. When you play Shadow Fiend, you will rarely go back to base with this rune as it will give you the instant health and mp you need to keep on battling. Plus with this rune, you can waste your mana clearing up creeps and farming more gold to get your items fast.

Double Damage- Buffs your hero and any illusions within 500 range 100% damage for 45 seconds. This only increases your base attack damage so bonus attack damage items like Monkey King Bar will not get the increase. Items like Butterfly that has +30 AGILITY will double with Shadow Fiend attack since AGILITY bonuses increase BASE damage.

Illusions - Creates two replicas with the current condition of yourself. So let's say you have 50% health, the illusions will also have the same amount. Each illusion takes 400% damage and deals 50% of the total damage you deal. The least useful out of the five runes. Does provide scouting information or get enemies to waste mana on it. Sometimes get the opposition to waste ultimates but that's a small chance. Also good when you want to push a lane and helps to last hit.

Now... back to the recommended items for Shadow Fiend...

Shadow Blade/Blink Dagger- Now this is fun to explain... Most of the time, people argue about what to go with: Shadow Blade or Blink Dagger. Personally, I would say that it depends on the situation and your preference. Let us list the advantage and disadvantage of both item first...


Shadow Blade


Advantages 
+30 Bonus Damage, +30 Attack Speed
Provides Shadow Walk an active invisibility and +150 bonus physical damage on next attack Movement speed is increased 20% when you're invisible.
Stronger escape tool than Blink Dagger.
Invisibility breaks after Requiem of Souls finishes cast.
You can do full damage with Requiem of Souls if you can stand directly above enemy
Easier to dodge projectiles than Blink Dagger

Disadvantages
Shadow Walk has a longer cooldown
Takes longer to get into a fight
Countered by Sentry Ward, Necronomicon, Gem of True Sight and Dust of Appearance
Chances to do full damage with Requiem of Souls are slim
850g more expensive than Blink Dagger Blink Dagger


Blink Dagger 


Advantages
Cost 2150g
Better Initiation
Instant Positioning
Jump through obstacles
Able to dodge projectiles if timed correctly
Shorter cooldown than Shadow Blade

Disadvantages
Provides zero stat boosts
Three second cooldown when you take damage
Harder to escape than with Shadow Blade
Radiance counters Blink Dagger hard if you're trying to escape Blink Dagger

In the end, you will be choosing what is best for you and what is more needed by the team. If you have Tidehunter or Magnataur in your team which has the ability to stun enemies in a wide radius, then you are better off with Blink Dagger first. But if you don't have teammates like this, then it's better yo build Shadow Blade first. Just do remember that you can't have both item at the same time as it's very costly. Instead of getting the two, pick one and start building your Luxury Items.

Power Threads/Boots of Travel/Phase Boots- These are the boos which are recommended for Shadow Fiend. So, does this mean that I will take all three? LOL. No one does that and definitely NO. You just pick one depending on the situation. The Power Threads provides flexibility to your hero. Remember that you can switch this boots to INT, AGI or STR which gives you a bit of an advantage in a certain scenario whether you need, life, mana or a bit boost in damage.

On the other hand, in cases where you most need the ability to chase and escape, then Phase Boots is your item. Remember that this item provides a short movement speed increase and also, don't forget that this boots has an effect which enable you to move through creeps or what other call as anti-collision effect. Well, that doesn't include towers or trees but how I wish it can do that sort of stuff. ahaha. Anyway, one of the other advantage that you can benefit from this boots is positioning. Just like Rune of Haste, the faster your movement, the quicker you can position yourself and cast Shadowraze or Requiem of Soul.

Now the last Boots in the list is Boots of Travel. In most cases, I end up replacing Phase Boots or Power Threads with this boots at the late stages of the game, wherein you'll need the ability  of this item to teleport you to places you want to go. At late game, you'll need to free up that space in your stash where you always place your town portal, to put that item which gives more BANG to your Hero.

Core Option

Magic Wand- In times when the regen from Bottle don't suffice the HP and MP you need, then go get Magic Wand. But take note, it's only an option. If Bottle is enough, and you have enough money to buy your luxury item, then I suggest that you do buy them instead of sticking with another sustainability item.

Luxury Items


Manta Style- This will be a great item for Nevermore. Not only does it gives you the movement speed that you need (due to the Yasha effect), and not only for the damage it gives you, but also for the ability to dodge enemy attacks if you timed them well. Just check out the video below on how Manta Style helped the player dodge the bullet, killed the attacker and escaped while you are LOL on the enemy...

In addition to the great dodging ability, Manta Style will be very helpful in pushing lanes also. Remember that the Illusions of Manta Style will adapt the damage of Shadow Fiend and pushing lanes with Shadow Fiend in mid to late game will be be like a breeze with Manta Style.

Butterfly- Attack Speed, Dodge Rate and more damage? What more can you ask for? This item provides solid stats especially for Shadow Fiend. The increase in attack speed is really great but the dodge rate is the thing, which is why  I really like this item.


Situational Items


Black King Bar- An average DOTA 2 game will always have stunners or what we often call as disabler heroes which will definitely bother the casting of Nevermore's Requiem of Soul. If the situation gets more competitive and out of 10 times, you only landed your Requiem of Soul once successfully, then I think it's time to pick a Black King Bar my friend. This will be your source of protection for those skills that can cancel your Requiem of Soul

Linken's Sphere- You will definitely say the moment you see Linken Sphere, "I don't need this one!". But guys, here me out first before you decide to neglect this item. In DOTA 2, there are certain heroes that can override the effect of BKB. More specifically, skills like Batrider's Flaming Lasso and Beastmaster's Primal Roar can neglect the BKB's effect. If you have heroes like this on the opposing team, better to build Linken Sphere first and, if you there are average disablers and BKB overriders, then better pick both BKB and Linken Sphere for that extra protection. And besides, these two item doesn't only help as a protective measure for Shadow Fiend, it also boost his stats. So, it's really worth picking in situations like this!

Daedalus/Satanic/Eye of Skadi-  One of your main problem in late games is cutting down big chunks of life of the tanker hero like Centaur and Axe. As we all know, these two will have the most armor at the late stage of the game and, one way of bypassing the heavy armor is by landing critical hits with Daedalus. Another way of dealing with this hero is through kitting them with the help of Eye of Skadi. Both of them are melee range and you will have no problem in terms of killing them with your range. The only problem that I could think of in going with Eye of Skadi is if this two have Blink Dagger. So be wary of what they are doing at all times, especially in clashing. My basic rule in clashing with this hero is: DON'T SHOW UP UNTIL THEY SHOW UP! And lastly Satanic. The main key of buying this item is outsurviving these king of beefy heroes. With the sick Lifesteal that Satanic provides, I think you will have the a little bit of an edge against these tanking titans at the end.

Ethereal Blade- If enemy team has strong AUTO-ATTACKERS, I'd buy Ethereal Blade to survive attacks from heroes like Drow. Deals damage proportional to how much AGILITY Shadow Fiend has and sends both you and your target into an etherael state. In the etherael form, both you and your target unaffected by auto-attacks and take increased magical damage. A good combo against etherael'd enemies with Shadow Fiend is, Ethereal Blade -> Black King Bar -> get closer to etherael'd enemy -> Requiem of Souls -> Profit. It's a bit risky if you get Ethereal Blade when they have strong abilities like Lion's ultimate Finger of Death but that's why you activate Black King Bar before or after you've used it. Buying a Butterfly further increases your survivability and boosts the power of the e-blade.

Heart of Tarrasque- If things really get rough and you need extra boost in life, then HoT is the item you need. This item is really useful especially when you are facing a hero which has already brought a Butterfly. Probably, you will be defeated every time if you go toe-to-toe with enemies with Butterfly and, with evasive buffs like Mortred. The extra health and as well as the regen will be crucial in winning the battle against those certain heroes.

Monkey King Bar- Another way to win against heroes who already have bought butterfly is by buying MKB. Take note that this item has this so called Passive True Strike which prevents your attack from missing and, don't forget the mini stun it has.

Nevermore Shadow Fiend Game Strategies

Well, I am not really the best Shadow Fiend player out there in DOTA 2, but I will try to cover some basics information on how you should play Shadow Fiend.

First things first.... Let us talk about LANE-ing. The best lane for Shadow Fiend is on Middle Lane where he can farm easy with the help of runes. Be sure to talk to your team first and ask them that you will go on middle lane if you will pick Shadow Fiend. However, always be wary of your surroundings when you are at middle lane as Nevermore. YOU WILL BE THE CENTER OF ATTENTION once you go to middle lane and picked this hero. What can you do to avoid being a failure in MID? WARDS BABY! You can check out some of the spots that you must ward to help you not be gank every time and be wary of rune availability.


Goals at Early Game
Your main goal in the early game is to farm for soul and farm for your core items. Pawn a bunch of creeps with your Shadowraze skill and if you have the chance, gank at top lane or at bot lane. If there's one advice I can give you at early stage of the game, that is CONTROLLING THE RUNES! The RUNES will be your best friend as Shadow Fiend, so pay attention to it every two minutes and of course, don't forget to ward the RUNE spot so it will be more easy for you to detect where is the rune at that current time.

Middle Game Goals
At this stage of the game, you must already have your Core items like Shadow Blade/Blink Dagger, the boots that you prefer in that current situation and your bottle of course. In this stage, I prefer ganking with a team mate more preferably, those heroes with disables like slow and stuns. Remember that Nevermore hasn't got this much of a talent in Ganking solo (unless you are really good of course) as he has no stable disable skills. All he has is pure raw damage from his Shadowrazes and base damage. 

And last piece of advice, be CAREFUL at the middle stage of the game. When you fail to gank and fail to outfarm enemy heroes, there's a big chance that you will end up losing the game. GANK CAREFULLY AND FARM CAREFULLY. Anyway, you have escape mechanism at the moment with your Shadow Blade/Blink Dagger... USE THAT WISELY if you are in danger and, of course use it as often in Ganking enemy heroes.

Late Game Goals.
As like any other heroes, at late game, your goal is to be the main carry of the team. You will be the one inflicting damage to the enemies in clash with your Shadowraze and Requiem of Soul and of course, with your base damage. At this part of the game, it's all about pushing, clashing and winning battles!

I strongly advised that you have Manta Style at this stage as like what I have said, not only that it will increase your stat, it will also give you more escape mechanism. 

DON'T GO ALONE! Be with an ally or more preferably, be with your team all the time. Also, learn to communicate well with the hero who will initiate clash or those heroes like Tide Hunter. Be sure to always take a look on what he/she is doing as remember, you will be the one taking a big chunk of life, of the opposing team's heroes, with your Requiem of Soul. 

So there you have it guys... This is my NEVERMORE The Shadow Fiend DOTA 2 Hero Guide and Strategy. For comments and suggestions on my guide, feel free to write a few words on the comment box below. And oh yeah! Before you leave, you can watch out a few videos of players, playing Nevermore The Shadow Fiend to get more tips on how to play this Shadow Fiend with style and finesse!

Thanks for your time and may you continue to support Web Junkies Blog!


source: http://www.dotafire.com/dota-2/guide/nevermore-the-soultrain-stealer-shadow-fiend-guide-221

Targeting Big Countries to Increase Adsense CPC

$
0
0
You may already know some ways on how to increase your Adsense Cost-per-Click and, I think you are already familiar of the technique called "Geotargeting". But for those who haven't got a clue on this, let me share my own understanding about this technique.

In relation to pay-per-click advertising and putting it on simple words, Geotargeting is a way of increasing your Adsense CPC by creating content which will derived more traffic from locations with good economy or what we call as those countries which will pay more for online advertising.

Let's put Web Junkies Blog as an example for this. At the moment, my blog gets more traffice from my homeland, the Philippines and, we all know that my country isn't that good in terms of economy. We are there on the map but we are not considered to be giants in terms of our economy. In general, my goal is to get as much traffic from countries like United States, Europe and other countries with good economy. Why? It's because people from these countries will pay more for online advertising compared to my country.

I think you are getting the big picture here but to be more exact and to help you with your online business, I will share a big of my experience using Geotargeting to your advantage to increase your Adsense earnings.

The next thing I will show you are the steps on how to increase your CPC through Geotargeting.

Step 1: Reviewing your Adsense Performance Report

What need's to be review on your Adsense? THE COUNTRIES WHERE YOU GET THE MOST CLICK or more specifically, THE COUNTRIES THAT GIVES YOU THE MOST ADSENSE EARNINGS PER CLICK.

Login to your Google Adsense account and from there, navigate your way through "Performance Reports" then go to "Countries".

I will show you my Performance Report on "Countries" for last week but, only the CPC report. Check it out below.

Now what does this report shows you? Take note that the report is hierarchical which means that the one at the top is the one that leads in terms of earnings. As you can see, most of my Google Adsense earnings came from the Philippines but, the CPC is really low gaining just $0.08 per click. Now, my target location will be United States, Australia, Switzerland and any other countries which will give me high CPC.

Now, I know that you are asking "Now that I know where are the countries that provides me high CPC, what will I do next?". Simple... Let us proceed to Step 2.. :D

Step 2: Using Google Analytics to your Advantage 
You may say "Whoa.. How? Why?" Okay okay, settle down... I will explain why. As we all know Google Analytics provides the review on the performance of our blog or website in general. In here, you will have some insights on what are the pages that MIGHT be providing the traffic on the countries which we have high Adsense Cost-per-Click. Remember that I say "MIGHT" which means that it's not a 100% assurance that this pages are the ones that has been click but based on experience, I would say that it has a 60% chance that these are the pages we are looking for.

So how do we do it? Simple... First, login to your Google Analytics account and then navigate your way to "Traffic Sources" then click "Overview".

From there, you will need to "View Full Report" of your keywords and from there, you will need to find out which are the pages which are being visited by those countries which has high paying Adsense CPC. 

In my case, I need to find out the pages where most visitors are from United States and Europe.

If you have finally found out what are the pages you are looking for, it's time to proceed to the final Step.

Step 3: Writing the Same Quality Content

When I say writing the same quality content, I refer to creating identical content which gives you more traffic on countries, which gives you high paying adsense CPC. In my case, I have found out that in my page http://webjunkiesblog.blogspot.com/2013/03/best-inferno-monk-build-in-diablo-3.html, might be giving the most CPC on my adsense earnings and for me, it would be wise to create more diablo 3 content. And of course, not just any content BUT THE SAME QUALITY CONTENT. If you have problems writing one, then you can go check out my article about "How to Write Quality Content for Readers and Search Engines" later. Get the idea now? :D.

I really can't show you my adsense earnings due to it's not allowed in the Adsense Policy and due to confidentially also but, what I can assure you is that this technique really works. I have been using Geotargeting Strategy to Increase Adsense CPC for half a year now and it's really working like a charm for me. It did boost my Earnings by three folds and I definitely suggest that you try it yourself. It's simple and legal! So.... GO DO IT YOURSELF NOW!

For comments or suggestion on my article about "Targeting Big Countries to Increase Adsense CPC", feel free to write a few words on the comment box below.

HAPPY BLOGGING WEB JUNKIES!

The New Noel Race in Ragnarok 2 Online: Crecentia and Soul Maker

$
0
0
Last week, Ragnarok 2 Online has a new addition to their races called the Noel Race. It's the latest race of the game and along with its arrival, Asiasoft also included the addition of a new map where the Noels originated from – Yggdrasil Garden. 

The History of Noels 
Noels came about during the time of the Midgard battles. They were once Elves who battled alongside the Human Race against the Goddess Freyja, in which they emerged victorious. However, after that, the Elves began to disappear after they absorbed the demon spells that were casted during the battle. The Elves could only survive by absorbing spells and thus they started to grow black wings and tails on their backs, and the symbol of the demon, horns, also appeared from their heads. Due to the transformation, the Human Race started calling them Noels. The Noel race was saved from extinction by a piece of Ymir, which contain pure and infinite spells, preventing the Noels from transforming into demons when they absorbed demon spells. Even though they would grow into adulthood, they spent their lives as children to reduce the need to consume more spells. 

New Map: Yggdrasil Garden 
The Yggdrasil Garden, located on the top of the world tree Yggdrasil, is the home of the Noels. The Noels started building the small town Elenas, and lived there happily and peacefully until one day, the peace was shattered by the Freyjas. The Freyjas' mission was to destroy the pendant made from Ymir, and the Noels fought bravely to protect it. The Noels won the battle eventually after a long and hard fight and they marked this victory with a celebration. However, it was abruptly ended when a wounded traveler showed up in Elenas town and the story of Noel began.

The 2 New Classes of Noel Races
There are to classes added in the game if you choose to pick being a Noel. First, you will go off as an Alter and then, you can choose to being a Crecentia or a Soulmaker.

The Alter Class
The Noel race starts their job as Alters. Once they reached the 1st job, Noels will be able to choose between two class advancement:
The Crecentia Class
The Crecentias can use all Alter skills. They are the main attackers; dealing long distance and multiple melee damage by using their AOE (Area of Effect) debuff attacks and AOE attack skills. The Crecetias are also able to have carious patterns of battle with objects, using their action control skill.
The Soul Maker Class
The Soul Makers cannot use Alter skills. They are restricted to their use of their own skills. However, the Soul Makers are able to use the Heal ability and strengthening buff through linking with various objects. The Soul Makers are able to provide object buffs through linking and are able to increase the buff effects by dealing special abilities.
Now, if you want to see the Noel class in action, you can check out some videos below later. Take not that these videos aren't mine. I picked the best videos on youtube showing the Noel race in action and just posted it on my blog. They are from various uploaders and I think you will learn something from this class by seeing them below.
And lastly, if you are looking on the skill build guides for both Crecentia and Soul Maker, well, I will be posting them soon here on Web Junkies Blog. Currently, I am experimenting on what are the best builds for these two class and possibly, I can post them this week or next week. So stay tuned Web Junkies!

A Modern Day Love Story (Hi Hey Hello)

$
0
0
Hi guys... I just want to share to you a video that I have watched earlier today. The video features the most powerful smartphone of today, the Galaxy S4. Well, in my opinion, it's the highlight of the video but what really inspire me to watch the video over and over again is how they Samsung showed the modern way of two lovers, falling in love for the first time....

Although yes, it may consider as a Samsung Galaxy S4 advertisement but when you don't consider that when watching, you'll definitely smile and relate the ways you 0say Hi Hey Hello to your first fiancee for the very first time.

Disclaimer: The video you will see here by the way is not mine and Samsung has no connection with me whatsoever. I just wanted to post this video in this blog because I think those Web Junkies out there could really relate to this.

Short Description of the Video

We all remember how it feels to fall in love. But times have changed. We've become more sophisticated. Our instincts developed. And so has the Samsung GALAXY S4. 

Samsung Mobile proudly presents a story of a young couple falling in love, starting with a simple "Hi, Hey, Hello", a song by The Chicharones. 

Filmed by Grammy Award-winning director, Joseph Kahn, this music video marries love and technology in a way that's relevant to today's youthful mobile culture. 

In a playful unraveling of new courtship, the male lead uses the GALAXY S4's unique features such as Dual Shot, Samsung Smart Pause, Drama Shot, Sound & Shot and Air Gesture to attract the girl's attention.

Thor: The Dark World Goes Mobile this Fall of 2013

$
0
0
Paris, 22 July 2013- Having previously teamed up to developer several successful games including The Amazing Spiderman and Iron Man 3- The Official Game, Gameloft, a leading global publisher of digital and social games, and Marvel are joining forces once again to bring the official game inspired from the highly anticipated new movie Thor: The Dark World, to iPhone, iPad, iPod Touch and Android.

In this free-to-play game, Thor must restore order to the Nine Worlds. You will lead Asgardian forces in over 100 exciting and varied missions against Marauders and Dark Elves. Gameloft’s stunning HD game engine brings to life the beauty of the Thor universe and worlds like Jotunheim and Asgard. Thor: The Dark World will also include a compelling social multiplayer element where fans join forces to earn victory. An original story inspired by the film and co-written by famed Marvel writer Christopher Yost provides a gripping narrative for the game. 

"We are delighted to continue our excellent collaboration with Marvel," said Karine Kaiser, VP Marketing & Licensing at Gameloft. "Developing official games from Marvel's cinematic blockbusters and bringing the fans an immersive experience in a Super Hero would inspires us every time."

"Thor: The Dark World- The Official Game will allow fans of the franchise to play as one of Marvel's most iconic super heroes in a game of epic scope and beauty." said Javon Frazier, VP Games Marketing at Marvel. "With this new game, we are further expanding the successful relationship between Marvel and Gameloft."
Thor: The Dark World –The Official Game will be released in conjunction with the theatrical film from Marvel in November.

Gameloft Thor: The Dark World- The Official Game Press Release (Original):
Early Screenshots of the Game:


Best Soul Maker Build Guide in Ragnarok Online 2

$
0
0
The Soul Maker Class

The Soul Makers cannot use Alter skills. They are restricted to their use of their own skills. However, the Soul Makers are able to use the Heal ability and strengthening buff through linking with various objects. The Soul Makers are able to provide object buffs through linking and are able to increase the buff effects by dealing special abilities.

Alter Skills


Diem Wind-Inflict 14% of physical attack plus 20% chance of applying stigma debuff.


Illusion Blade-Inflict 40% of your physical attack and you can earn 2 stigma debuff at 20% to the target. The target under the curse skill gives 30% of the damage dealt additional damage.


Curse Burst- Explode your concetraded stigma and deal damage 5 meters around you at 6% of magic attack, add 1% additional magic attack damage for every stigma compounded.


Crucio- Curse the enemy of 19% of your magic attack, plus DoT (Damage over time) of 9% for 10sec.


Evanesco- Reflect the damage done by the target by 2%.


Furnunculus- Down a curse upon the target every 2 sec for 30sec, DoT damage of 10% Magic attack, increase DoT damage every 5sec by 4%.


Ignition- This passive skill doubled the physical and magical attack of your character.


Raw Tilt-Curse enemy for 30sec to increase the damage they received by 5%, Can’t be used with blindness.


Blindness-Physical / Magic Attack 30sec to break the balance of the spirit of the target decreases by 5%. Can’t be use with tilt.

Recommended Skill Build for Alter Going Soul Maker
We don't really need to think this over. What we must to here is to get the skills that will help inflict as much damage to the enemy and help us level up faster. Anyway, when you change your job to Soul Maker, your skill points will be reset so you don't need to worry of being short of SP on the Soul Maker tree.

I recommend that you go max out the following skills:
  • Diem Wind
  • Crucio
  • Curse Burst
  • Furnunculus
  • Raw Tilt
Your Skill Build for Alter will look like this:


Raw Tilt will be your first skill as it will help you boost your damage dealt to the enemy. While Diem Wind, Crucio and Furnunculus will serve as the main skill to inflict damage to the enemy. And lastly, Curse Burst will be your resort to increasing your damage, just like Raw Tilt.

Skill Rotation:Raw Tilt>Furnunculus>Crucio>Diem Wind till 5 stigma>Curse Burst

Soul Maker Skills

Soul Extinction- Explodes the concentrated magical power of souls to inflict x% of magical attack damage, and inflicts x% of additional DoT for 10 seconds.


Casting Time: 1 second
Cooldown: 5 seconds
Comment: At level 1 this skill inflicts 27% of magical damage and 14% DoT while at max level, the damage increases to 40% and the DoT rises to 20%.

Soul Extinction Mastery- Immobilizes the target for 1 second when Sould Extinction succeeds.


Comment: At max level, the target will be immobilized for 3 seconds.

Mental Breakdown- Inflicts additional damage -x% of magical attack damage - by fragmenting the targets mind. If the target is under Soul Injection, the damage jumps to addtional 5 enemies max. On each jump, the damage is decreased by 10%.


Casting Time: 1 second
Cooldown: 1 second
Comment: This skill gives off -20% magical attack damage when it's level 1 while at max level, it gives off 30% magical attack damage.

Soul Extortion- Inflicts x% of magical attack damage every 1 second, for 5 seconds, by taking over the target's soul. The movement speed of the target is decreased by x% when casting is in progress. if the target is under Soul Injection, the damage jumps to additional 5 enemies. On each jump, the damage decreased by 10%.


Casting Time: 1 second
Cooldown: 10 seconds
Comment: Level 1, it will inflict 21% magical damage while at max level, it does 31% of magical attack damage.

Death Spell- Inflicts x% of magical attack damage on the target and additional hostile targets up to 10 within 5 meters of the target, and adds Soul Injection debuff to all the targets which received the damage.


Casting Time: 1 second
Cooldown: 1 second
Comment: Inflicts 16% magical damage to the target at level 1 while 22% at max level.

Sacrifice- Sacrifices 10% of the caster's max HP, to inflict damage on the enemy. The enemy receives x% of magical damage plus the amount of the HP that the caster has sacrificed. The target is knocked down for 3 seconds. The caster could die from using the skill due to the HP required to use Sacrifice.

Casting Time: 1 second
Cooldown: 30 seconds
Comment: For 10% max HP, you will inflict 78% of damage to the enemy at level while and 115% at max level.

Awake: Soulmate- Communicates with Root of Death Worlds to makes its physical manifestation as a soul. Increases damage and movement speed of the caster by x%, and increases acceleration by x%. Recovers all HP of your party and attack squad members within 10 meters of you by x% every time the caster achieves a critical hit.

Casting Time: 1 second
Cooldown: 1 second
Comment: At level 1: the caster will have 10% increase in damage and movement speed, 5% increase in acceleration and 2% HP recovery for the caster and his/her party every time he/she lands a critical hit. While at full level: the caster will have 30% increase in damage and movement speed, 15% increase in acceleration and 6% HP recovery for the caster and his/her party every time he/she lands a critical hit.

Immunity- Inflicts x% of magical attack damage by sending Root of Death Worlds that is manifiested as a soul towards the target. When hit, the energy waves of the soul spreads from the target to other enemies within up to 20 meters of the target to inflict 42% of magical attack damage on hostile targets and recover HP of allies.

Casting Time: 2 seconds
Cooldown: 10 seconds
Comment: When this skill is level 1, the Root of Death Worlds will inflict 77% of your magical damage to the enemy and the waves that spreads will do 31% of your magical damage to the enemies hit nearby. At max level it does 105% damage to the target and 42% damage to the enemies hit by the waves.

Exploitation- Increases intelligence of the caster for 30 seconds by absorbing the souls of enemies within 5 meters of the caster. The souls of up to 5 hostile targets can be absorbed, each of which increase the casters intelligence by x%.


Casting Time: 1 second
Cooldown: 180 seconds
Comment: Level 1 will give the caster a 2% increase in Intelligence while 6% at max level.

Impositio Manus- Increases physical/magical attack damage of party and attack squad members by x% for 30 minutes.


Casting Time: 1 second
Cooldown: 1 second
Comment: Your physical/magical attack damage and as well as your party will increase by 2% at level 1 while 10% at max level.

Transpersonal- Increases attack hit power of all party and attack squad member by x% for 30 minutes.


Casting Time: 1 second
Cooldown: 1 second
Comment: Your critical hit power and as well as your party will increase by 2% at level 1 while 10% at full level.

SoulLink: Concentration- Increases acceleration and vitality of the caster and up to 5 allies within a certain range by x% for 5 minutes. While spiritually connected, acceleration and vitality of the ally and the caster is increased by x% every time the caster achieves a critical hit. The acceleration and vitality can be increased up to x%. If no critical hit occurs, the increased level gradually decreases. When the level goes below the minimum value, the buff will be removed.
Casting Time: 1 second
Cooldown: 3 seconds
Comment: You and your party's acceleration, and vitality will increase by 2% for 5 minutes at level 1 while it will rise to 10% at max level.

SoulLink: Balance- Makes a spiritual connection with one ally for 5 minutes to increase physical/magical attack damage of the ally and the caster by x%. While spiritually connected, physical/magical damage of the ally and the caster is increased up to x%. If no critical hit occurs, the increase level gradually decreases. When the level goes below the minimum value, the buff will be removed.
Casting Time: 1 second
Cooldown: 3 seconds
Comment: You and one ally's physical/magical attack damage will increase by 2% at level 1 while 10% at max level.

SoulLink: Revive- Reduces the damage taken by the caster and up to 5 allies within a certain range by x% for 5 minutes and increases healing effect by x% at the same time. While spiritually connected, damage taken by the ally and the caster is decreased by 1% and HP is recovered by x% every time the caster achieves a critical hit. The damage taken can be decreased up to x%. If no critical hit occurs, the increased level gradually decreases. When the level goes below the minimum value, the buff will be removed.
Casting Time: 1 second
Cooldown: 3 seconds
Comment: At level 1: The damage taken by the caster and the ally will be reduce to 2%, the healing effect will be increase by 2% and the HP will recovery will be increased by 1% every time the caster lands a critical strike. While at full level: The damage taken by the caster and the ally will be reduce to 10%, the healing effect will be increase by 10% and the HP will recovery will be increased by 5% every time the caster lands a critical strike.

SoulLink: Devotion- Make a spiritual connection with one specified ally for 5 minutes to transfer x% of damage that the ally receives to the caster. The caster and the ally recover HP by 10% of damage taken every time they are hit. When the ally receives damage that would kill him/her, that ally recovers x% of max HP instead of dying, and the buff will be removed.


Casting Time: 1 second
Cooldown: 3 seconds
Comment: When this skill is at level 1, 6% damage will be received by the caster instead of the ally who has this buff on. While it the damage absorption will increase to 30% at full level.

Restore- Recovers HP of one ally by x% of magical attack damage.


Casting Time: 1 second
Cooldown: 1 second
Comment: Recovers 44% of HP at level 1 while 64% at max level.

Restoration- Heals one party member by x% of magical attack damage, then jumps to heal all the other members within 10 meters of the specified member. Up to 5 members can be healed, and the healing effect decreases by x% on each jump.


Casting Time: 1 second
Cooldown: 5 seconds
Comment: Heals 19% at level 1 while 28% at full level.

Cure- Recovers HP of the target by x% of magical attack damage for every 2 seconds for 30 seconds. Healing is increased by x% every 5 seconds for as long as Cure lasts.


Casting Time: 1 second
Cooldown: 1 second
Comment: Recovers HP of the target by 8% at level 1 while 12% at max level.

Dispell- Dispells the movement impairing effects (debuff) on the target with x% probability. The caster can use this skill even when he or she cannot control himself or herself.


Casting Time: 1 second
Cooldown: 30 seconds
Comment: It gives you 10% chance to dispel movement impairing effects at level 1, while 30% at full level.

Detection- Detects any invisible enemies within 10 meters of the caster by focusing his or her mind. Removes the invisibility effect applied to any enemies within the range, and stuns them for 3 seconds with x% probability.


Casting Time: 1 second
Cooldown: 30 seconds
Comment: Gives you 10% chance to stun a target after they become visible at level 1 while 30% chance at full level.

Cure Pearl- Generates 5 healing spheres around the caster. When an ally approaches a sphere, it is absorbed by him or her to recover HP by x% of magical attack damage. The ally who has recovered his or her HP using one of the spheres has to wait for 30 seconds before he or she can absorb another sphere.


Casting Time: 1 second
Cooldown: 10 seconds
Comment: Gives 30% HP recovery at level 1 and 44% at max level.

Soul Maker Recommended Skill Builds

There are two builds that I recommend on using once you have decided to become a Soul Maker. These are the Full Support and Hybrid Build. No DPS? Yes no DPS build. For now, I don't think that DPS build will not benefit that much when becoming a Soul Maker. Most of Soul Maker build focuses on healing and support. Yes! they are more like priest!

However, that doesn't mean that they can't inflict good damage to the enemy. They still can do! But, if you do max out those skills that will inflict good damage, you will then sacrificing some of the healing and supporting capabilities of this class. So that is why it is better to go Hybrid if you're thinking of rolling a DPS Soul Maker IMO...

For now, I am currently using this build on my two Soul Maker.

Full Support Build

1st Variation: (Max SoulLink:Devotion Build)


In this variation, you will see that we prioritize those support and healing skills over the damager skills. The highlight on this build is the SoulLink: Devotion skill. What we aim to do here is to support the tanker while healing the party in times when we most need our healing skills (when the healer falls).

If you are planning to roll in a build like this, I suggest that you GET CARDS which has large amount of VIT on it or large amount of VIT on set bonuses. We need as much VIT for this build so that we can survive from the damage absorption we receive to save our TANK. But of course, try also to get as much INT and AGI. Remember that INT will help our healing skills do more heals and AGI will be crucial on the two SoulLink skills before SoulLink: Devotion.

2nd Variation: (NO SoulLink: Devotion Build)


In this variation of the Support build, we didn't take the SoulLink:Devotion skill. We focus on healing most of the time while dealing damage to the enemy. Instead of SoulLink:Devotion, we will try to max out SoulLink: Revive to increase the heal effect.

I really prefer this build when you are going full support. Why? It's because you can focus more on increasing your INT which basically increases your magic attack and your healing. In fact, I think this is a much safer way to be a support Soul Maker as you don't need to absorb additional damage and just focus on supporting your raid members.

Hybrid Build

1st Variation (Damage-oriented Build)


This build is pretty straight-forward... We will max those skills that will do good damage to the enemy namely: Mental Breakdown, Death Spell, Sacrifice and Immunity. And then, we will pair them with those skills which are basically for survivability namely: Awake: Soulmate, Restore, Restoration, Cure and SoulLink: Revive.

2nd Variation (Heal-Oriented Build)


In this build, we just reverse what we did on the 1st Variation (Damage-oriented Build). We first prioritize the healing skills and then we pair it with those skills that can deal decent damage to targets.

Soul Maker Suggested Stat Distribution

The first thing we need to know is the different stats of Soul Maker. For every:

1 STR= No effect
1 AGI= 4 CRIT, 2 DODGE
1 INT= 2 MAGIC POWER, 2 PARRY
1 WIS= 10 SP
1 VIT= 6 HP

Basically, we need to concentrate on AGI and INT.

The question now is, what stat will I prioritize: INT or AGI?
Well, it really depends on your personal perspective: what build do you want and how much is your gold in stack. Why did I say this? Let's just take for example being a Full Support Build. If you are going as a Support, you definitely need a lot of AGI for CRITS to receive the most benefit from the SoulLink skills of a Soul Maker.Remember that you need to Crit a lot to make all that buffs work like a charm. In my personal point of view, you need to distribute 60% of your points to AGI and the rest is to INT.

The second issue here is how much money are you willing to spend to make your Soul Maker IMBA. We all know that there are cards and as well as gears that could boost a lot of both our AGI and INT. Some of them are really rare that you need to spend million of golds to buy a piece or two. But, if you do have the gold, then you will have no problem at all. I suggest that in this case, you give priority to INT as if you have a great set with AGI bonuses, you will definitely have no problem landing critical hits.

How about WIS and VIT? 
Investing points on these two stat will definitely be a waste. It doesn't give that much of a benefit to your character when you do invest points on both or either WISDOM and VITALITY. Instead of wasting your points, just focus on the two mentioned stats above. Just leave the gears and cards (sets) to do the increasing of your WISDOM and VITALITY stats.

So there you have it guys... This is my Best Soul Maker Build Guide in Ragnarok Online 2. For comments or any suggestions on the builds, please feel free to share your thoughts by dropping a few comments below.

HAPPY GAMING WEB JUNKIES!

Best Crecentia Build Guide in Ragnarok 2 Online

$
0
0
The Crecentia Class 
The Crecentias can use all Alter skills. They are the main attackers; dealing long distance and multiple melee damage by using their AOE (Area of Effect) debuff attacks and AOE attack skills. The Crecetias are also able to have carious patterns of battle with objects, using their action control skill.

Alter Skills

Diem Wind-Attacks the enemy to inflict 14% of physical attack damage. Adds Stigma debuff to a hostile target with 20% probability per hit. 
Default: 1/5 
Casting Time:1 sec 
CD: 1 sec 
SP Cost:1  

Crucio-Puts a curse on a hostile target to inflict 19% of magical attack damage and inflicts 9% of additional DoT for 10 sec.
Default: 1/5 
Casting Time:1 sec 
CD: 5 sec 
SP Cost: 1  

Ignition-Doubles the physical/magical attack damage that is increased by Strength and Intelligence.
Default:1/1 
Casting Time:Instant 
CD: 0 sec 
SP Cost:0  

Illusion Blade-Swings around a scythe with the magical power of the dark side fiercely to inflict 14% of physical attack damage and adds 2 Stigma debuffs to a hostile target with 20% probability per hit. Targets under curse spells receive 30% more damage in addition to the initial damage it had taken. Affected Skills: Crucio, Evanesco, Furnunculus, Raw Tilt, Blindness 
Default: 0/5 
Casting Time:1 sec 
CD: 5 sec 
SP Cost:1  

Evanesco-Puts a curse on an enemy to inflict 2% of damage that it had caused on itself. Lasts for 30 sec. 
Default: 0/5 
Casting Time: 1 sec 
CD:10 sec 
SP Cost:

Raw Tilt-Puts a weakening curse on the target to increase the damage that it received by 5% for 30 sec. Cannot be used concurrently with Blindness.
Default:0/3 
Casting Time:1 sec 
CD:10 sec 
SP Cost: 2  

Curse Burst-Makes Stigma debuff of one target explode to inflict 6% of magical attack damage on the target and other enemies with Stigma debuff within 5m of the target. This skill inflicts additional damage – 1% of magical attack damage – depending on the number of Stigma debuffs added.  
Default:0/5 
Casting Time: Instant 
CD:0 sec 
SP Cost:

Furnunculus-Puts a curse on a hostile target to inflict DoT – 10% of magical attack damage – every 2 sec for 30 sec. DoT is increased by 4% of damage inflicted every 5 sec for the duration of effect.   
Default: 0/5 
Casting Time: 1 sec 
CD:10 sec 
SP Cost: 3 

Blindness-Decreases physical/magical attack damage by 5% for 30 sed by breaking the balance of the target’s mind. Cannot be used concurrently with Raw Tilt.  
Default: 0/3 
Casting Time: 1 sec 
CD: 10 sec 
SP Cost: 3 

Recommended Skill Build for Alter Going Crecentia (MUST READ!)

Since Crecentia is different with Soul Maker in a way, especially on skill distribution, I suggest that you just go ahead to the recommended skill build for Crecentia. This class isn't like Soul Maker that when they reached a certain level, the skill will reset. Once you have chosen to be a Crecentia, the skill points you have distributed on the Alter tree will stay and you will be short of SP probably if you will recklessly distribute it.

Crecentia’s Skills 

Bram Gush-Gathers the magical power into shock bullets to inflict 7% of magical attack damage on up to 10 enemies in front of you when using scythe. Adds Stigma debuff to a hostile target with 6% probability per hit. 
Default: 0/5
Casting Time: 1 sec
CD: 1 sec
SP Cost: 1

Stigma Thread-Spreads Stigma debuff to other targets within a certain range of the targets to which the debuff was originally added. Stacks up to 5 times for a target to which the debuff is already added.
Default: 0/1
Casting Time: 1 sec
CD: 10 sec
SP Cost: 0

Earth Worm-Inflicts earthquake damage – 16% of magical attack damage – on the nearby enemies by controlling the Earth’s crust at will and decreases movement speed by 70% for 2 sec. Then jumps to inflict damage on up to 5 nearest enemies within 10m of the target to which the skill was used.
Default: 0/5
Casting Time: 2 sec
CD: 15 sec
SP Cost: 3

Tempest-Strikes the target fiercely using a weapon with Root of Darkness to inflict 68% of physical attack damage. If the target is under Stigma debuff, 1% of physical attack damage is added per 1 debuff. Also, the target is stunned for 3 sec.
Default: 0/5
Casting Time: 3 sec
CD: 60 sec
SP Cost: 4

Curse Reinforce-Increases the damage of curse spells by 5% Affected Skills: Crucio, Furnunculus, Land of Darkness.
Default: 0/3
Casting Time: Instant
CD: 0 sec
SP Cost: 0

Contingency-Strikes down on the target fiercely using a weapon to inflict 16% of physical attack damage. Decreases defence by 1% per curse which can stack up to 5 times for 30 sed and inflicts DoT which is equivalent to 1% of physical attack damage.
Default: 0/5
Casting Time: 2 sec
CD: 20 sec
SP Cost: 2

Land of Darkness-Continuously inflict 6% of magical attack damage on up to 10 enemies within the range where Land of Darkness is used. The damage is increased by 1% for any target under Stigma effect.
Default: 0/5
Casting Time: 2 sec
CD: 10 sec
SP Cost: 3

Awake: Darkness-Uses the physical manifestation of Root of Darkness. Increases damage and movement speed of caster by 10% and decreases all damage taken by 5%. Increases defence of all your party and attack squad members within 10m of you by 1% every time the caster achieves a critical hit. The defence can be increased up to 10%.
Default: 0/3
Casting Time: 1 sec
CD: 600 sec
SP Cost: 4

Death Grip-Inflicts 77% of magical damage on the enemies by exploding the physical manifestation of Inner Shadows of the caster and the nearby allies. Additional 10% damage is added per party member who is within 10m of the caster at the time of attacking a hostile target. The additional damage is added up to 5 party members.
Default: 0/3
Casting Time: 2 sec
CD: 10 sec
SP Cost: 5

Levicorpus-Makes up to 10 targets within 5m of the caster sleep for 10 sec with 20% probability by sending a strong Shock Wave and decreases damage taken by 10%. The target which is asleep wakes up when hit. 
Default: 0/5
Casting Time: 1 sec
CD: 60 sec
SP Cost: 1

Imperio-Decreases acceleration of all the hostile targets which are within 5m of the caster by 20% for 20 sec by spreading fear among them.
Default: 0/5
Casting Time: 1 sec
CD: 120 sec
SP Cost: 2

Mayhem-Adds Silence debuff which lasts for 5 sec to the target with 10% probability when Imperio succeeds.
Default: 0/3
Casting Time: Instant
CD: 0 sec
SP Cost: 0

Crecentia Recommended Skill Builds
Without a doubt in my mind, Crecentia are best in doing two things: debuffing and dealing good DPS. That is why, I have decided to create thre builds for this Class. One is the pure PVE build which focuses on maximizing the most needed damage skills (DPS and DoT) and getting some of the debuffing skills of this class. In this way, we can help our team in Nest raids do more damage not only by dealing damage ourselves, but also increasing their damage which some of our skills which can multiply damage by a certain percentage.

The other build is purely for PVP fanatics or those who like to go toe-to-toe with other players. Well, the very brief description that I can say with this build is it is purely made to hurt the enemies a lot. The Dot and as as well as DPS skill are maxed to the fullest extent to outdamage your opponent in PVP matches.

And lastly the Hybrid build. In this build, we will be doing a 50-50 distribution. 50 for the damage skills and 50 for the supportive skills or those skills which will help the team in raids. This is best for those who want to have the goodness of both PVE and PVP.

Now let us go to skill explanations...

So far, I can say that the PVE build is the most fun build I ever used while playing my Crecentia. Well, I really enjoy nest raids on Ragnarok 2 Online so there is no question why I enjoy this build a lot. :D.

Anyway... wether you go PVE, PVP or Hybrid, you must consider prioritizing the skills that I will mention below...

First is, the greatest asset of a Crecentia is the Ignition skill. Take note that this passive will help you double your physical and magical attack based on your STR and INT respectively. The very first thing you should do is obviously you should get this skill to get more Fire Power for your Crecentia.

Diem Wind will be one of your DPS skill by the way. It will add up to the damage you will deal with your DoT skills which are mentioned after the break.

Crucio and Furnunculus will be your main magic attack which will deal good Damage over time. Whenever these two skills is ready to use, just go cast it again and again to maintain that DoT on the enemy. By the way, I think these skills have more edge in terms of DoT compared to Priest's DoT skills as it has faster cooldown.

Evanesco will be a big help to you also. Reflecting 10% isn't that much on PVP but in Nest raids, especially on bosses, do remember that 10% is really big as the attacks of bosses is really huge. Another great skill use in raid is Raw Tilt. Just use Raw tilt during Raid and go switch with Evanesco (if boss cast AoE Deadly spell to protect yourself and your party indeed, it will reduce 15% of target damage) then switch again into Raw tilt. Raw tilt is a great skill, even better than Rogue's Death Mark but this skill can be used with Rogue's to maximize Damage rate.

Levicorpus is your life saver skill. It will reduce half of incoming damage and make the enemy sleep with a 100% chance at max level. A small side note though: use this skill near the enemy/monster, at least 1 enemy/monster have to be inside the area effect.

Awake:Darkness and Death Grip will be your massive INT damage skill. Awake: Darkness will let you transform into a Dark being, dealing massive damage to the enemy and the skill which you will use during this state will be Death Grip.

The rest of the skills will be just for prerequisite or for the sake of just "just get 1" to get the next skill.

However, there are other northworthy skills that are needed to be mentioned also. These are:
Imperio and Mayhem- Imperio are a good skill as it will decreases the acceleration of the enemies by a certain percentage by 30 whole seconds while Mayhem will be the passive skill which will add silence debuff when Imperio succeeds. However, the downfall of this skill is that it has long cooldown. It is really a situational skill which most Crecentia will agree to just leave it as it be and focus more on other skills.

Curse Reinforce and Contingency- These are the skills which are basically "a want and not a need". Let me explain that....These are the skills that you want to do more damage but you shouldn't prioritize this skill. Curse Reinforce can help you more damage when you cast curse skills: Crucio, Furnunculus and Land of Darkness. While Contigency is basically a damage, DoT and a damage multiplier skill as it will decrease the enemies defense when hit by this skill. However, if you really WANT to get these skills for maximum damage, I suggest that you prioritize Curse Reinforce and if you have extra SP, add it on Contingency.

Now that you have some basic knowledge on Crecentia Skills, let's go then proceed on seeing some of my build for this class...

PVP Skill Build
PVE Skill Build
Hybrid Skill Build

Crecentia Suggested Stat Distribution
The last thing you should know is stat distribution... Obviously, Crecentia's main stat is INT. You must prioritize on getting as much INT as possible..whether on your stat distribution, bonuses on equipments or bonuses on cards. INT will be the most crucial stat to boost your magical damage.

The other stats that you might want to consider is STR and VIT. STR is mainly to add more damage to those physical attack skills. With the help of your IGNITION skill, you will surely deal good damage with those physical sided skills. While VIT will be the third stat that you must consider to increase your survivability in battles.

So there you have it guys... This is my Best Crecentia Build Guide in Ragnarok Online 2. For comments or any suggestions on the builds, please feel free to share your thoughts by dropping a few comments below.

Most In-Depth Neverwinter Trickster Rogue Executioner PvE Build Guide

$
0
0
Neverwinter Trickster Rogue Executioner PvE Build Guideby batuba

First off I’d like to clarify that this was not originally my build as far as feats however, rotation and points into powers are. I can’t remember who’s feat build it was (and when I find out I will give due credit) but ever since I’ve seen my damage sky rocket and always first on dmg by around 1-4 million over other players (even over other TR’s) against equal geared characters. I hadn’t planned to write a guide so I don’t have all the screen shots needed at the moment, but if this post is useful to anyone, I’ll be sure to get some next time I’m able to log in the game, also my first time ever writing a guide however I was asked to do so by many TR I grouped with as well as the constant whispers I get in game about my build. If there is a similar post with a similar build, then I apologize in advance, however I haven’t seen any builds so far. So here goes… My character’s name is Luna@batuba (currently at 9.9k Gear Score) and is a Drow Trickster Rogue.

My ability scores are as followed (with out campfire buff) : 26 Dex, 19 STR, 17 CHA.

FEATS


HEROIC

Action Advantage 2/4/6/8/10% additional Action Point for dealing Combat Advantage damage. 5/5
You should constantly be striving to be in combat advantage due to extra damage and feat bonuses. Getting extra action points is very nice as well.

Weapon Mastery 1/2/3% greater chance to land a critical hit. 3/3
This build is based on crit and crit damage. Every bit of crit will help.

Toughness Increase your Maximum Hit Points by 3/6/9%. 1/3
Little bit of extra HP never hurts and a good place as any to dump the extra point needed to advance in the tier.

Cunning Ambusher You deal 2/4/6% more damage for 6 seconds after leaving Stealth 3/3
You should constantly look to fight from stealth when your able. This will stack very nicely with other abilities later discussed.

Endless Assault Your encounters deal 2/4/6% more damage. 3/3
More damage… can’t go wrong

Scoundrel Training Your At-Wills deal 3/6/9% more damage to foes not targeting you. 3/3
Clearly not a soloing ability however you in groups you’ll nearly always have this damage bonus.

Disciple of Strength Increase the amount of bonus damage Strength gives you by 5/10/15% 2/3
If your Race is Human, I strongly recommend finishing this up with 3/3. Again, more damage always better. 

PARAGON

Dazzling Blades Your At-Will powers have a 3/6/9/12/15% chance to reduce the cooldown on
recharging Encounter powers by 1 second. 5/5
Get your abilities off CD faster… Can’t go wrong

Cruelty’s Reward When you critically strike a foe you generate 2/4/6/8/10% less threat for 6 seconds.
5/5
Better than the alternatives at this point. Also less threat on you means you can take advantage of the 9% extra dmg from your target not focusing you from Scoundrel Training (see above).

Brutal Backstab While Stealthed you critical with 5/10/15/20/25% more severity. 5/5
Bread and butter of this build. This with Lurker’s assault and other feats discussed make this build brutal. 

Critical Teamwork You and your nearby allies gain a 1/2/3/4/5% chance to crit. 5/5
More crit for you AND your party… YES PLEASE

Duelist’s Flurry has a 5/10/15/20/25% chance to apply ‘Deadly Momentum’ Deadly Momentum;
Increases your critical severity by 5% per stack. 5/5
This is an amazing feat. You’ll nearly always have all 5 stacks of this with only one DF chain.

Overrun Critical When you land a critical hit, one of your next attacks strikes with 30% of your crit
severity.
Amazing ability that allows you to get off some consecutive big crits.

Underhanded Tactics Increase the effectiveness of Combat Advantage for you by 4/8/12/16/20%
As stated before, to maximize your damage, you always want to be in Combat Advantage as much as possible and this will increase the benefits by 20%… again, YES PLEASE!

POWERS I USE CONSTANTLY SITUATIONAL POWERS I NEVER TOUCH

There are powers I don’t mention here, and I didn’t do so because I didn’t bother placing points into them at all.

POWERS

AT WILL 

Cloud of Steel 3/3 
I use this primarily for PvP. No real reason to use this in PvE. 

Sly Flourish 3/3 
My left mouse button. Great for when you don’t have time to do a full Duelist Flurry combo. Also 
during stealth or combat advantage, this can build up some serious damage quickly. 

Duelist’s Flurry 3/3 
Right mouse button. This is the main ability of this build. With the feats selected, you’ll be adding 25% crit severity as well as a bleed effect that stacks up to 10 times. (I’ve personally had up to 14k + ticks however average around 4-7k). Keep in mind that this ability has its down sides as well. First two parts of the chain are very slow animations and in that time your target might move away and you’ll have to start the chain again. Another is that if your target is knocked off the edge during the 3rd part of the chain, you may fly off the edge as well (or during CW’s daily to suck all the mobs to one point, its possible to get stuck in the roof if the ceiling is low enough and you have to do the /killme and waste 20 silver on a repair kit). On a positive note, during the 3rd part of the chain, CC/knockdowns don’t affect you. 

ENCOUNTER  

Dazing Strike 3/3 
This ability is nearly always on my bar. Dazes target and is part of my combo rotation that I will explain further on. 

Deft Strike 3/3 
You could use this for PvP (however I don’t). My main use for this actually is for when I get stuck in walls or weird places due to Duelist Flurry and mobs getting knocked around by other players. Im forced to place this on my bar and teleport to an ally or enemy in hopes that I don’t have to do /killme (/stuck hardly ever works) 

Lashing Blade 3/3 
Amazing ability that dishes out ton’s of damage. IMO all rogues and builds should have this. 

Bait and Switch 1/3 
I’ve never used it. 

Blitz 3/3 
My GO TO AoE ability. Does considerable burst damage for an AoE (limited amount of targets, I think its around 5-6) and the best one rogues have. 

Path of the Blade 3/3 
Very low damage AoE however I keep it around in case we need the extra AoE to take care of mass monster adds. 

Courage Breaker 2/3 
I’ve never used it… I keep it around in case one day there is a dungeon boss that hits like a truck (maybe a raid *crosses fingers*) and you could help mitigate the damage done. 

Wicked Reminder 3/3 
If you know your going to be full time on a boss and will have 0 AoE during the process, this is a nice ability to place on your bar. Low CD makes generating Action Points faster and you help the group with a damage resistance debuff. 

Smoke Bomb 3/3 
I used this purely for PvP however I’ve found uses in PvE when I know all the monsters will be in a certain spot, pop that down to give some breathing room to your cleric and who ever has the aggro (normally the cleric too :P) 

Impossible to Catch 3/3 
PvP skill mainly. If your against a lot of CC, this could be a nice ability to get around it. 

DAILY 

Lurker’s Assault 3/3 
Your main daily and the whole purpose to this build. Lurker’s assault allows you to get permanent stealth during its effect and increases your damage by 60%. Stack this damage buff with your other feats to do extra damage in stealth, leaving stealth and so on, you’ll notice monstrous damage. I’ve taking off 40% off certain bosses health during one use of this daily in T2 instances. Can’t stress how good this daily is. 

Whirlwind of Blades 3/3 
I have this on my bar however I’m not sure really how good this is. It hits a limited amount of targets and increases power… Its “okay” for using if you want to do a bit more AoE and only reason I keep it on my bar. 

Bloodbath 3/3 
Decent for PvP since you become immune to damage during its use. I never use it however. 

Shocking Execution 3/3 
Good “Execution” ability for finishing people off in PvP. Not worth it in PvE in my experience. 

CLASS FEATURE 

Tactics 3/3 
I’m still up in the air about this one (in between this and Skillful Infiltrator). 15% more action point gain is always nice and since Lurker’s assault is the basis of this build, getting to use it more often is always good. 

Infiltrators’ Action 1/3 
Never use it… need to place points some where right? 

Skillful Infiltrator 3/3 
3% crit, 15% movement speed alone makes this worth while. Since I haven’t placed to dodge regen, having the extra movement speed allows me to get out of danger zones quicker (or allows me to side step cone attacks quick enough to where I don’t have to dodge roll and can get more dps time in) 

Invisible Infiltrator 3/3 
A must have with this build. 15% more damage with your already 60% damage from Lurker’s assault as well as assuring you’ll have stealth active when you pop your daily. 

Tenacious Concealment 1/3 
Again… need to place a point somewhere 

First Strike 1/3 
Again… need to place a point somewhere 

Sneak Attack 1/3 
I think we can all agree that this will never be on anyone’s bar at 60. Should be renamed to Quick Sneak… flying mongoose or donkey balls. 

HOW THIS BUILD WORKS 

Okay the goal to this build is to have as much crit and power as you can. On my rogue I have around 50% crit on my character tab (not sure if this includes feats or not) and 4500 or so Power. When I get to a fight, first thing I always do is position my self to gain combat advantage to gain full benefits of your CA (combat advantage) feats or directly go into stealth. 

ROTATIONS 
Yes even this game has them! Or at least I like to think so. 

BASIC ROTATION
Duelist Flurry – Lashing Strike – Dazing Strike – Blitz (only if there are multiple monsters) 
-or- 
Duelist Flurry – Duelist Flurry (to try and get the 10 stacks) – Lashing Strike – Dazing Strike – Blitz (only if there are multiple monsters) 

STEALTH ROTATION 
Duelist Flurry – Duelist Flurry (to try and get the 10 stacks) – Lashing Strike – Dazing Strike – Blitz (only if there are multiple monsters) 

If you do this properly, you’ll just be in time to get Lashing strike during stealth right before it ends not only getting 100% crit but also insures (due to feats) increased Dazing Strike’s damage. 

LURKER’S ASSAULT 
Duelist Flurry – Duelist Flurry (to try and get the 10 stacks) – Lashing Strike – Dazing Strike – Blitz (only if there are multiple monsters) 
-Or- 
Duelist Flurry x 3 – Lashing Strike – Dazing Strike – Blitz (only if there are multiple monsters) 

I normally go with the second option so I can remain in stealth longer before I break it. Just to give you an idea of the kind of numbers I’ve seen while doing this rotation in Lurker’s Assault : around 50-65k Duelist flurry (per chain) – up to 14k Bleed ticks – followed by a 30-56k Lashing Strike – 34k Dazing Strike crit – 11k crits on each monster hit with Blitz. All this in the short time that is Lurker’s Assault. I don’t have a vorpal enchant for my weapon yet, but expect to see higher numbers than that if you do get that. 

I hope this guide is able to serve at least one person. I’ve received a lot of whispers in game for my build and I feel that this might prove more useful than my cut up whispers due to me being in the middle of a dungeon. If you ever need additional advice please feel free to look me up, but before doing so read the guide well enough and see if you can find your answers here. I’ll post some screen shots soon of damage parses. I’d like to take this opportunity also to let people know that don’t judge your class before reaching T2. Most classes begin to shine here. I’ve seen GWF out dps rogues, Control wizards are key to successful groups as well as dishing out some mad damage as well. Know how to play your class and give them all a good run through in T2 before making judgements. Thank you.
Viewing all 3220 articles
Browse latest View live