Do you want to instantly save you instagram photos to your Dropbox? Or remotely download a torrent file by sending a link in an email? Or, do you want to receive a text on your phone when it's going to rain today? If you want these services, then all you need to do is to use the "IF THIS THEN THAT (ifttt) web service" and you can use all those services mentioned above and more.
What is IF THIS THEN THAT (ifttt) service?
If This Then That (ifttt) is a brilliant web service that let's you plug information from one service into another, allowing you to link all your favorite webapps to create super-charged integration between tools like Gmail, Dropbox, Instapaper, Facebook, Twitter, Instagram, Foursquare, and oh-so-much more. Here's how to use ifttt to get more from your online life.
It allows you to create custom tasks which allows you to create a work flow based on some sort of conditional statement (the pillar of all programming!). "If [this thing happens on one service], then [do that on another service]." For example, "If I post a new photo to Instagram, then download it to Dropbox."
How to Create an ifttt task?
Check out below the step-by-step guide on how to create an ifttt task.
First, you need to navigate to ifttt's Create a task page (you'll need to sign up if you haven't already). Once you have finished signing up, you will then see this:

Now you are ready to create a task.
Step 1: Choose a Trigger Channel
Click the bold this and ifttt will display this channel picker:

You want to trigger this task whenever someone tags a photo of you on Facebook, so Facebook will be your trigger channel. Click Facebook. (If this is the first time you've used the Facebook channel, you'll need to authorize the Facebook channel.)
Step 2: Choose a Trigger
Next you'll see all the possible Facebook triggers built into ifttt. Your options are:
- New status message by you
- You post a new link
- You upload a new photo
- You are tagged in a photo
- Your profile changes
You can create tasks that are triggered by any of those Facebook actions, but for the purpose of this action, we want the You are tagged in a photo action, so click that.
Step 3: Complete Trigger Fields

At this step, you can define trigger fields specific to certain channels. Our Facebook trigger doesn't have any trigger fields (there are no possible variables; it's triggered whenever you're tagged in a photo). When you're using other channels, like the RSS or Craigslist channels, for example, you'd paste a URL you want to watch in this step. (I'll explain a little more about how fields work in step six below.) Since this trigger has no trigger fields, just click Create Trigger. If all went well, you should see this:

Congrats! You've successfully defined your trigger. Now to define the action that follows the trigger. For our task, that means placing the tagged photo into a folder in Dropbox. Click the big blue "that" link to define your action.
Step 4: Choose an Action Channel
Now it's time to pick the channel that will react to our trigger. For our example, as you'd expect, the action channel is Dropbox. So click the Dropbox icon. Again, if this is the first time you're using Dropbox as an ifttt channel, you'll need to authorize it.
Step 5: Choose an Action
Dropbox only has one possible action: Add file from URL. Good news! That's exactly what we want! So click Add file from URL and move on to the next step.
Step 6: Complete Action Fields
If you recall, the tagged photos trigger from our Facebook channel didn't have any fields. Dropbox, on the other hand, does have fields that you need to fill out: The URL of the file you want to add to Dropbox and the folder inside Dropbox where you want to store your tagged photos.
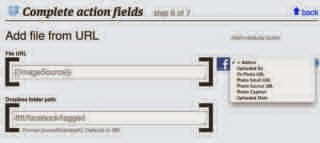
ifttt is smart (brilliant, even), so it already has the action fields filled out so that the File URL is defined as the tagged photo URL on Facebook—which is exactly what you want. It does this using "Addins" that are supplied by default when you choose the Facebook tagged photos trigger. ifttt knows that if that's your trigger, it can supply the action with several attributes.
For the Facebook tagged photos trigger, you can use any of the following information in your action fields:
- Uploaded by
- Fb Photo URL (a link to the page on Facebook where the photo is visible)
- Photo Small URL (a shrunk down, thumbnail version of your picture)
- Photo Source URL (this is the URL to the full image—and it's what we're using for File URL, defined by the {{ImageSource}} text you see in the File URL input)
- Photo Caption
- Uploaded Date
So keep File URL as is. You can set the Dropbox folder path input to whatever you like. By default, it's going to create an ifttt/facebook/tagged folder inside the root of your Dropbox folder. You can change this to whatever you want.

A note on addins: If you wanted, you could use an addin to, for example, place images in folders based on who took the pic. To do that (and for the purpose of illustration for how you might use addins), click the Dropbox folder path input, click the Addins drop-down, and select Uploaded by. You'll see a description of what the addin text will look like, and if you click the blue Addin tag, ifttt will append the addin to your input. You'll notice in this addin example, the Dropbox folder path becomes ifttt/facebook/tagged/{{From}}; if I tagged a photo of you, you'd see it in your Dropbox folder at ifttt/facebook/tagged/Adam Pash
Once you've got your action fields all filled out, click Create Action.
Step 7: Activate Your Task
You've officially created your first task. High five, baby! At this step you can add a description of your task. Descriptions are particularly useful if you want to share it as a recipe for others to reuse. When you're all finished, click Create.
That's all there is to it. ifttt will check each trigger every 15 minutes; every time a trigger returns true (in this case, whenever you're tagged in a new photo on Facebook), it'll execute the action (sync the photo to Dropbox).
Step 8: Turn Your Task into a Recipe (Optional)
If you want to share your brilliant task with the world, you can turn it into a recipe. To do so, visit your tasks page and click the task you want to make into a recipe. On the task page, click the recipe icon (it looks like a mortar and pestle).

Give your recipe a description if you like, edit any of the fields, and create your recipe.
Here are some example of the most handy ifttt recipes:


You can check here the most popular ifttt recipes later.